TeleChat guide
Updated on 3 October 2026
Every TeleChat feature, step by step, with screenshots: for students first, then for those who run a society, a school or the platform.
Contents
- Getting started
- Home and news
- Posting
- Societies
- Events and calendar
- Booking and paying
- My ticket
- Messages
- My profile
- Settings
- Reporting and blocking
- Help
- Running a society
- How do I open my society's admin?
- Admin, manager, member: who can do what?
- How do I manage members and roles?
- Edit the society's details and page
- Post on behalf of the society and manage its posts
- How do I moderate reports?
- How do I blacklist someone?
- How do I create a club?
- Create a chat for the society
- Who did what? The activity log
- Money: payments, memberships, finances
- Organising an event
- How do I create an event?
- How do I create and set prices?
- Offer options (drinks, cloakroom…)
- Follow your event: the overview
- Make an announcement to attendees
- Manage attendees, applications and the waiting list
- A ticket's record: payments, discount, refund, transfer
- Give or reserve a place for someone
- How do I scan tickets at the door?
- Set up ticket resale
- See an event's revenue
- Edit an event
- Running the school
- TeleChat team
- On computer and tablet
Getting started
Create your account, sign in, find your way around.
How do I create my account?
With your student e-mail address, or a sign-up code.
TeleChat is reserved for students of a school. To join yours, you need either an e-mail address on a domain your school recognises, or a sign-up code (often given by the student union or the school office).
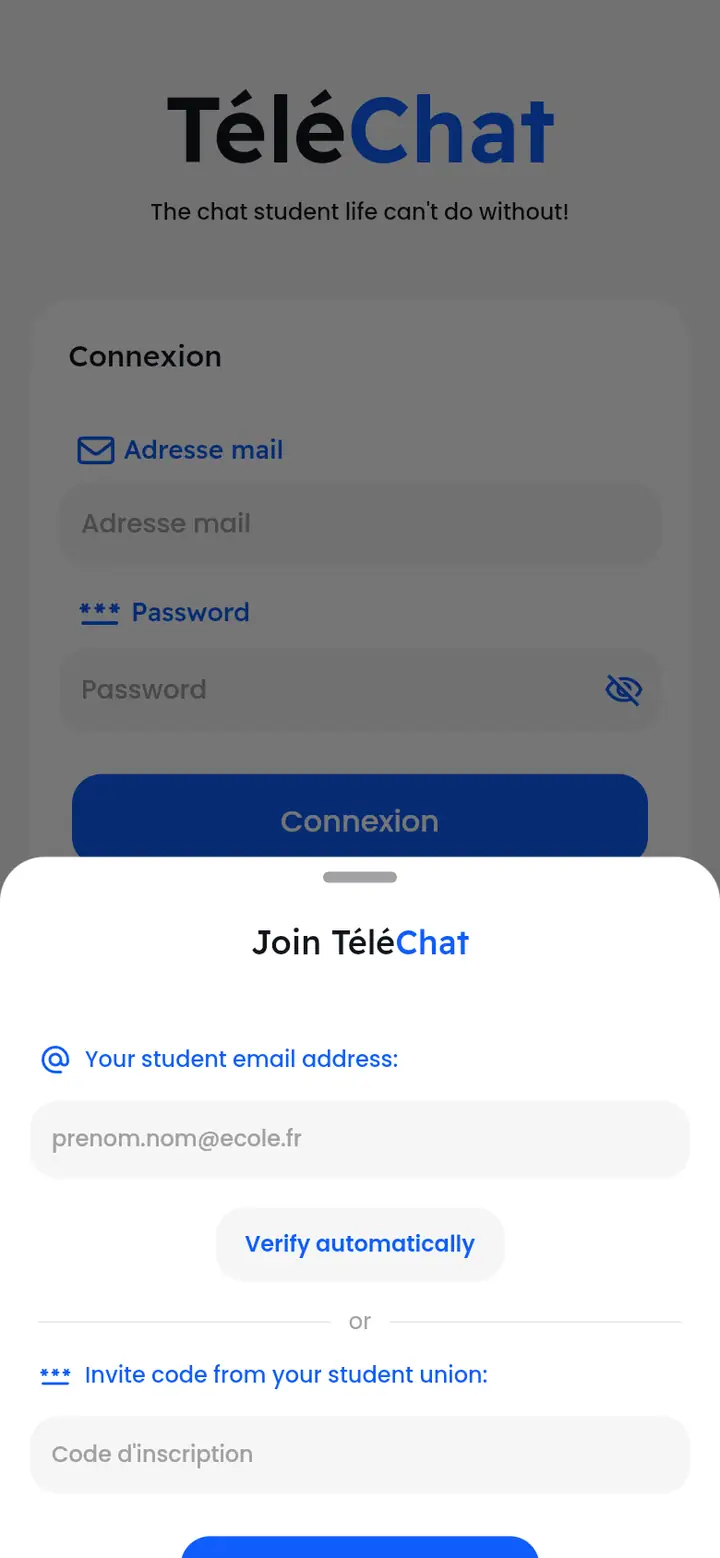
- Open TeleChat and tap “S'inscrire”, below the “Connexion” button.
- Enter your student e-mail address, then tap “Verify automatically”. If your school is recognised, it shows up: no code needed.
- Otherwise, type the sign-up code in the second field.
- Fill in your details (first name, last name, password, year), accept the terms of use, then tap “Create my account!”.
How do I sign in?
E-mail and password, or your Google or Apple account.
On TeleChat's welcome screen, enter your e-mail address and password, then tap “Connexion”. Depending on your device, “Continue with Google” or “Continue with Apple” (on iPhone) buttons also let you sign in without a password, once the account is linked (see “Linked accounts”).
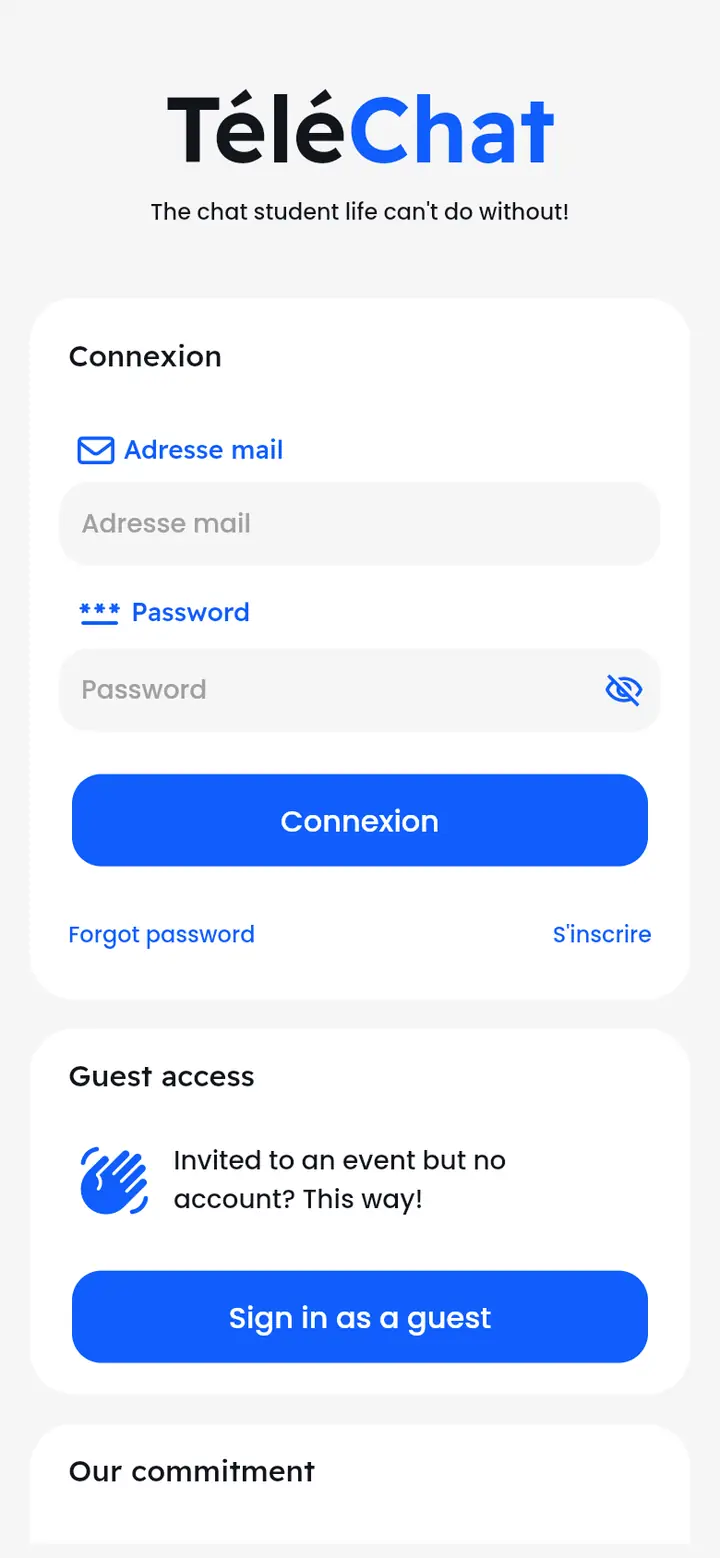
The “Guest access” box is for guests from outside the school. This access isn't open yet: if you're invited to an event, ask the organising society to register you.
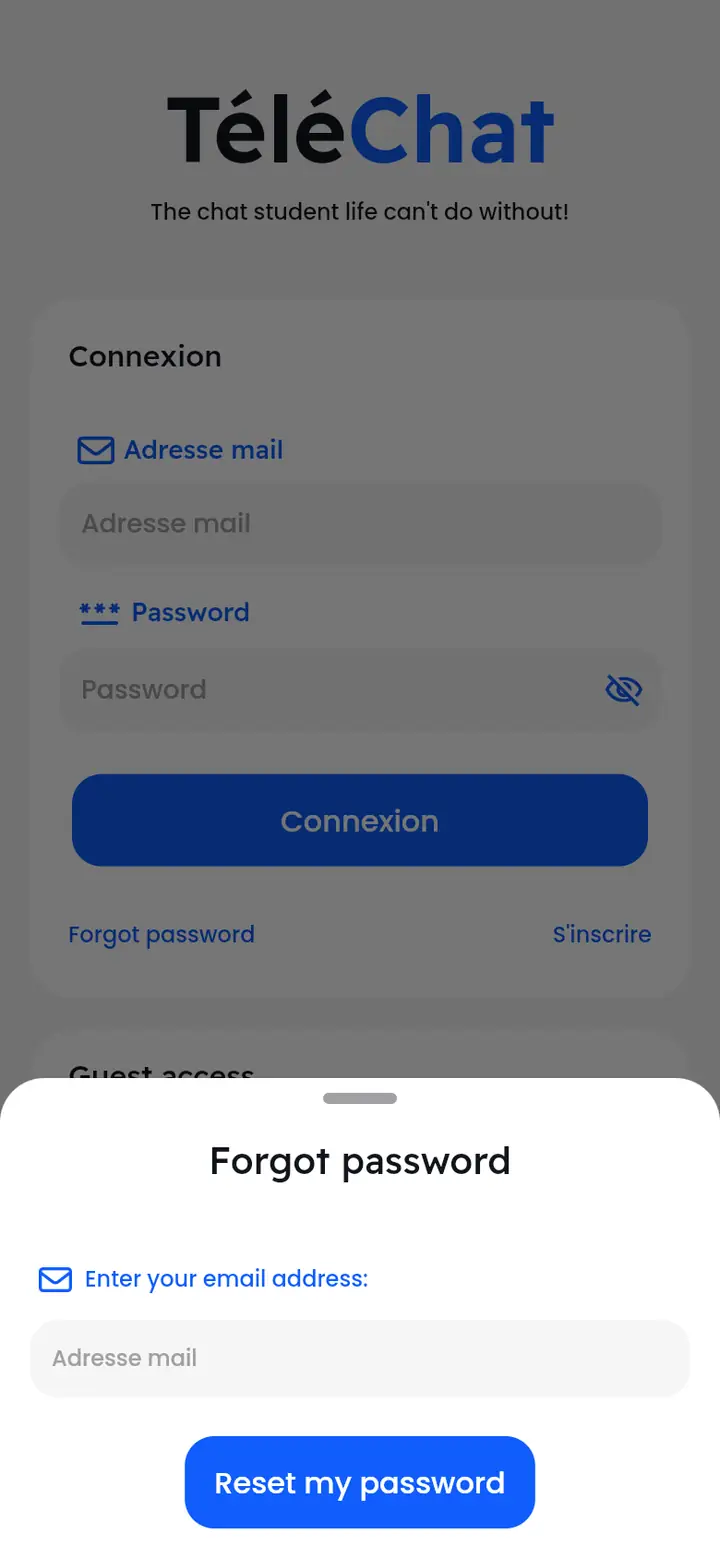
I forgot my password
Get a link to choose a new one.
- On the sign-in screen, tap “Forgot password”.
- Enter your e-mail address, then tap “Reset my password”.
- Open the e-mail you receive and follow the link: the app asks for your new password.
My account isn't linked to a school
Finish signing up with a code or your student address.
If you signed in with Google or Apple without signing up first, your account exists but doesn't belong to any school yet. The “Finish signing up” screen then appears.
- Tap “Join my school”.
- Enter your school's invitation code, or your student e-mail address.
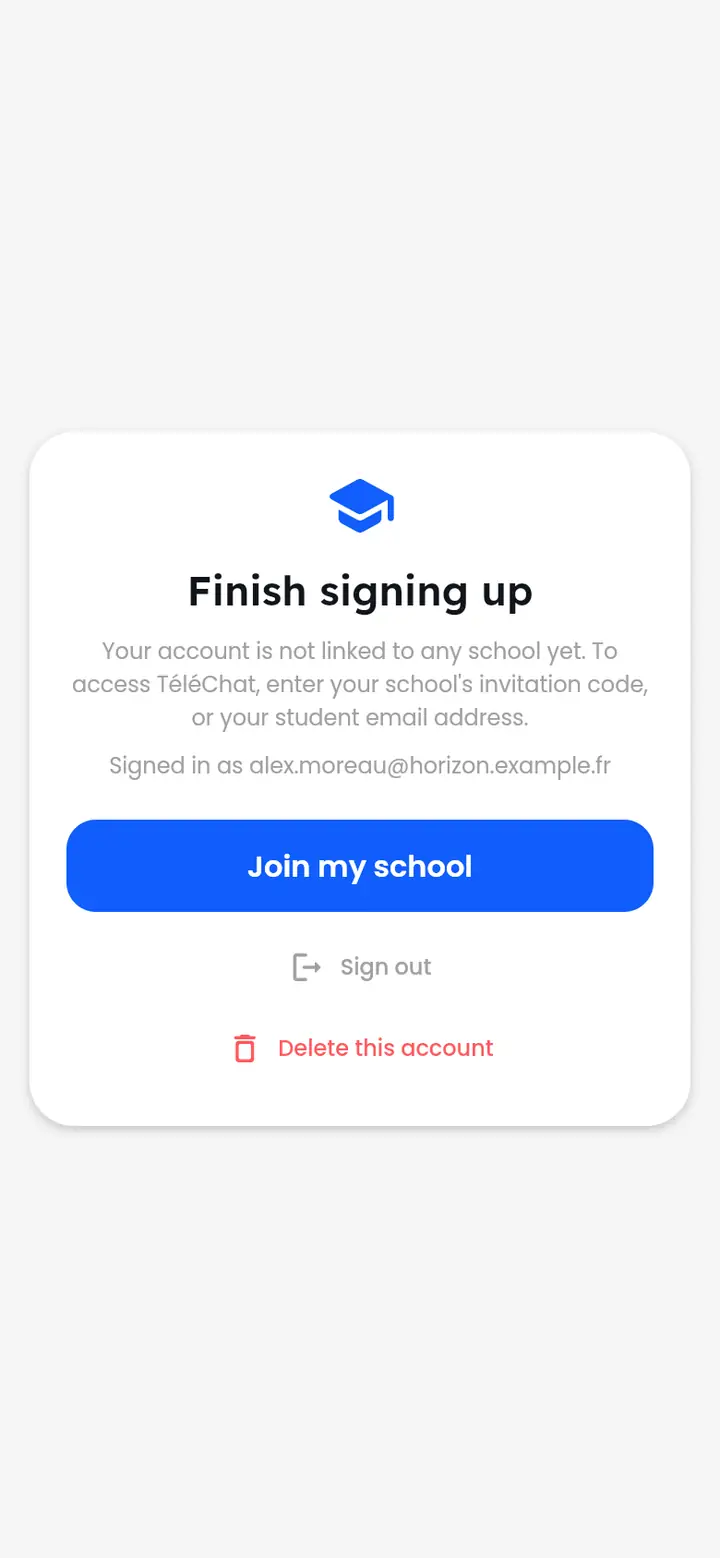
You can also sign out, or delete this sign-in account if it was created by mistake.
My first sign-in
Photo, bio, contacts, societies and theme: a few screens to get started.
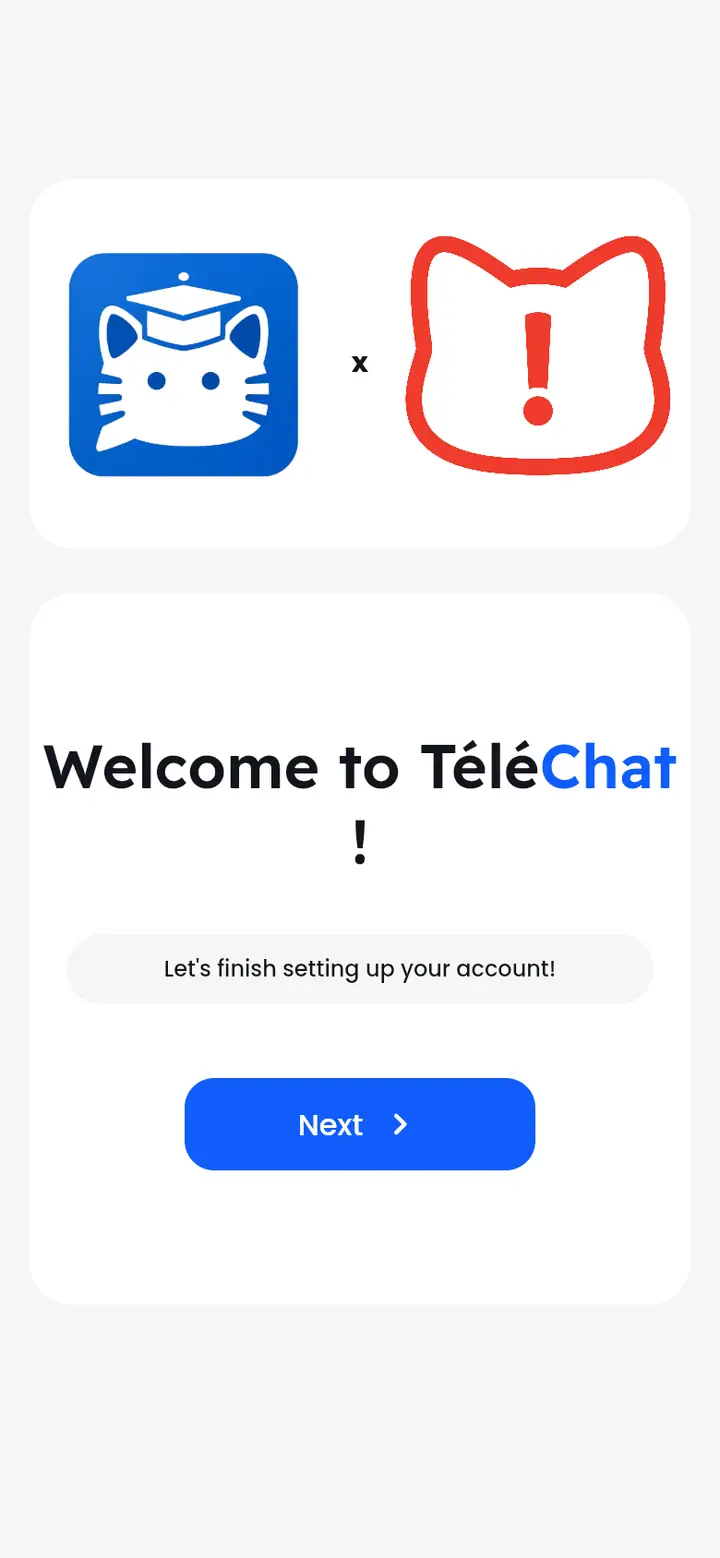
The first time you sign in, TeleChat helps you finish your account, screen by screen: profile picture, bio, contact details (which you can choose to show or not), societies to follow, and light or dark theme. Everything can be changed later in your profile.
Where are the main sections?
The bottom bar: Home, Calendar, Post, Messages, Profile.
On a phone, the bar at the bottom of the screen gives access to everything:
- The house: home, with news from your school and your societies.
- The calendar: the events calendar.
- The +: post an announcement.
- The speech bubble: your messages.
- The person: your profile and settings.
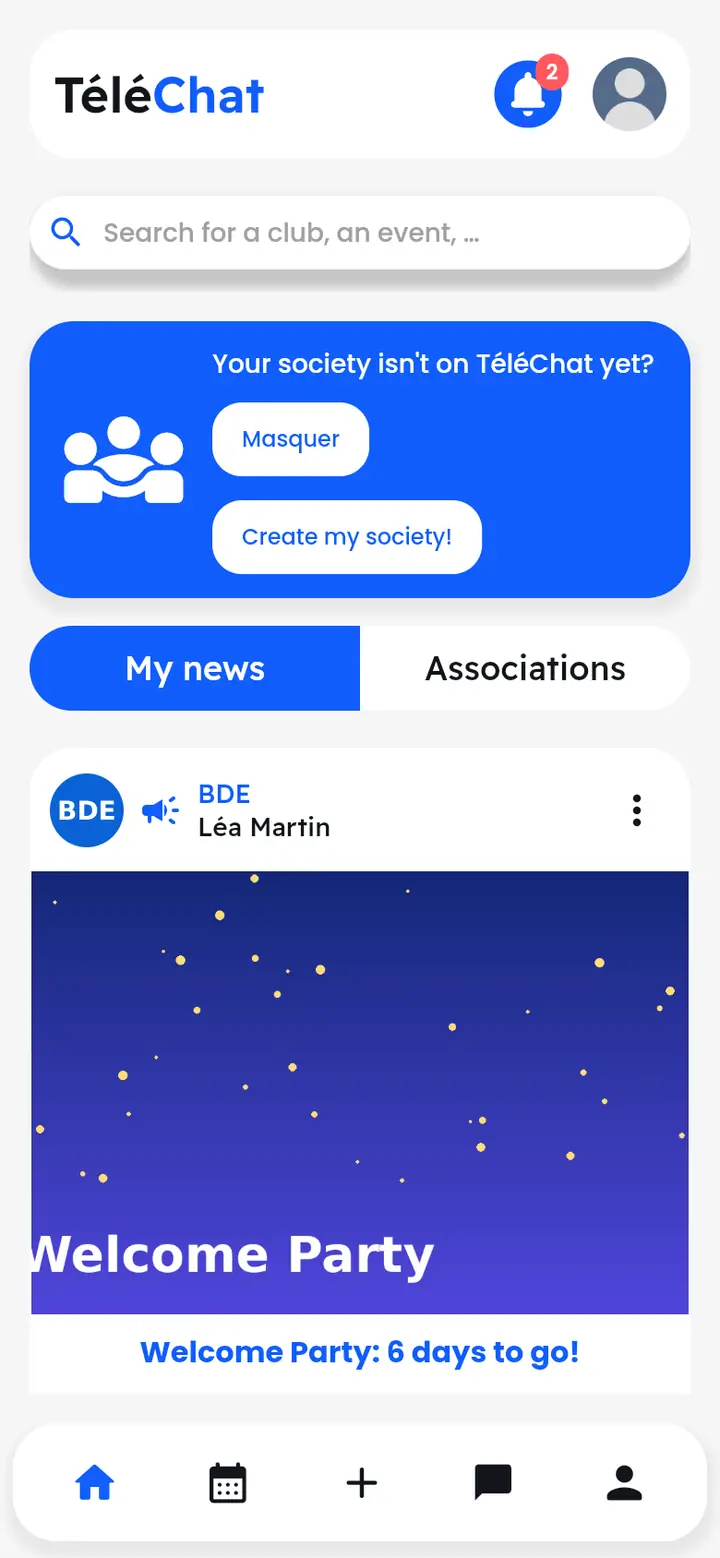
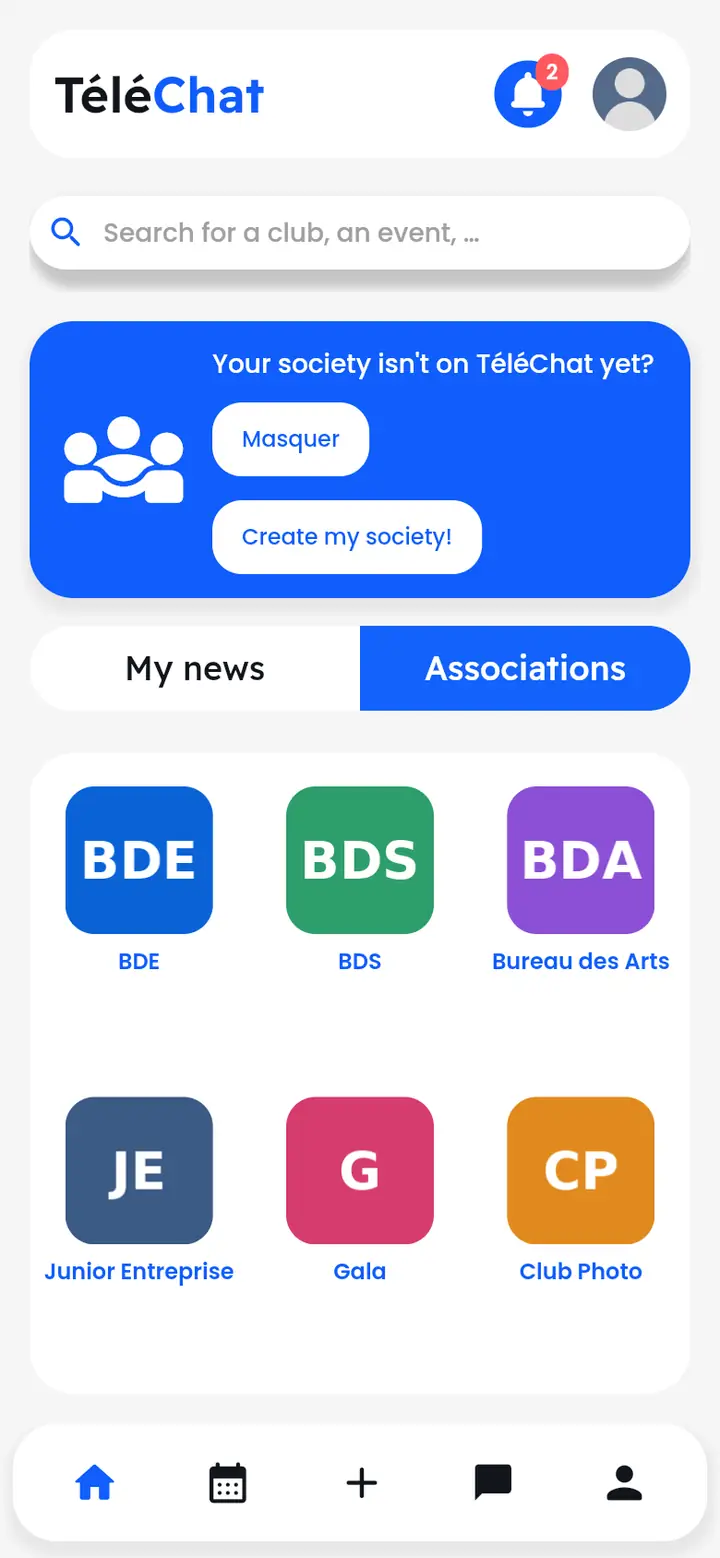
At the top of home: the notification bell (with the number unread), your picture (to your profile) and the search bar.
Home and news
The news feed, likes, comments, search and notifications.
What's on the home screen?
News from your school and societies, and the list of societies.
The “My news” tab gathers posts from your school and the societies you follow: announcements, photos, polls, upcoming events. Scroll to go back in time.
The “Societies” tab shows every society in the school: tap a logo to open its page.
How do I like, comment and reply?
The heart, the bubble, and “Reply” under a comment.
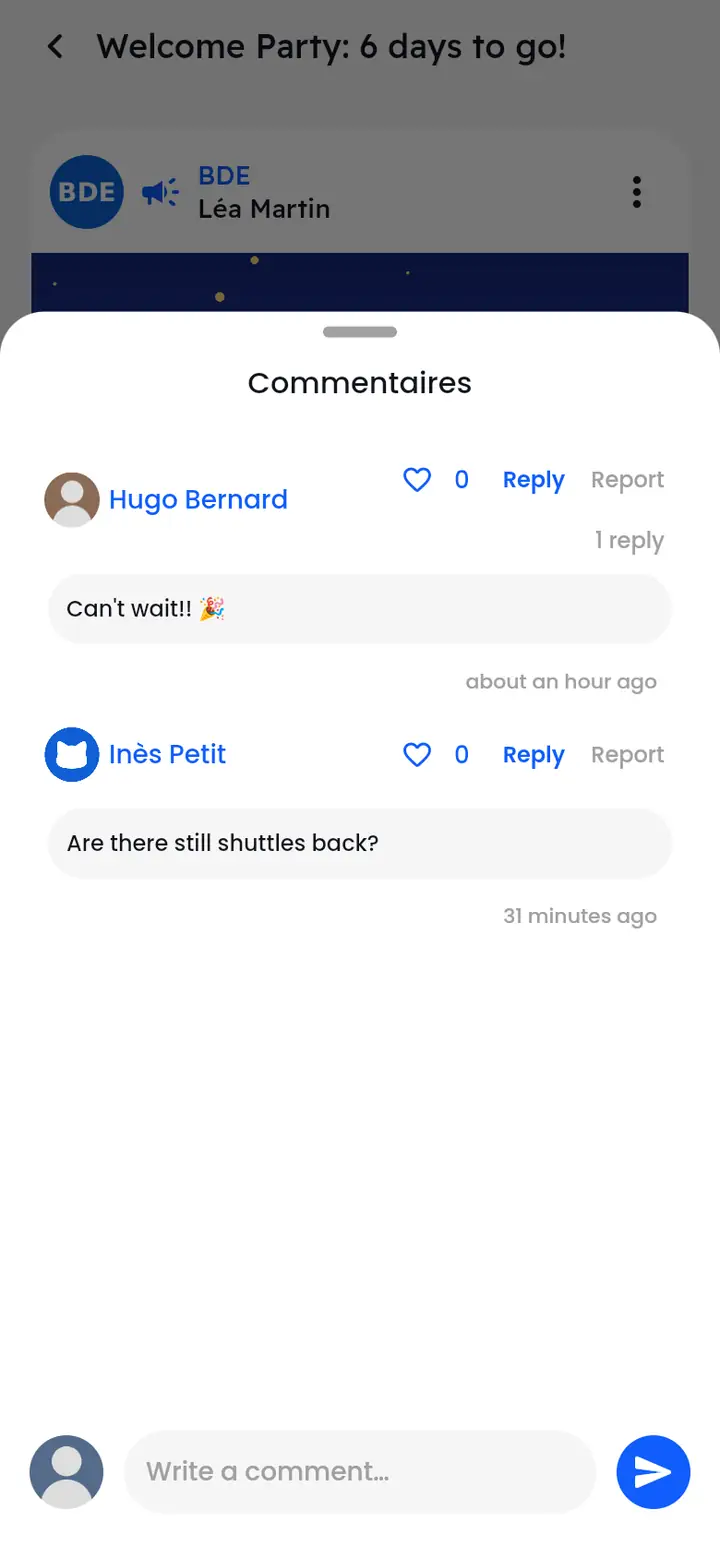
- Tap the heart under a post to like it; tap the number next to it to see who liked it.
- Tap the bubble to open the comments, write yours at the bottom and send.
- Under a comment, tap “Reply” to answer it directly; replies unfold below the comment.
How do I vote in a poll?
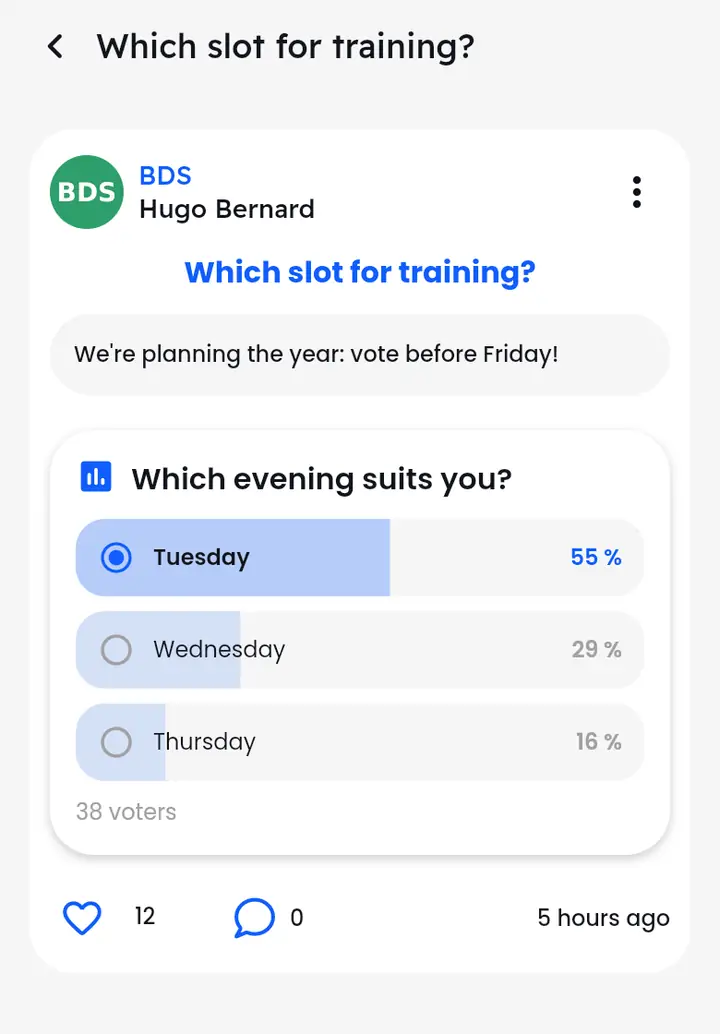
Tap your answer: the results show straight away.
A poll shows inside the post. Tap an answer to vote: the percentages and the number of voters appear. Some polls accept several answers, others close after a set time or when their author closes them; the results then stay visible.
How do I search for a society, an event or a student?
The search bar on home.
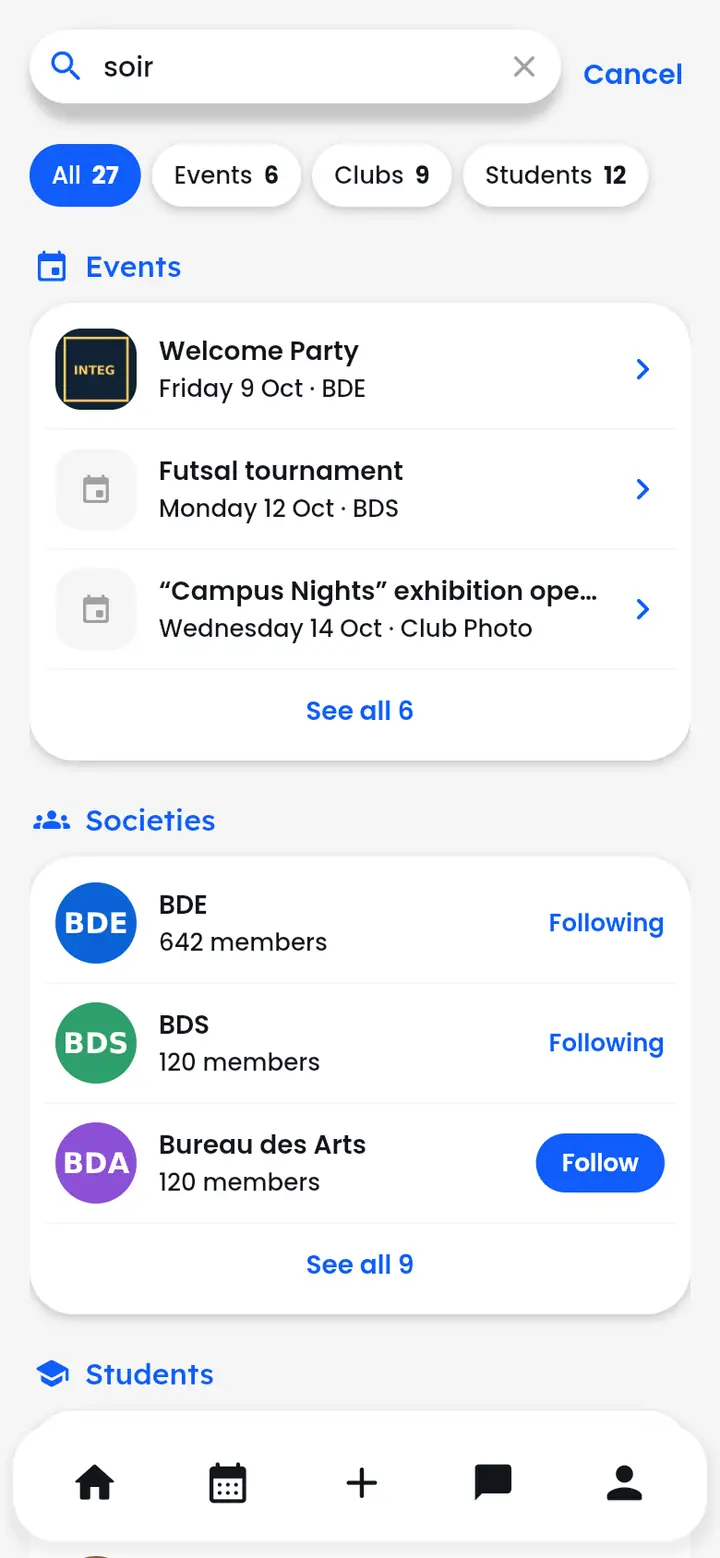
- Tap the “Search for a club, an event, …” bar at the top of home.
- Type a few letters: results come in as you type, grouped into “Events”, “Clubs” and “Students”.
- Filter with the chips at the top, or tap “See all {0}” for a whole category.
Where are my notifications?
The bell at the top of home.
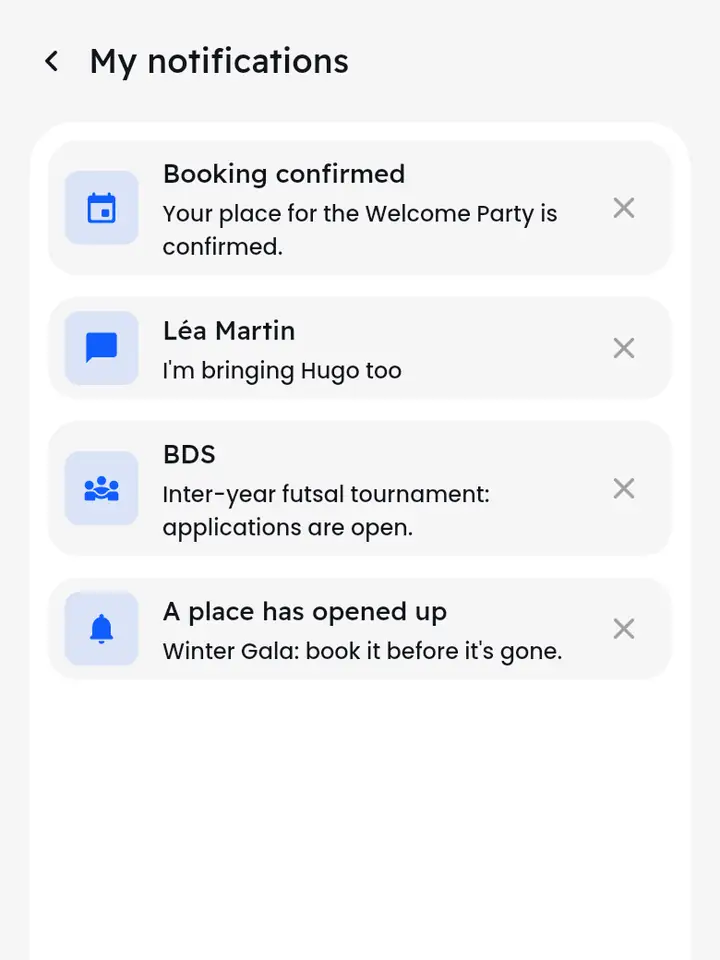
The badge on the bell shows unread notifications. Tap it to see the list: booking confirmed, new message, place freed up, a society's announcement… Tap a notification to go to what it's about, or the cross to delete it.
Posting
Write an announcement, add an image, a poll, a link or an event.
How do I post an announcement?
The + in the bottom bar.
- Tap the + in the middle of the bottom bar.
- At the top, choose who you're posting as: “Moi” (your name) or a society you run.
- Add a title and some text (the text is required), and an image if you like.
- Tap “Post”.
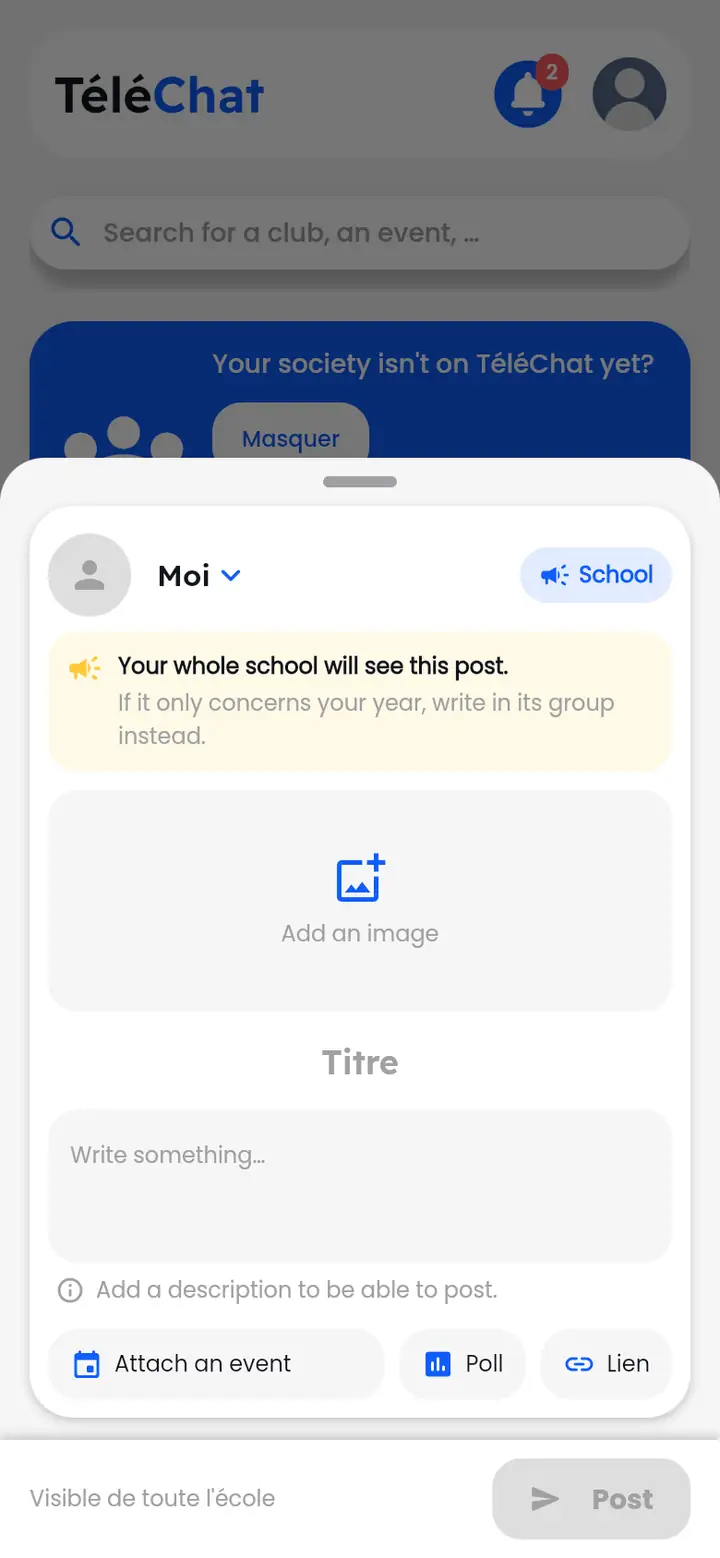
A post in your name is visible to the whole school: the app reminds you. If it only concerns your year, write in its group instead. A post on behalf of a society can be visible to the whole school, or reserved for the society's members.
Add a poll, a link or an event
The buttons at the bottom of the editor.
At the bottom of the editor:
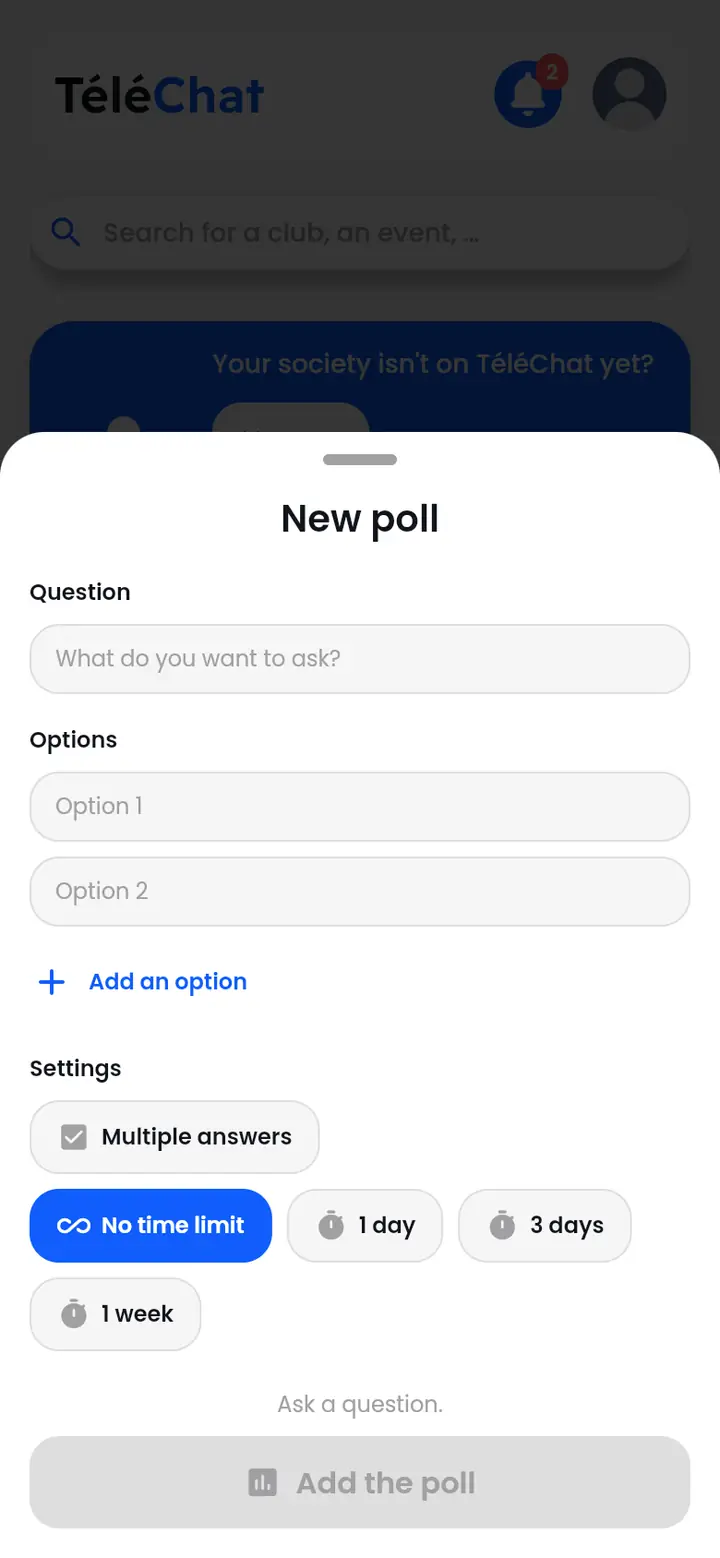
- “Poll”: a question, at least two choices, several answers allowed or not, and a duration (“No time limit”, “1 day”, “3 days”, “1 week”).
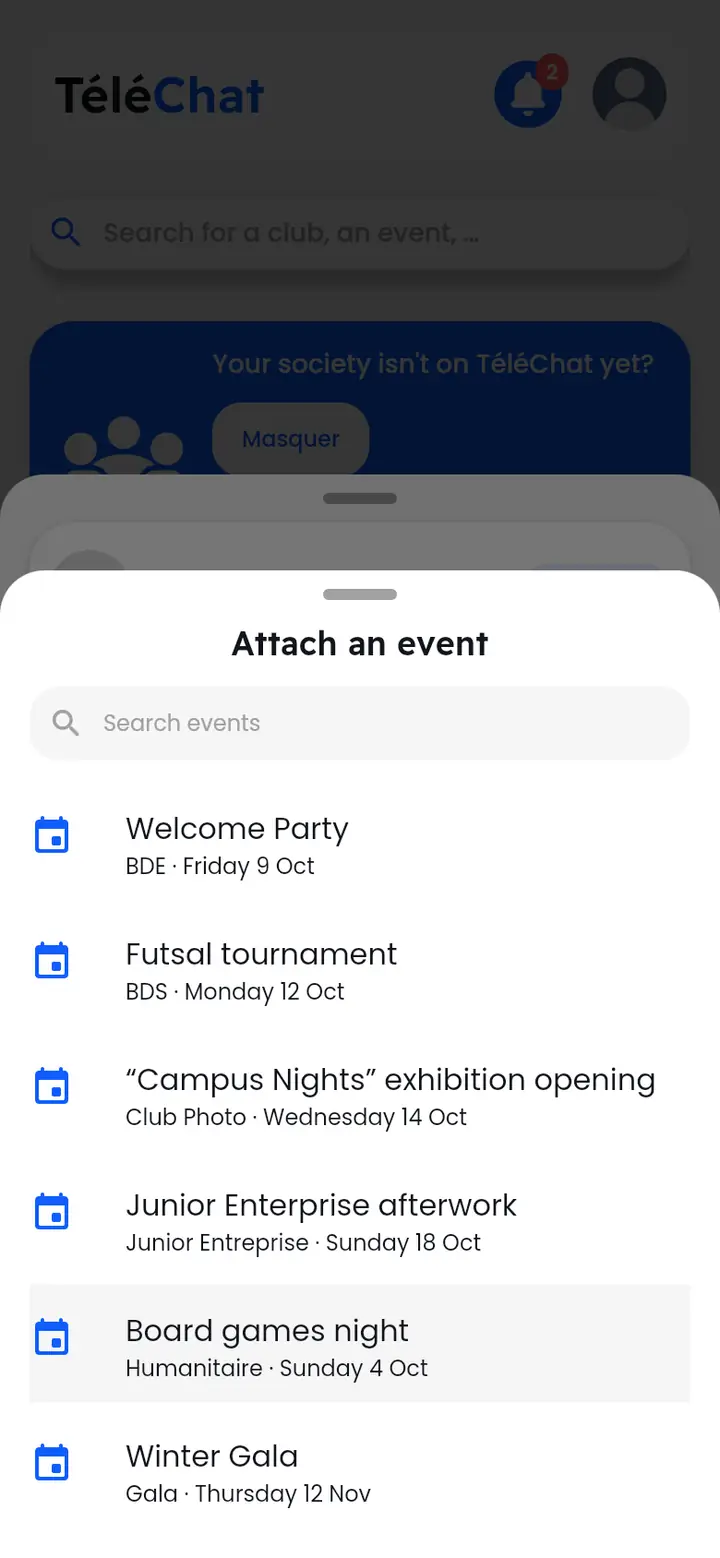
- “Attach an event”: attaches an upcoming event; it shows under the post and leads to its page.
- “Link”: adds a web address.
Edit or delete a post
The post's “⋮” menu.
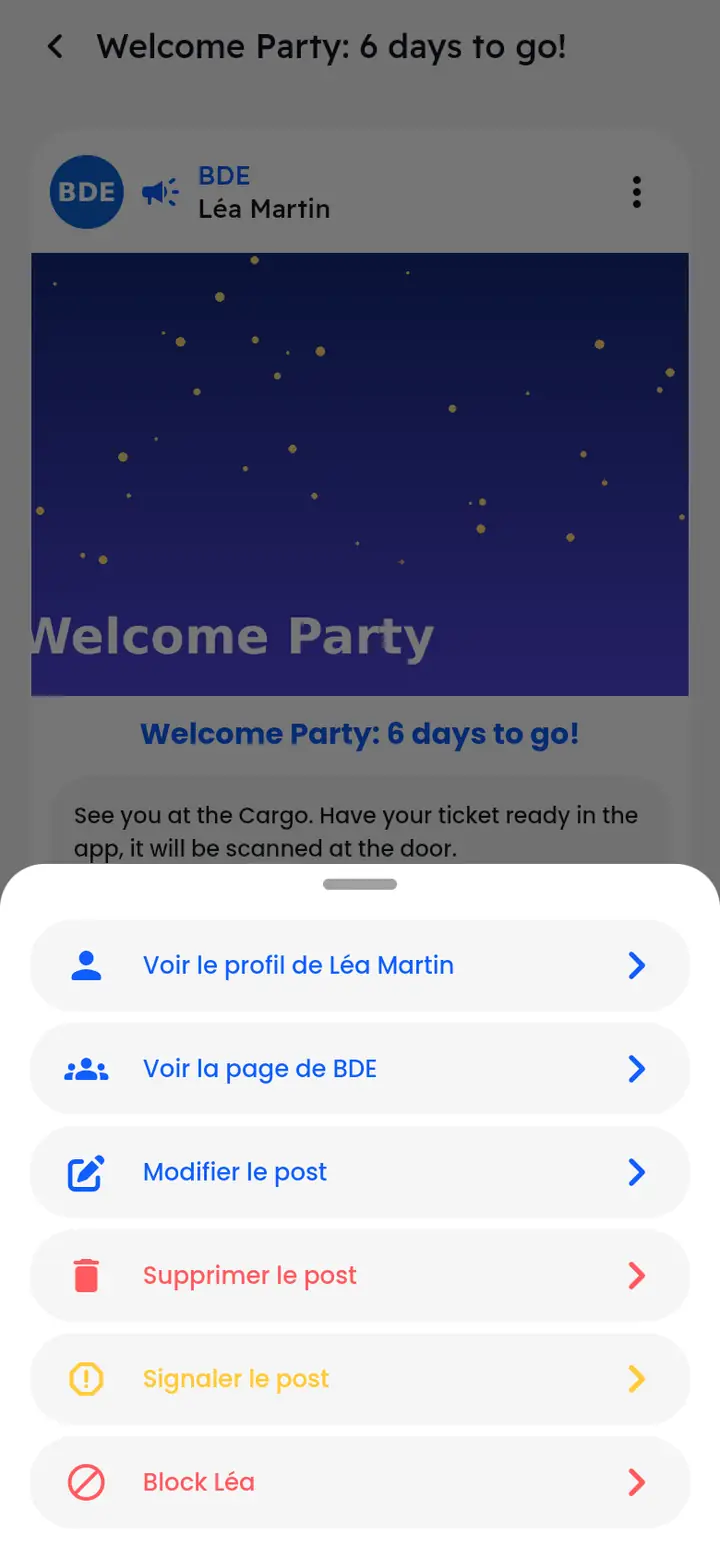
Tap the three dots at the top right of a post. Depending on your rights, the menu offers: view the author's profile or the society's page, edit or delete the post (yours, or your society's), report it, or block its author.
Societies
Follow a society, read its page, join its chats, pay membership.
What's on a society's page?
Its description, news, events and chats.
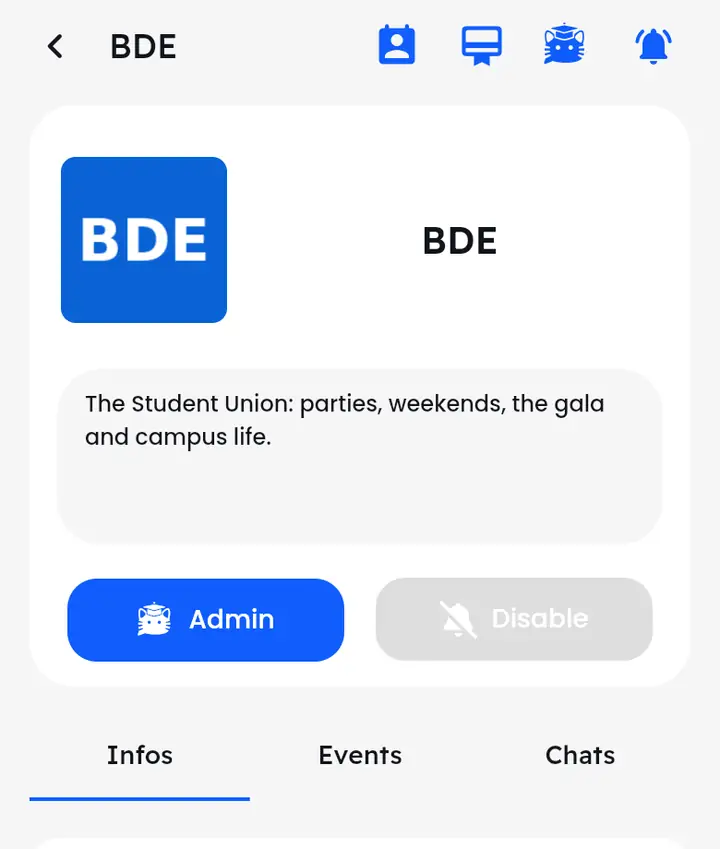
A society's page shows its logo, its description and three tabs: “Details” (its news), “Events” and “Chats”. At the top right: the society's board, its membership, and the bell for its notifications (the “Disable” button under the description turns them off too).
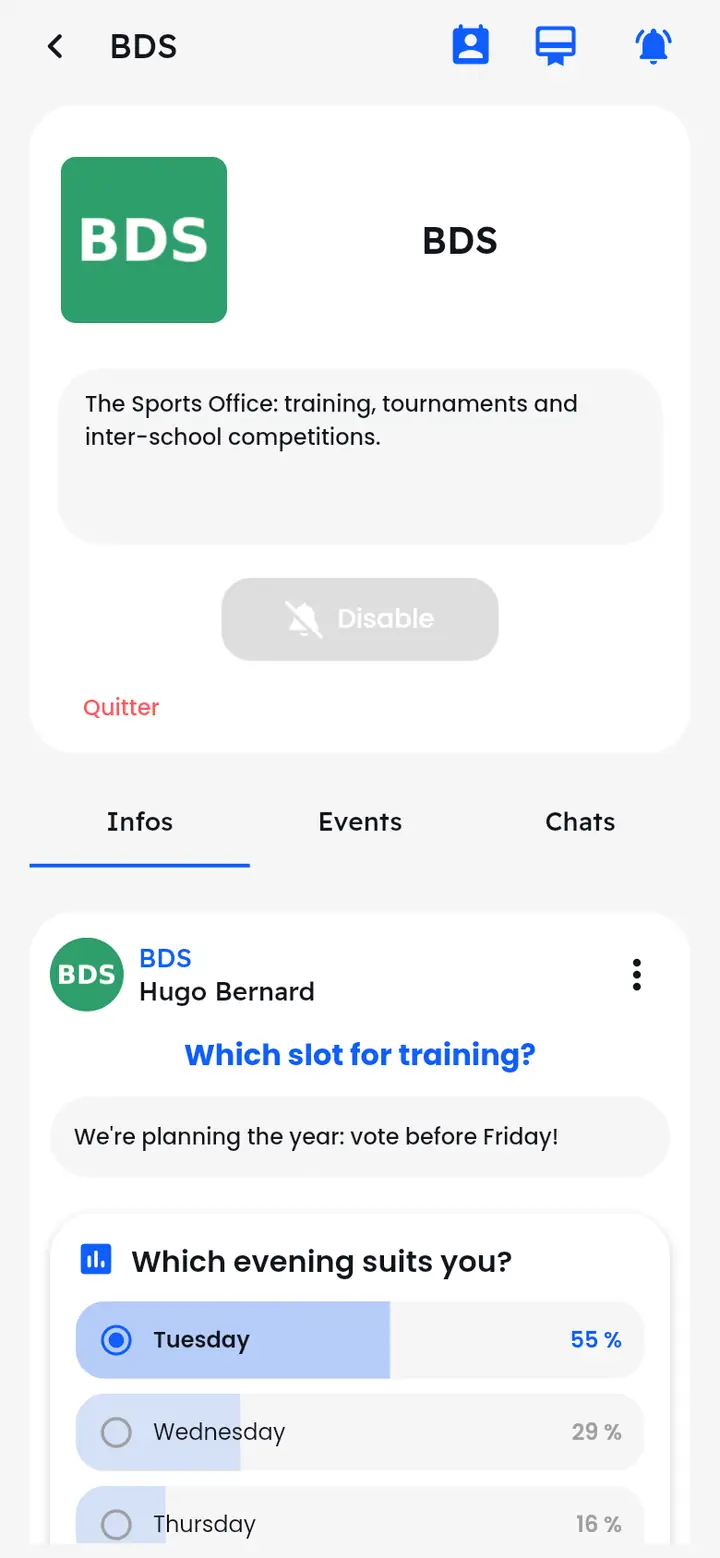
To follow a society, tap “Follow” (on its page or in search). To leave it, tap “Leave”: careful, you lose any role you had in it.
See a society's events and join its chats
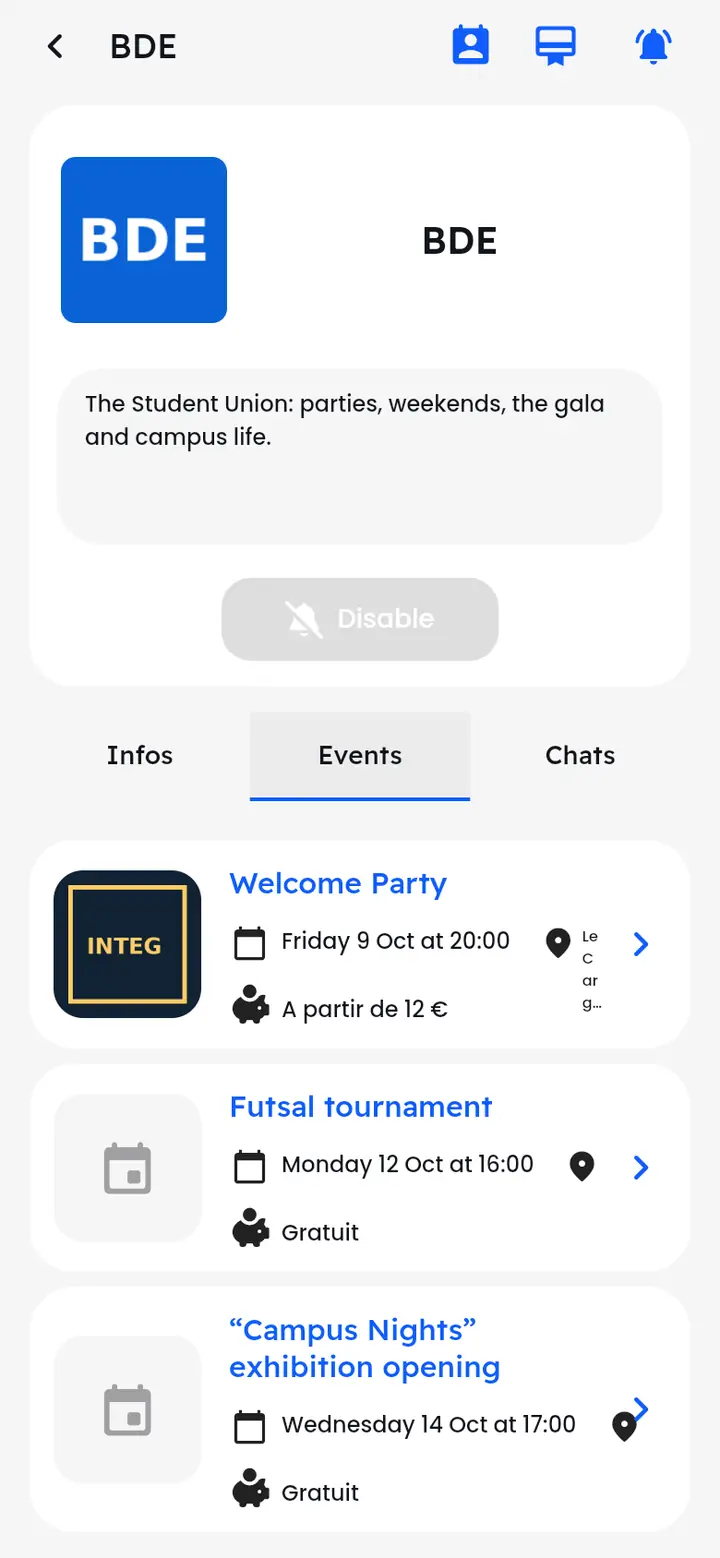
The Events and Chats tabs on its page.
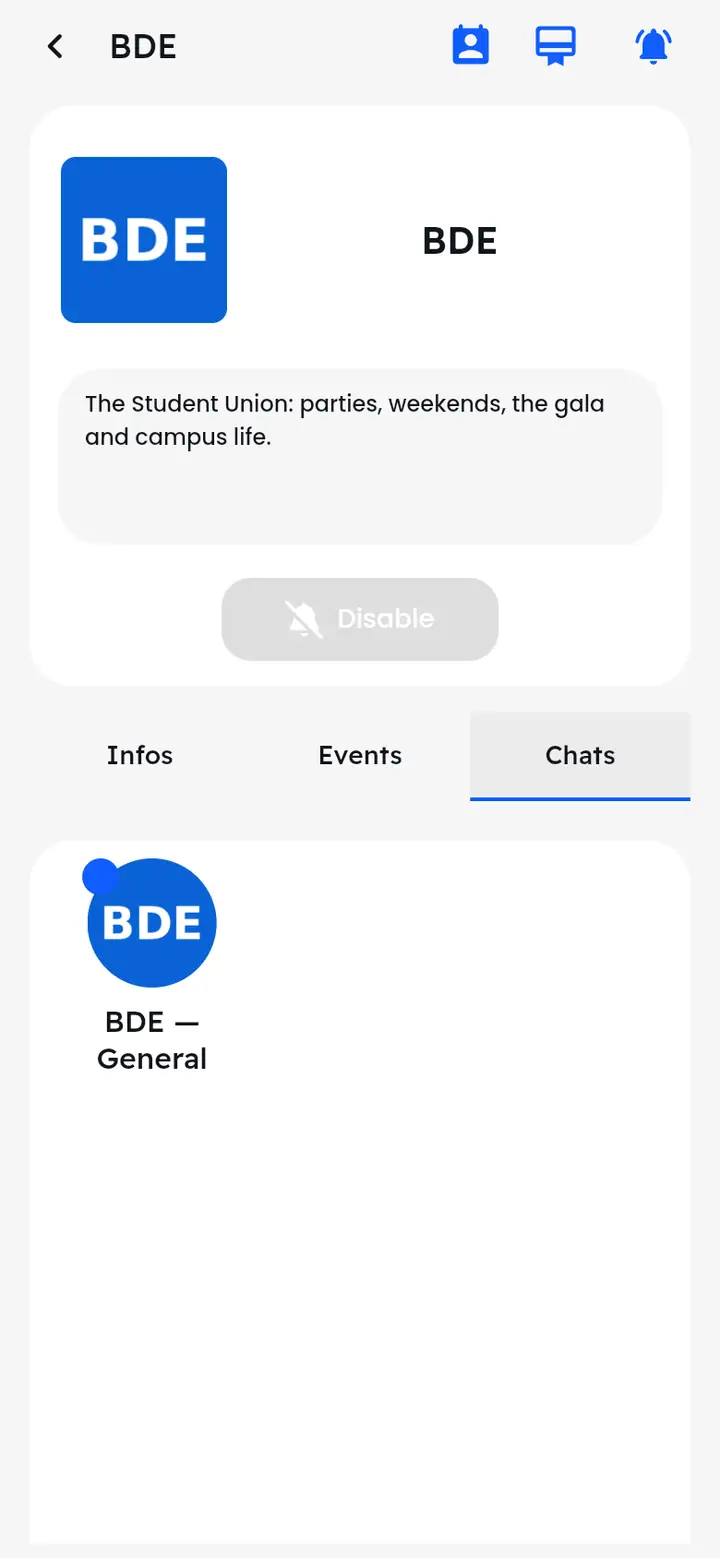
In the “Chats” tab, tap a group to join it: the app asks you to confirm, then you join it as a member.
Who is on a society's board?
The board icon at the top of its page.
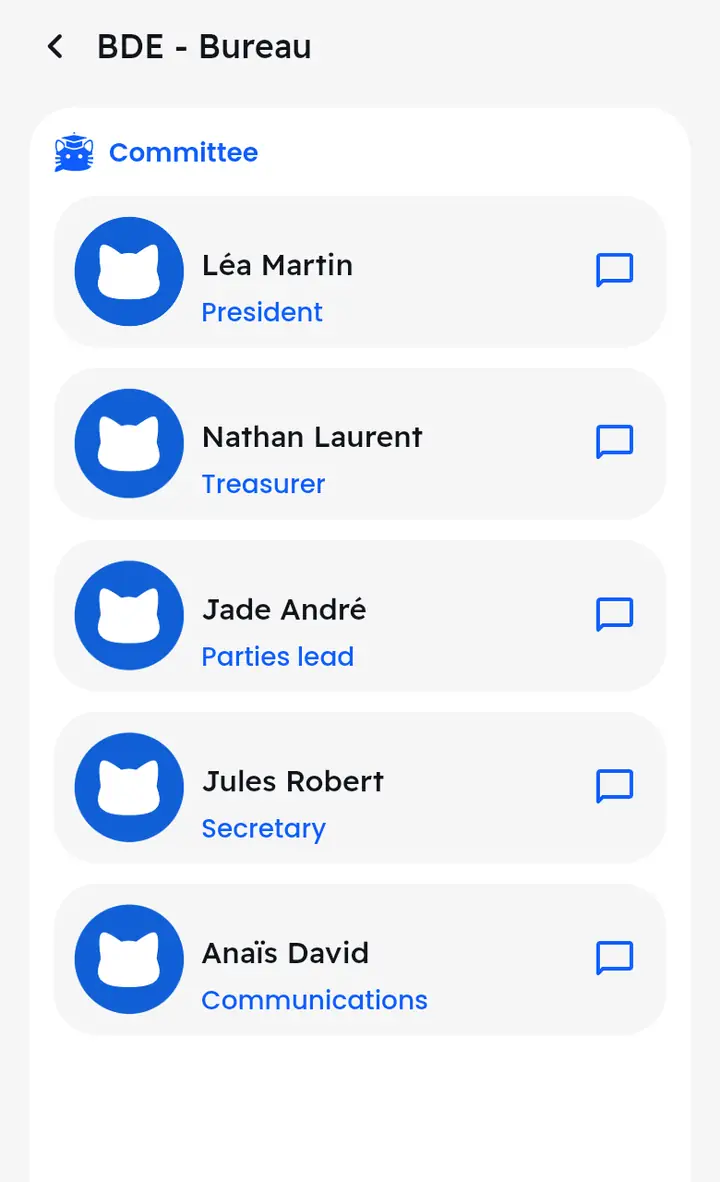
Tap the person icon at the top of the society's page: the board list appears, with everyone's role. The bubble next to a name opens a conversation with that person.
How do I pay a society's membership?
Membership gives you the member price on its events.
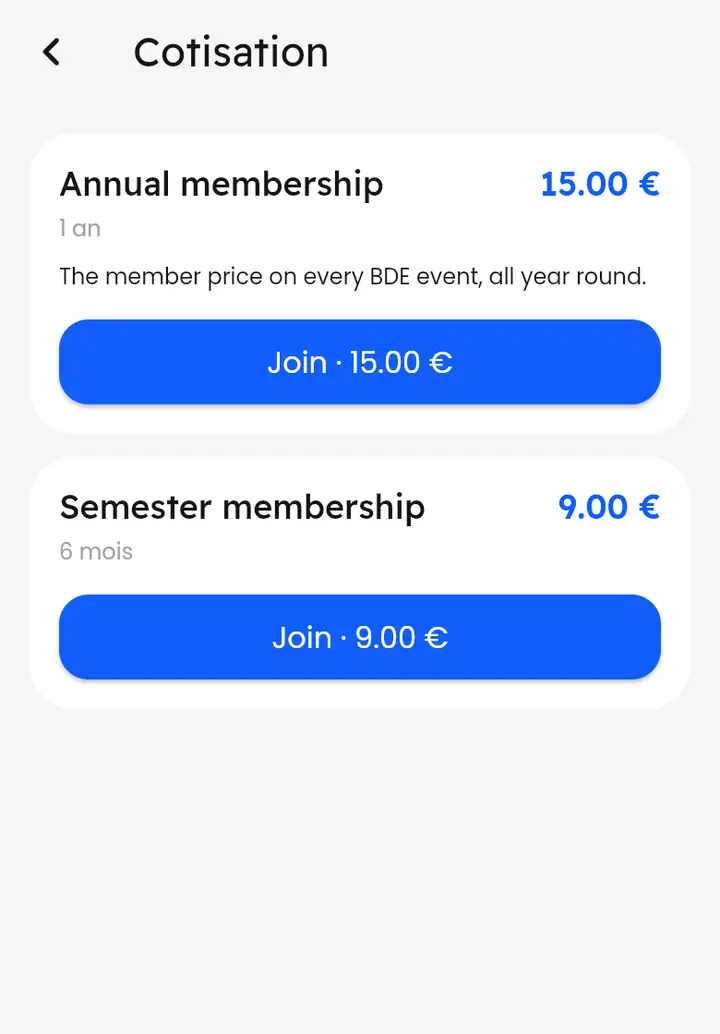
- On the society's page, tap the card icon at the top right.
- Pick a plan and tap “Join · {0}”: online payment opens. A €0 plan needs no payment (“Join for free”).
- Once the payment is accepted, the screen shows “You're up to date” and your certificate is sent by e-mail.
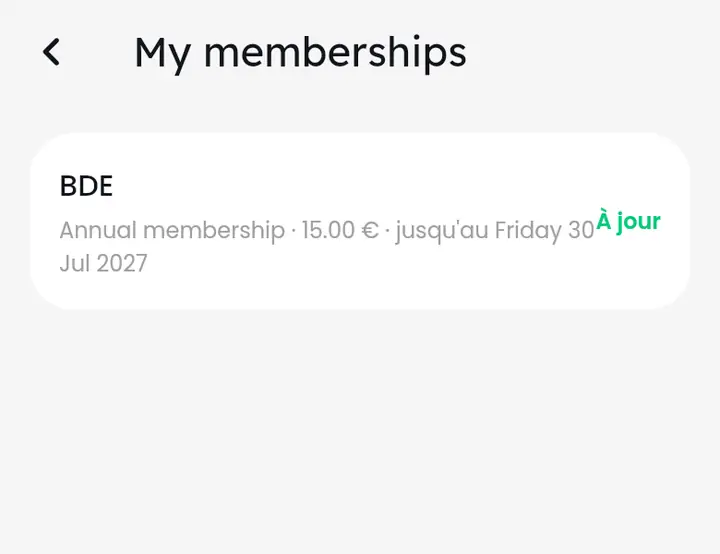
Your current memberships are in Profile > Settings > “My memberships”. If the society hasn't turned on online payment yet, contact them to pay another way.
How do I create my society?
A logo, a name, a description: you become its admin.
Your society isn't on TeleChat yet? Tap “Create my society!” on home, or Profile > Settings > “Créer une asso”.
- Choose a logo (required).
- Give the name, a location if the society has a room, and a description.
- Tap “Confirm”.
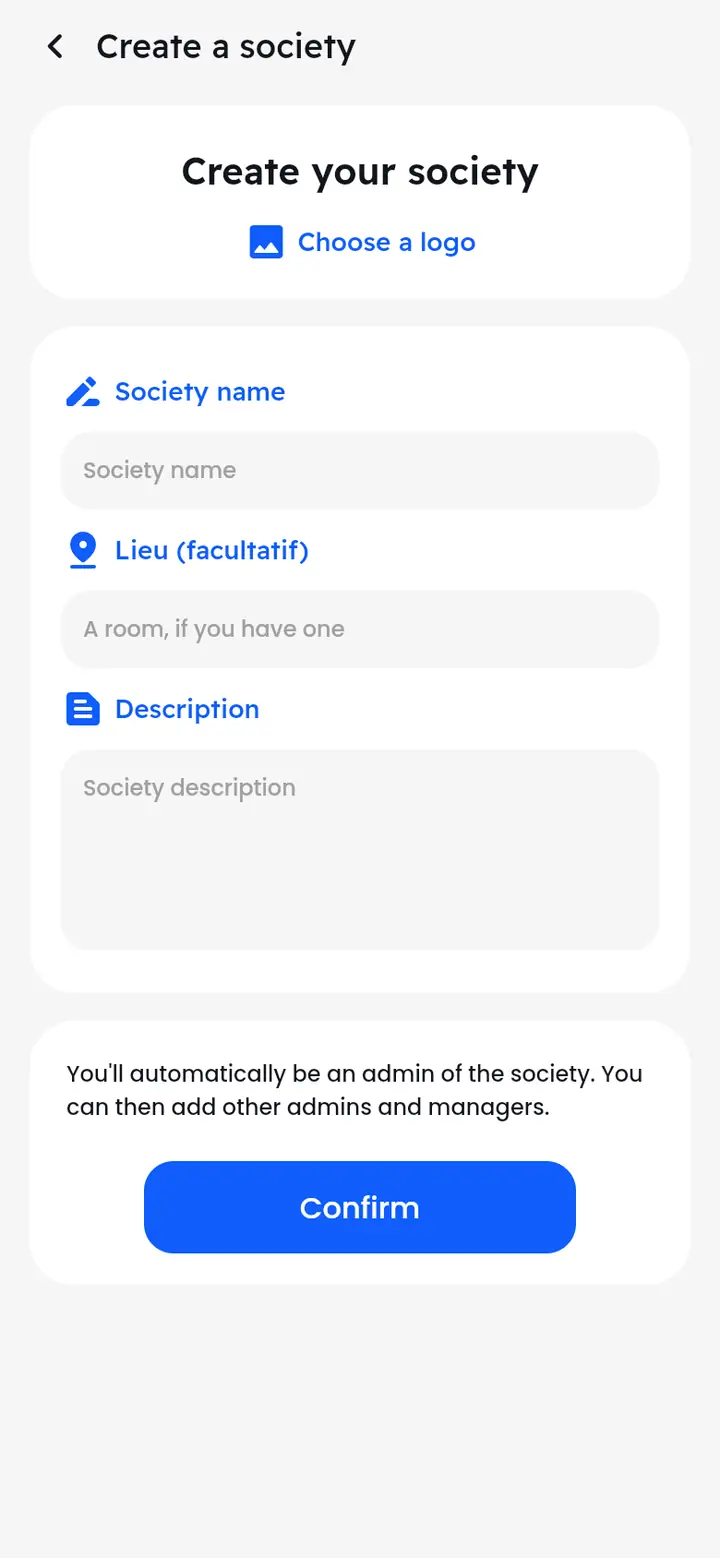
You automatically become its admin, and can then appoint other admins and managers (see “Running a society”).
Events and calendar
Find an event, understand how sign-up works, read its prevention policies.
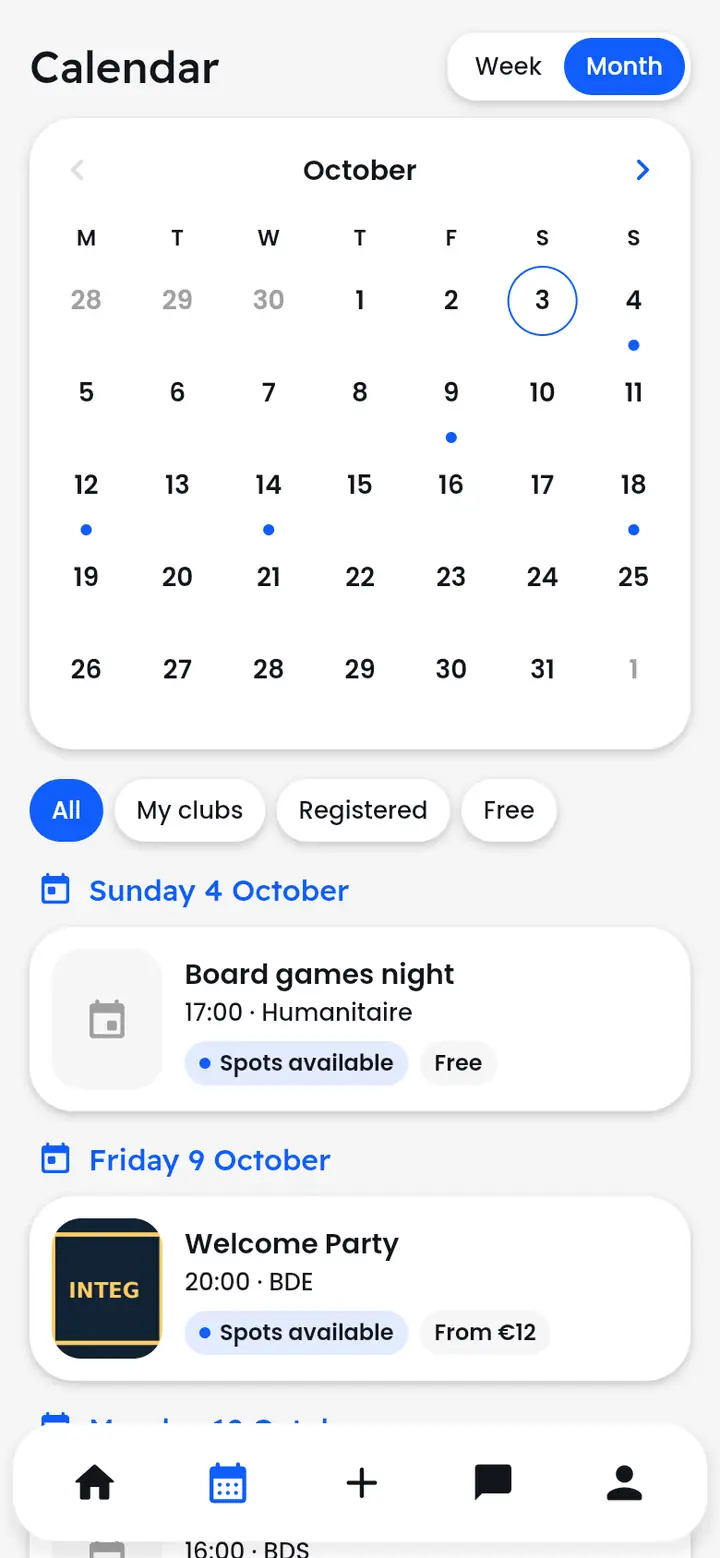
How do I use the calendar?
Upcoming events, by week or month, with filters.
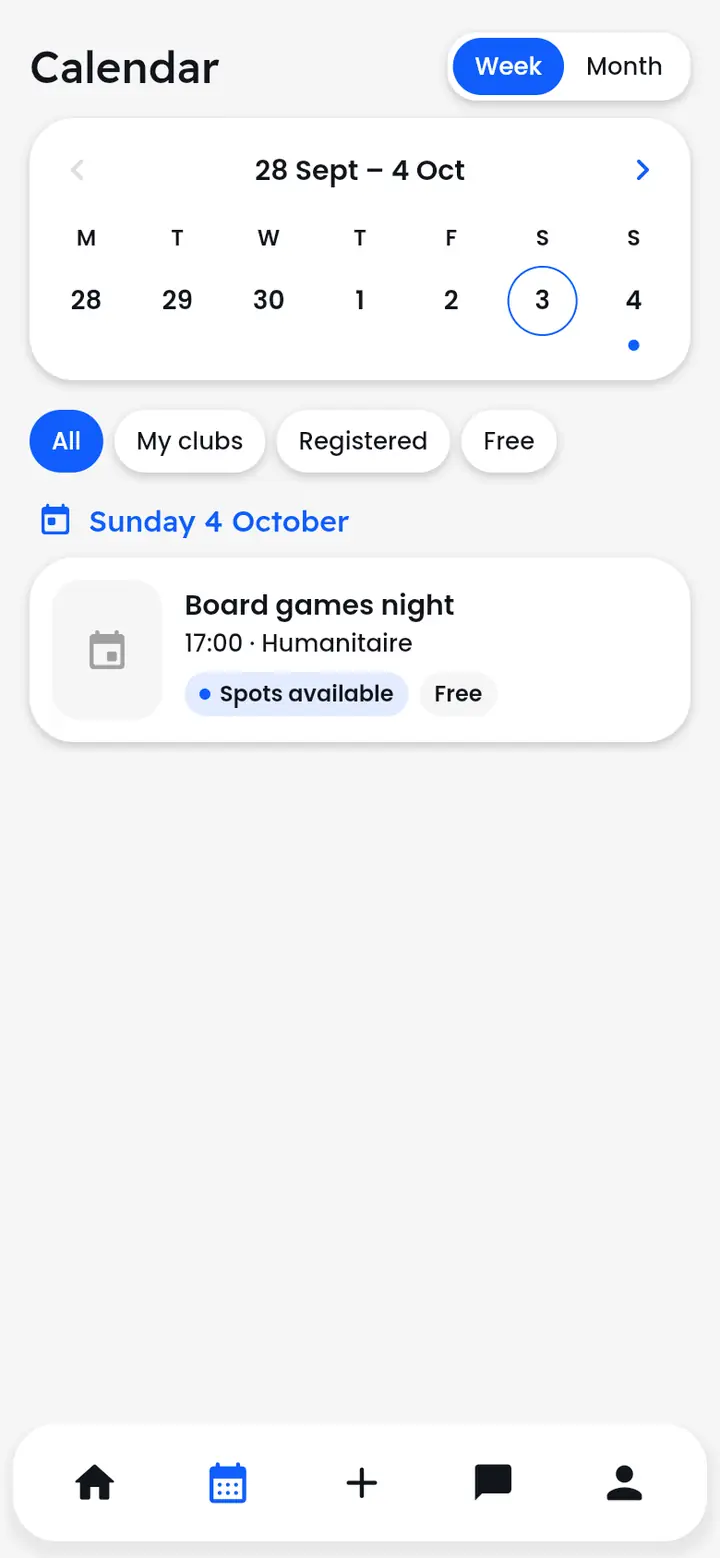
The calendar (the calendar icon in the bottom bar) shows the school's events. A dot under a day means at least one event; tap the day to see which.
- “Week” or “Month”: switch the view at the top right, and move between periods with the arrows.
- Filters: “All”, “My clubs” (the ones you follow), “Registered” (where you have a ticket), “Free”.
- Tap an event to open its page.
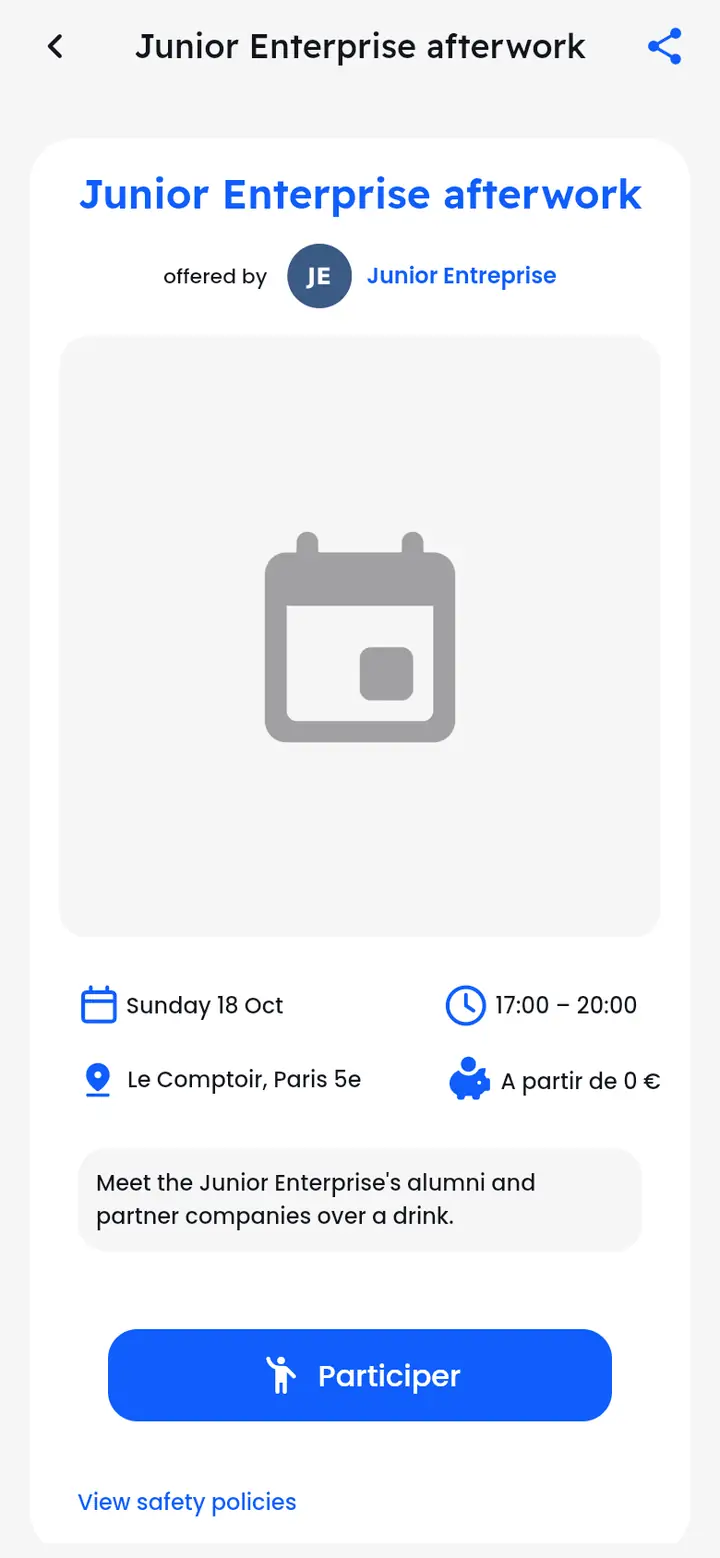
What's on an event page?
Date, times, venue, price, description, and the button to take part.
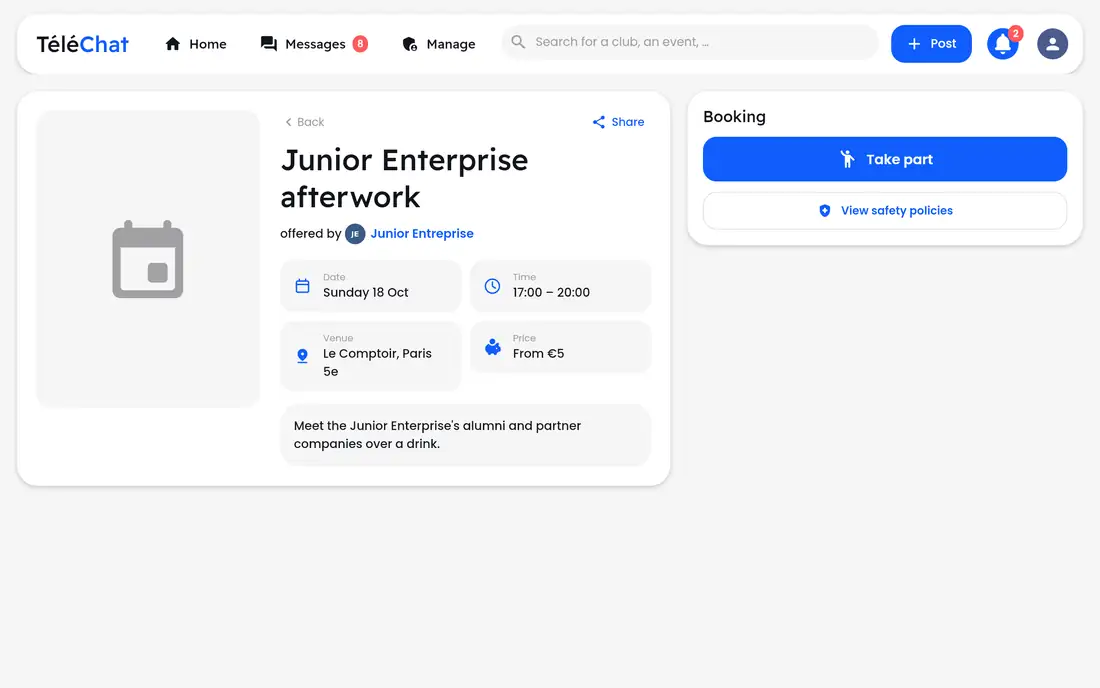
An event page shows the organising society, the date, times, venue, price and description. The “Participer” button starts booking. The share icon at the top right copies or shares the event's link.
If you already have a ticket, the button becomes “View my booking”.
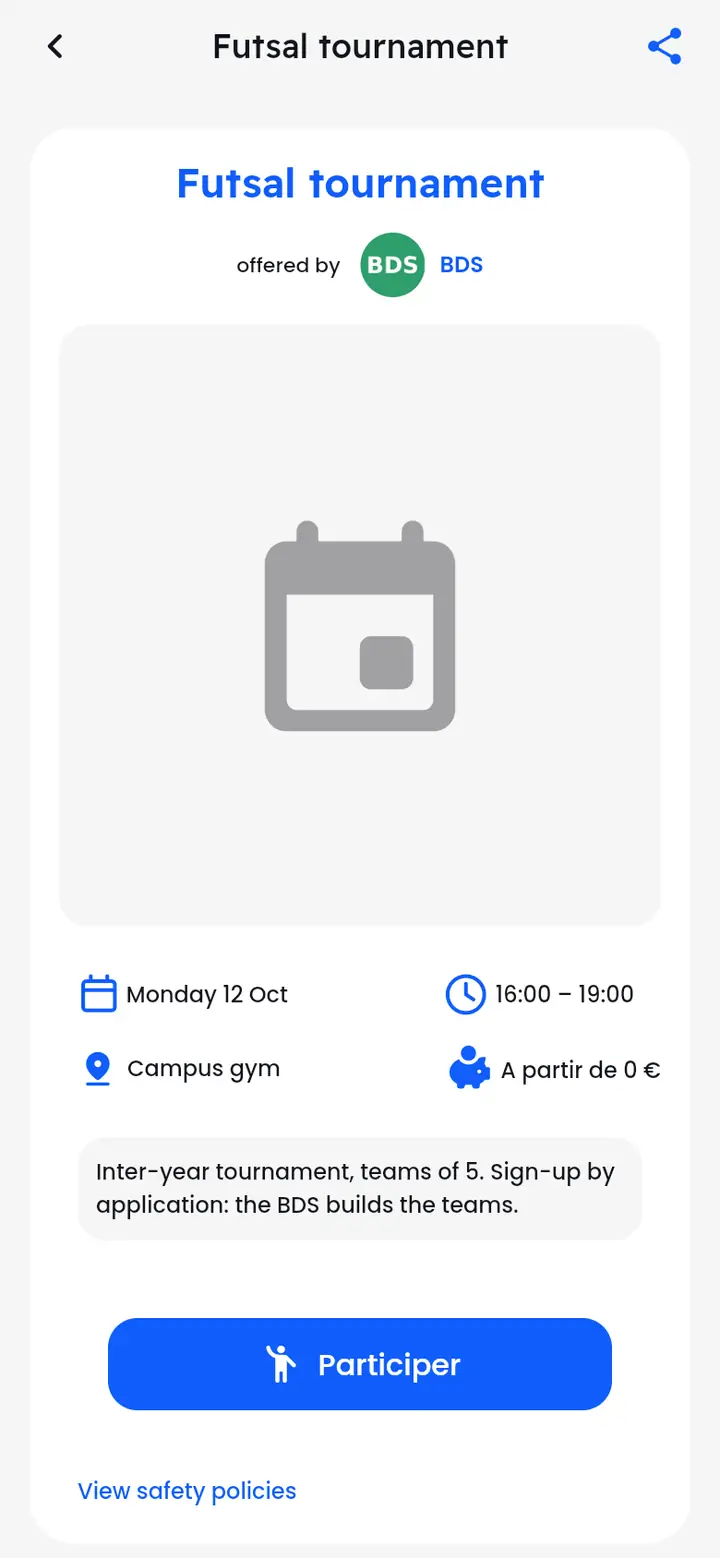
First come, application, waiting list: how does it work?
The three ways to sign up for an event.
Each event has a sign-up mode, shown on its page:
- Open sign-up: no limit on places, you're sure to get a ticket.
- First come, first served: bookings open at a set time, shown on the page. Once it's full, you can “Join the waiting list”.
- By application: the society reviews each request, regardless of the order received. You're told of its decision.
On the waiting list, your position shows in “My booking” (“You're no. 3 on the waiting list”). If a place frees up, you're notified.
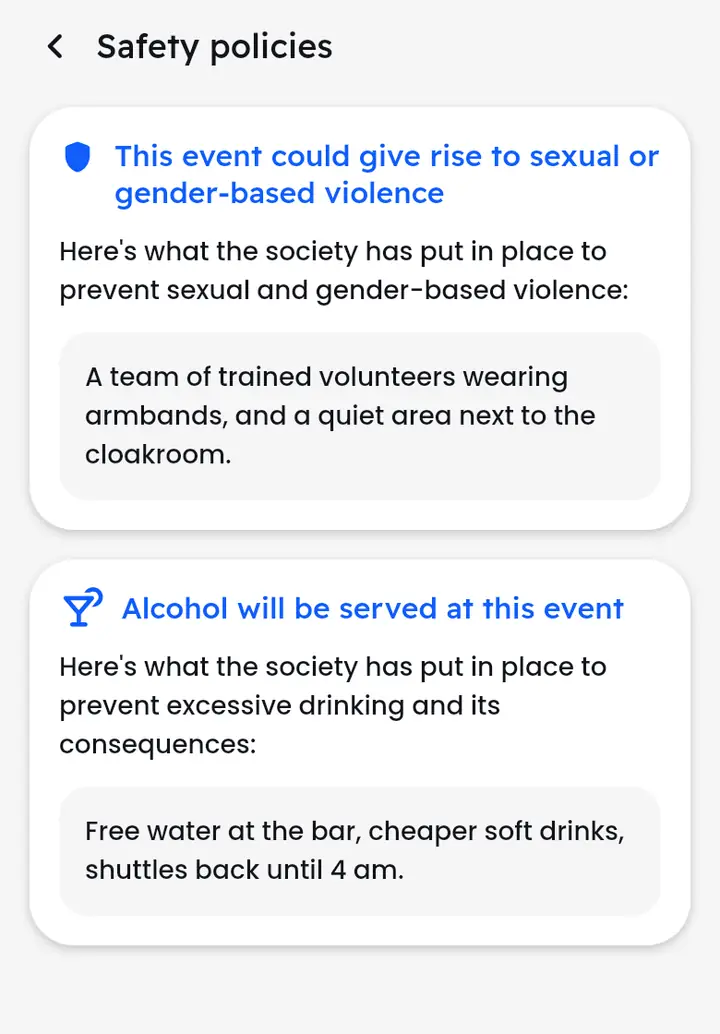
Where can I read an event's prevention measures?
Sexual and gender-based violence, alcohol: what the society puts in place.
Under the sign-up button, tap “View safety policies”. The society describes the measures taken against sexual and gender-based violence and against excessive drinking, when relevant to the event.
Booking and paying
Choose a price and options, pay online or on site.
How do I book a place?
Take part, choose your price, add options, confirm.
- On the event page, tap “Participer”.
- Choose your price. Only prices open to you are offered (student, member, grant holder…), with the places left and what they allow: “Cancellable”, “Transferable”.
- Tick the options you want (shuttle, cloakroom…): they're added to the total.
- Tap “Book”.
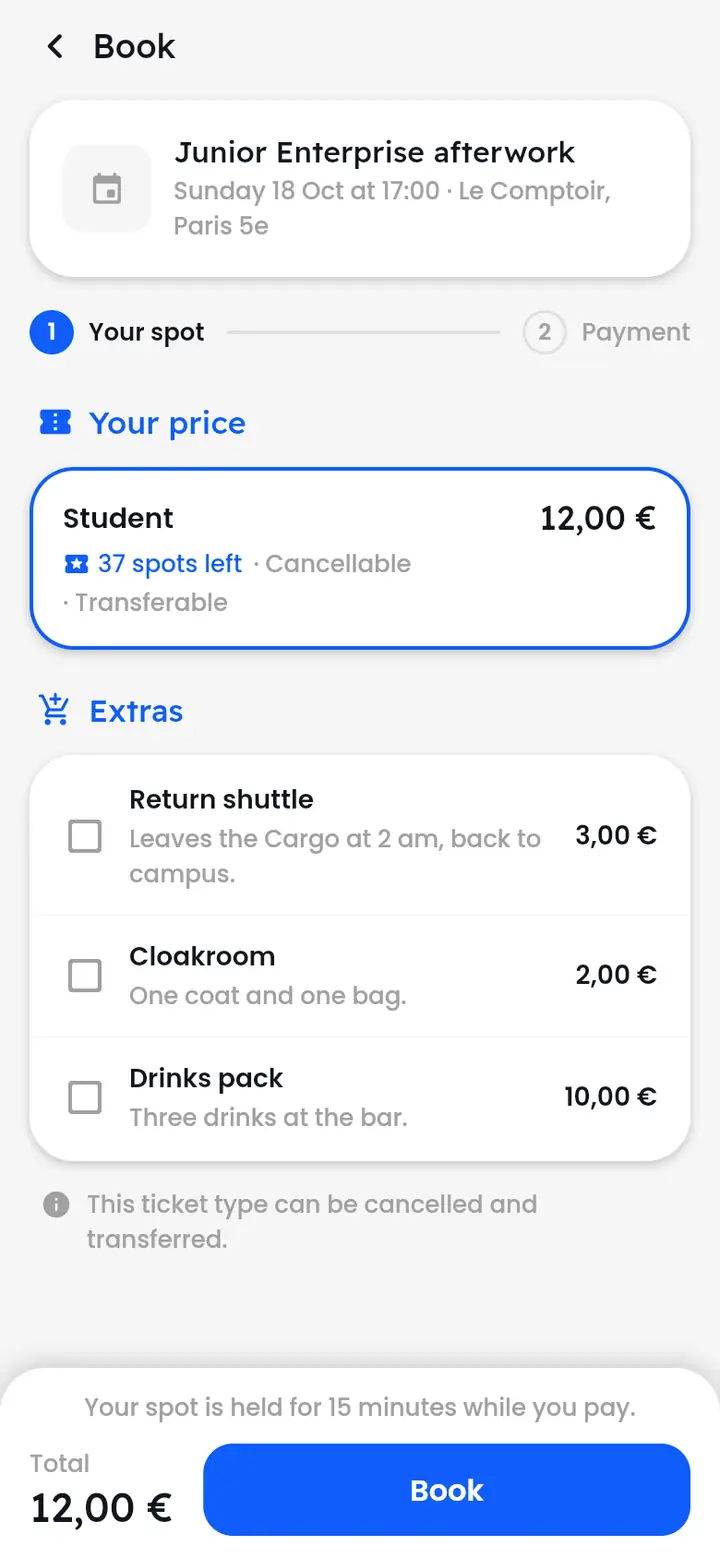
Your place is then held for 15 minutes, while you pay. After that, it goes back on sale.
How do I pay for my place?
Online by card, or in cash to the society.
After “Book”, the “Payment” step offers the methods the society accepts:
- “Pay online”: a secure card payment, right after confirming. Your ticket is confirmed within seconds.
- “Pay in cash”: you confirm your place, and pay the society in person.
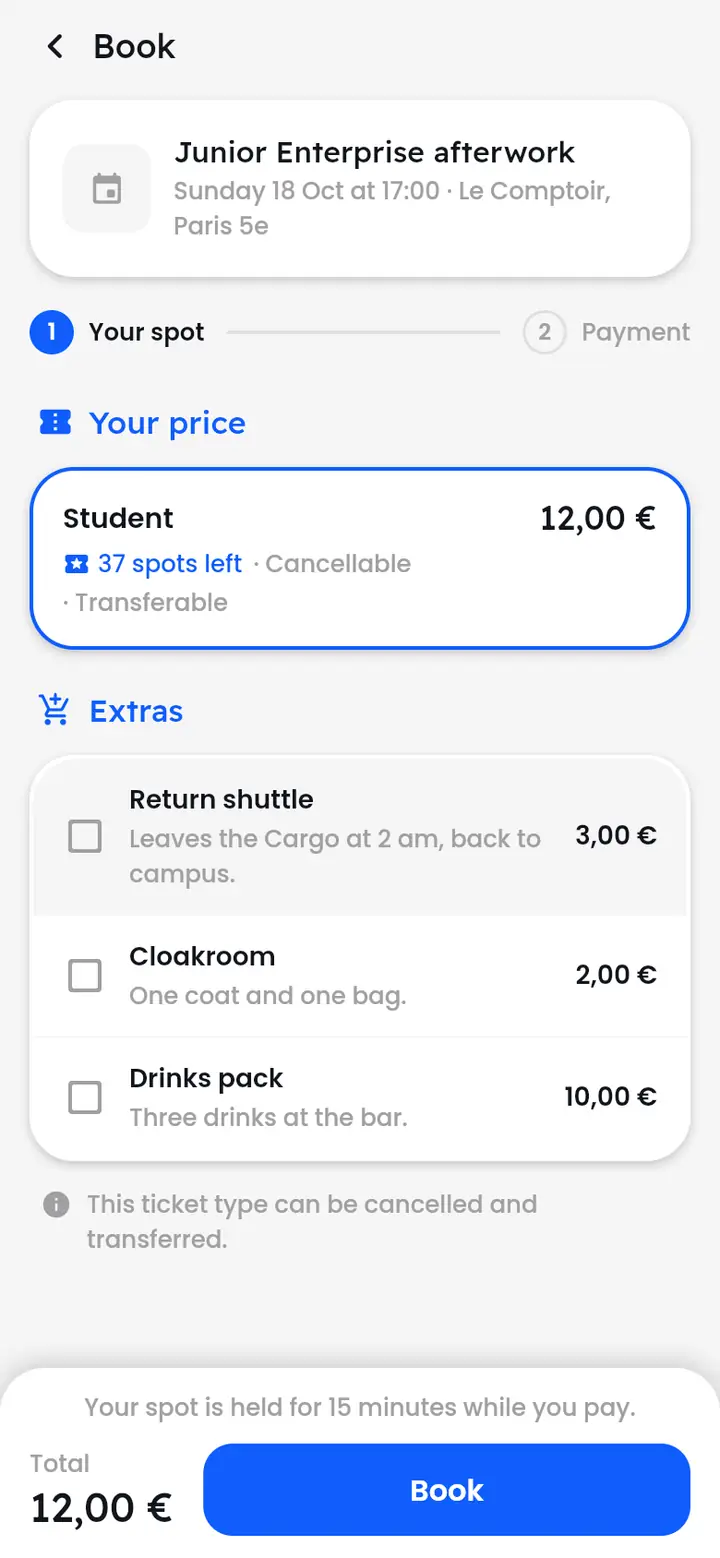
A free event is confirmed straight away with “Confirm my ticket”. If you leave before paying, “My booking” shows “Booking to complete”: tap “Complete my booking” to resume.
My ticket
Find it, add it to your wallet, transfer it, resell it, cancel it.
Where is my ticket?
My booking, then “See my ticket”: the QR code to show.
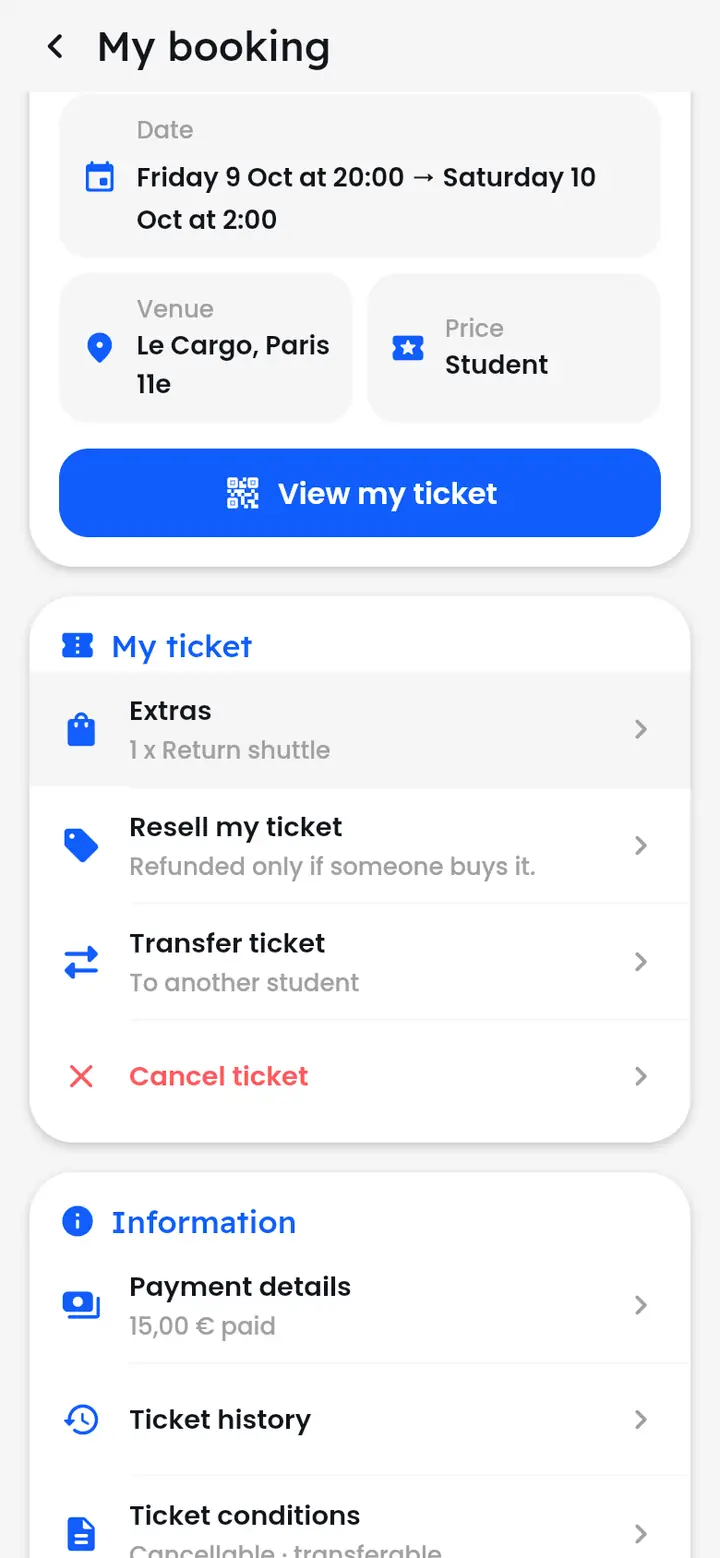
Open the event and tap “View my booking” (or go through Profile > “My events”). The “My booking” screen sums up your place: status, reference, date, venue, price.
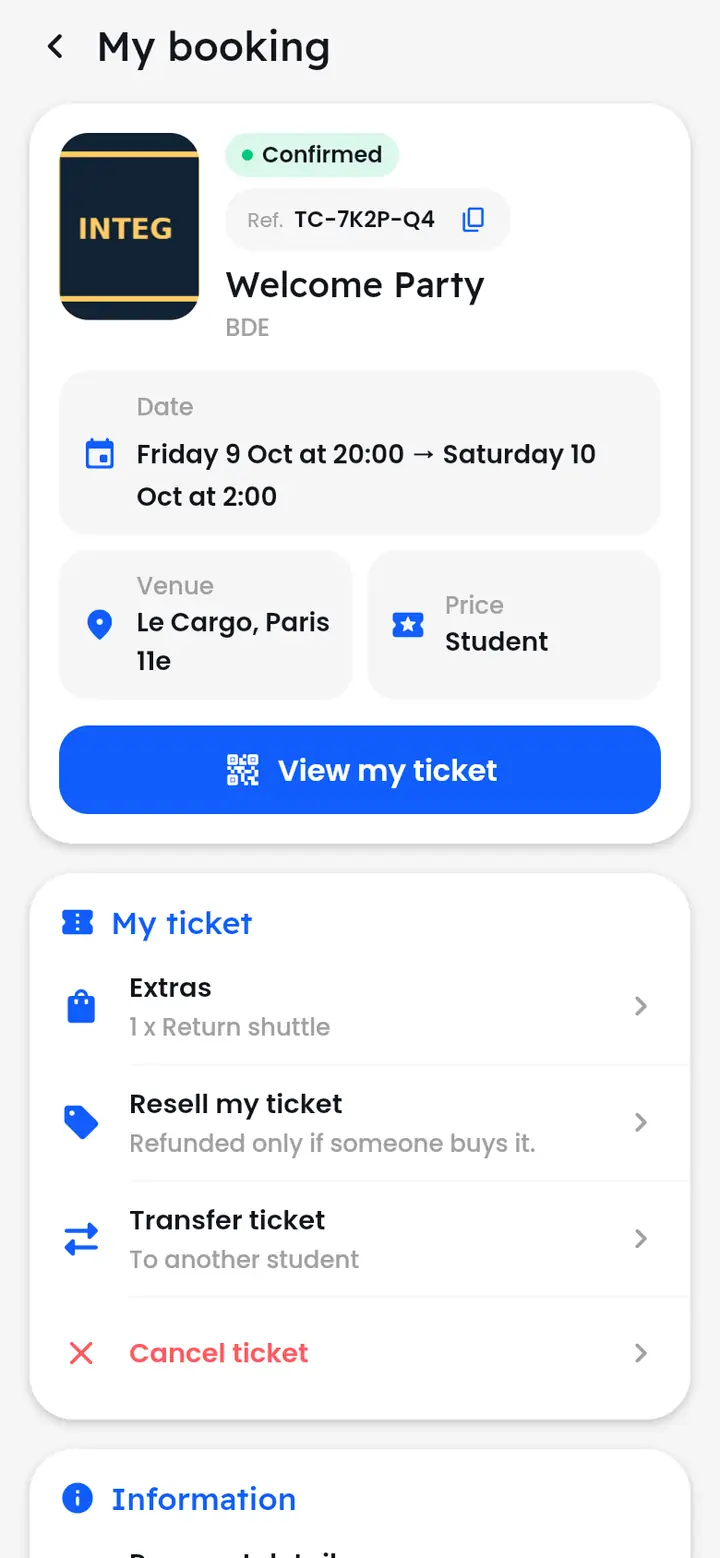
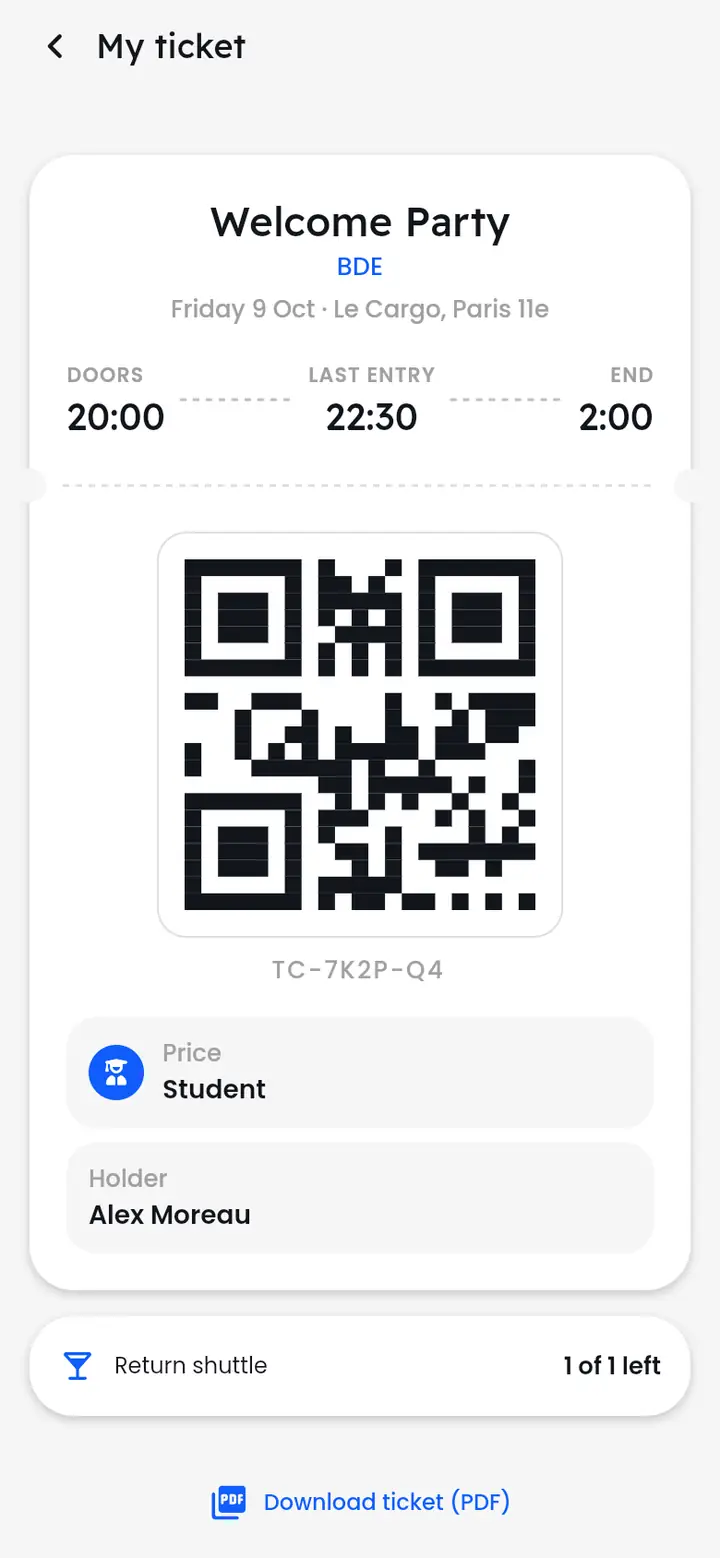
Tap “View my ticket”: the QR code appears, with the door opening, last entry and end times. That's what gets scanned at the door.
How do I add options to my ticket?
Shuttle, cloakroom, drinks: even after booking.
- In “My booking”, tap “Extras”.
- Under “My options”, the ones you already have; under “Add more”, the ones on offer.
- Set quantities with + and −, then tap “Add my options”.
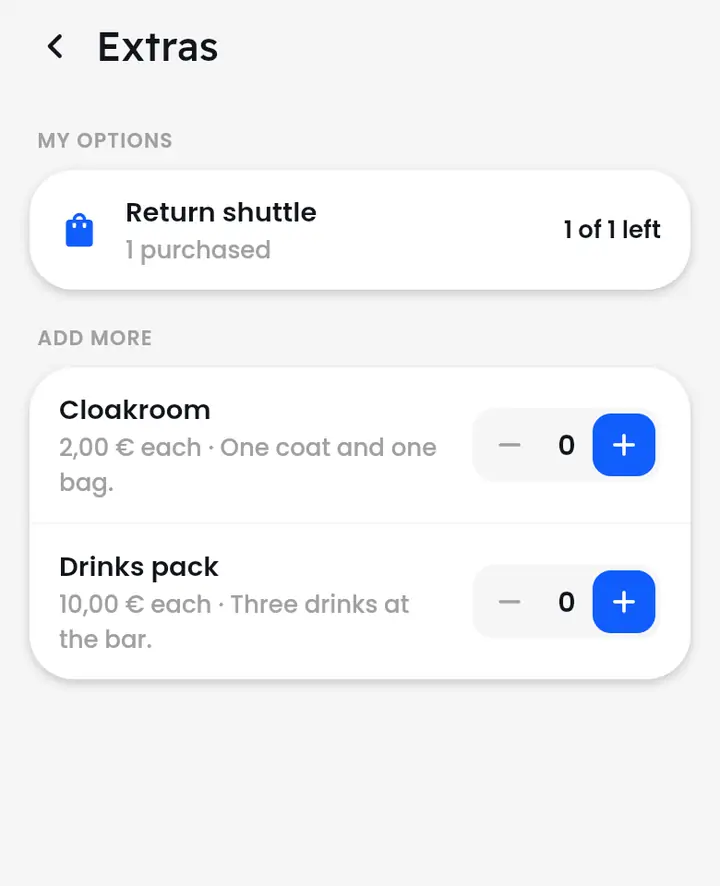
On site, the organisers scan your ticket at the bar or cloakroom to use an option; the “{0} of {1} left” counter updates.
How do I transfer my place to someone?
To another student at your school, if the price is transferable.
- In “My booking”, tap “Transfer ticket”.
- Search for the person at your school who will receive the place.
- Choose them, then confirm.
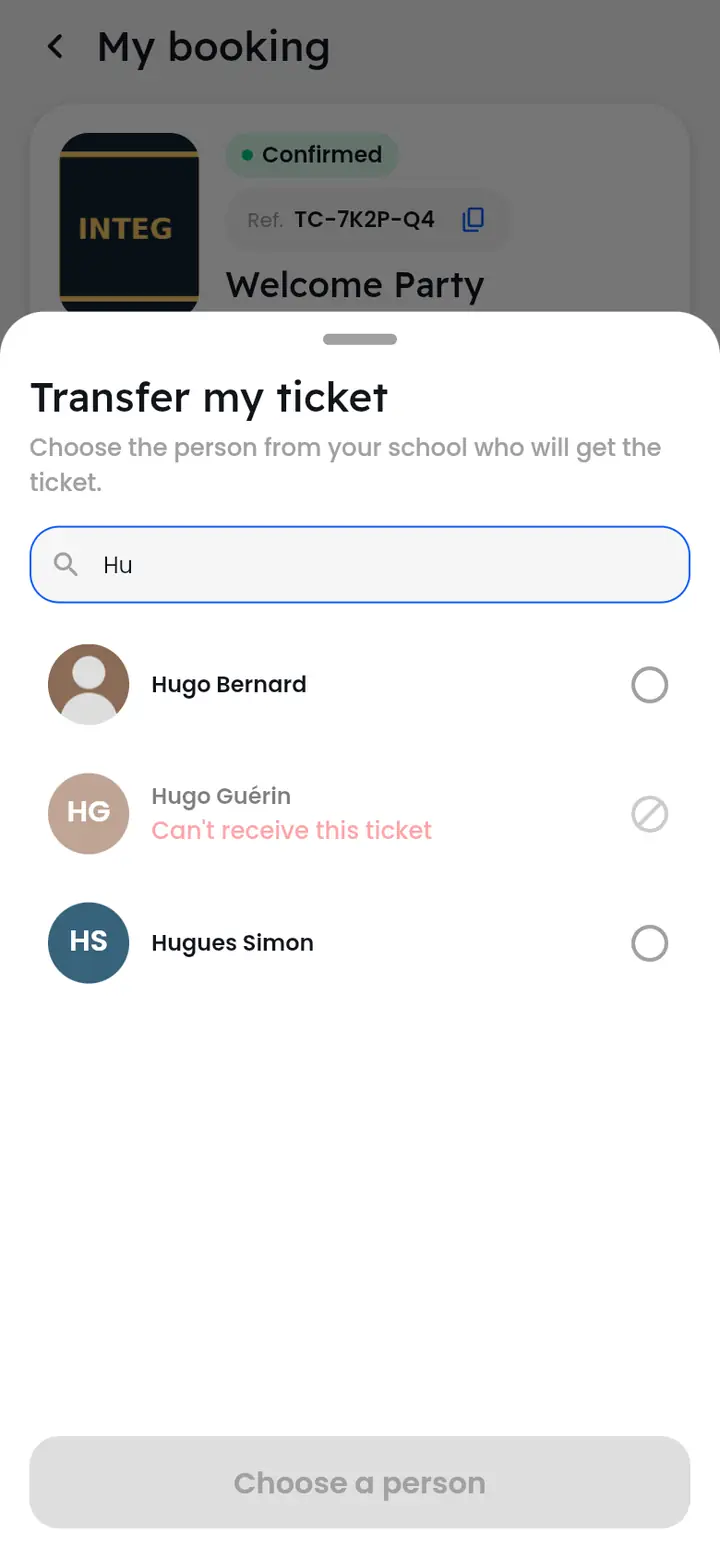
The ticket disappears from your account and a new QR code is issued for the other person: the old one no longer works at the door. Any amount still due becomes theirs. Someone who already has a place, or who isn't eligible for this price, can't receive it.
How do I resell my place?
Resale: you're refunded when someone buys it.
- In “My booking”, tap “Resell my ticket”.
- Set the resale price: at most what you paid, unless the organisers allow free pricing. “You will receive” shows what you'll get back.
- Tap “Put up for resale”.
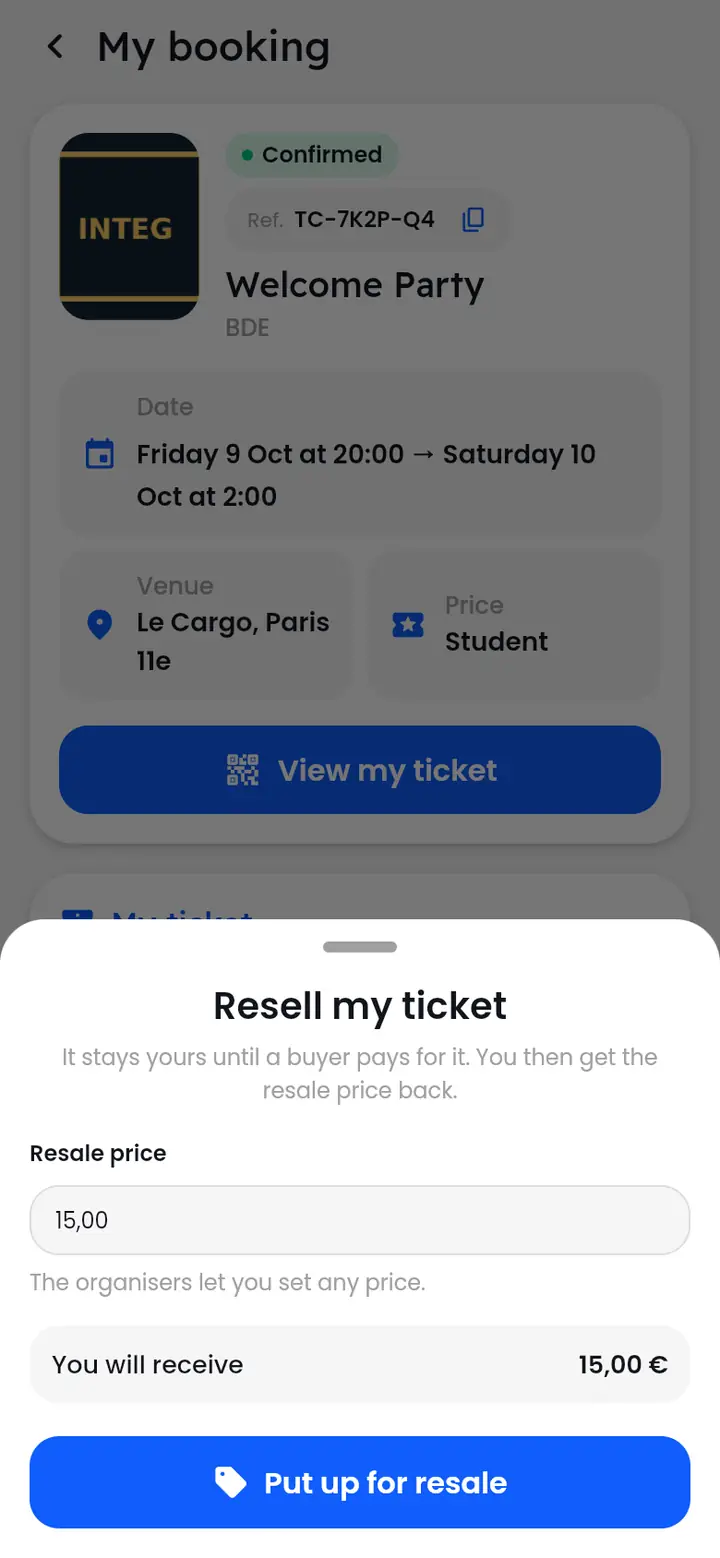
The place stays yours until someone buys it. Once bought, you're refunded the resale price. You can “Withdraw from resale” at any time, except while a buyer is paying.
How do I cancel my booking?
Cancel, abandon, leave the waiting list or withdraw your application.
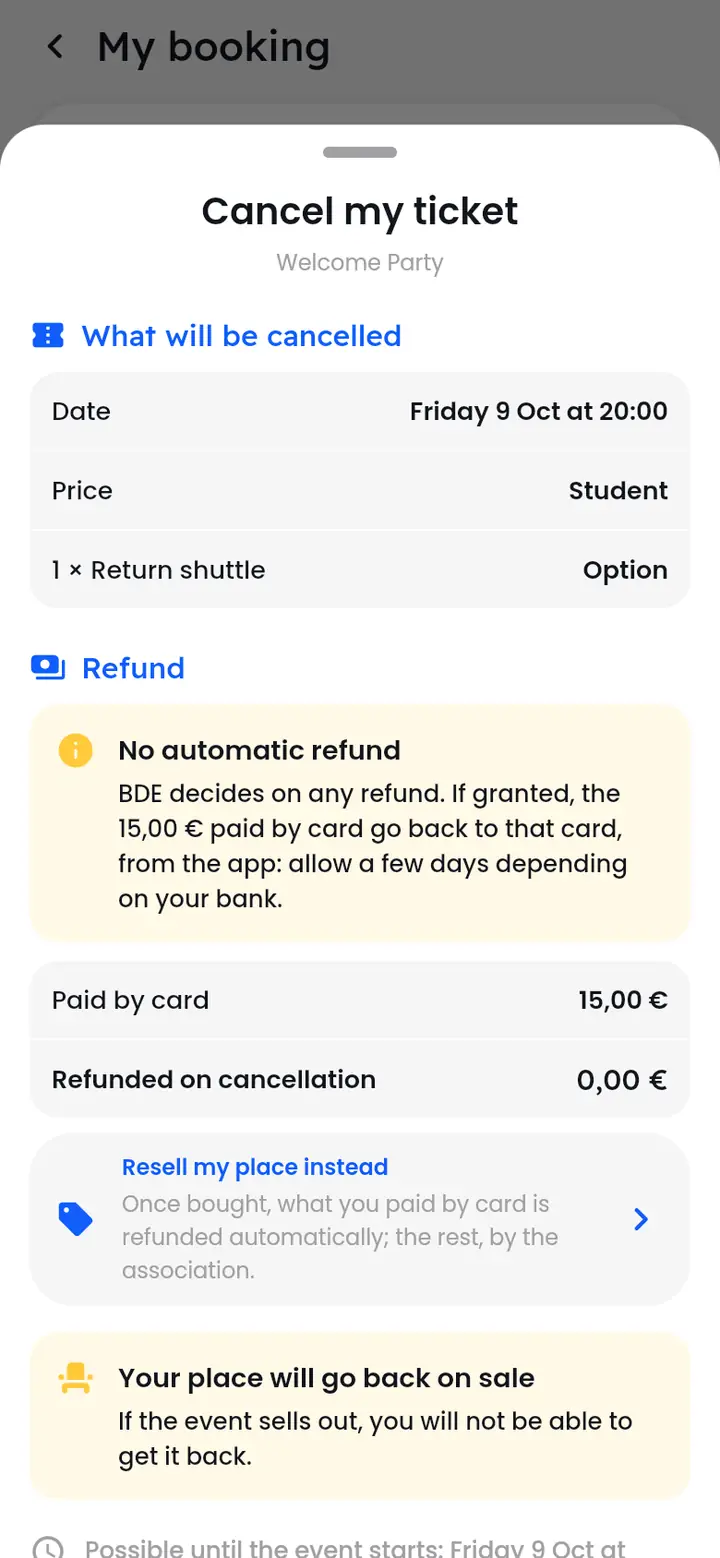
At the bottom of the “My ticket” card in “My booking”, the last button depends on your situation: “Cancel ticket”, “Give up my booking” (not paid yet), “Leave the waiting list” or “Withdraw my application”. The app asks you to confirm.
What about a refund?
Nothing is refunded automatically: the society decides. If it agrees, what you paid by card goes back to that card (allow a few days depending on your bank); a payment made on site is settled with them directly. A cancellation certificate is sent to you by e-mail and stays downloadable.
Where are my payments, receipts and ticket history?
The Information section of My booking.
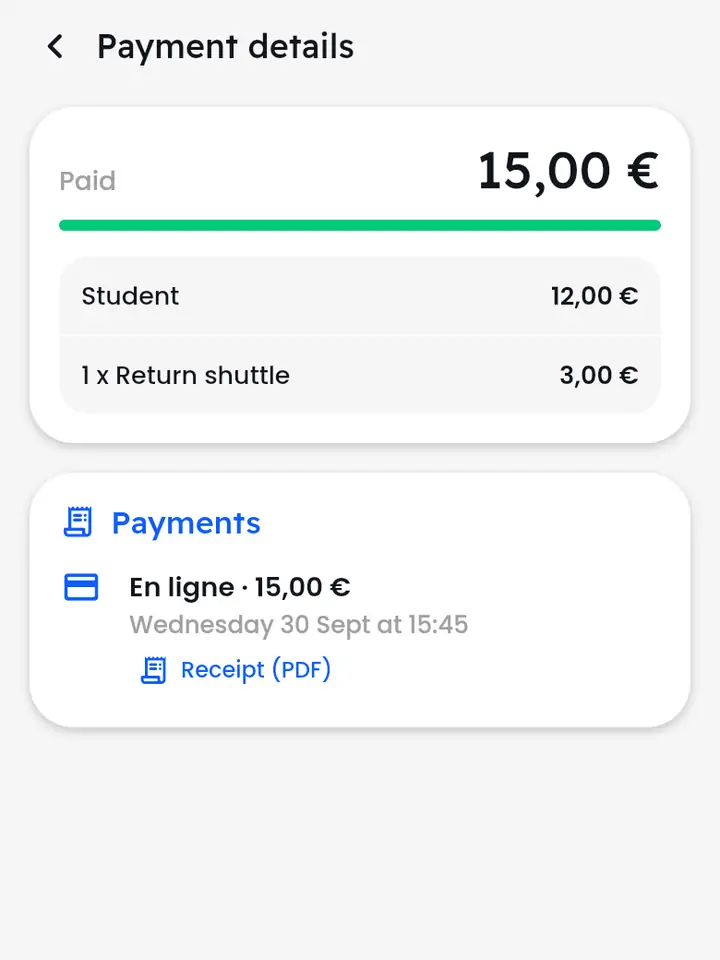
Scroll “My booking” down to “Information”:
- “Payment details”: what's due, what's paid, each payment with its reference and its “Receipt (PDF)” (which serves as an invoice).
- “Ticket history”: booking, payments, confirmation, transfer, entry… with the date and who did it.
- The ticket conditions, the prevention policies, and “Contact the organisers”.
Where can I see all my events?
Profile > My events: upcoming, past, and calendar.
In your profile, “My upcoming events” shows the next ones; “See all” (or Settings > “My events”) opens the full list with the “A venir” and “Past” tabs and a calendar. Tap an event to get back to your booking.
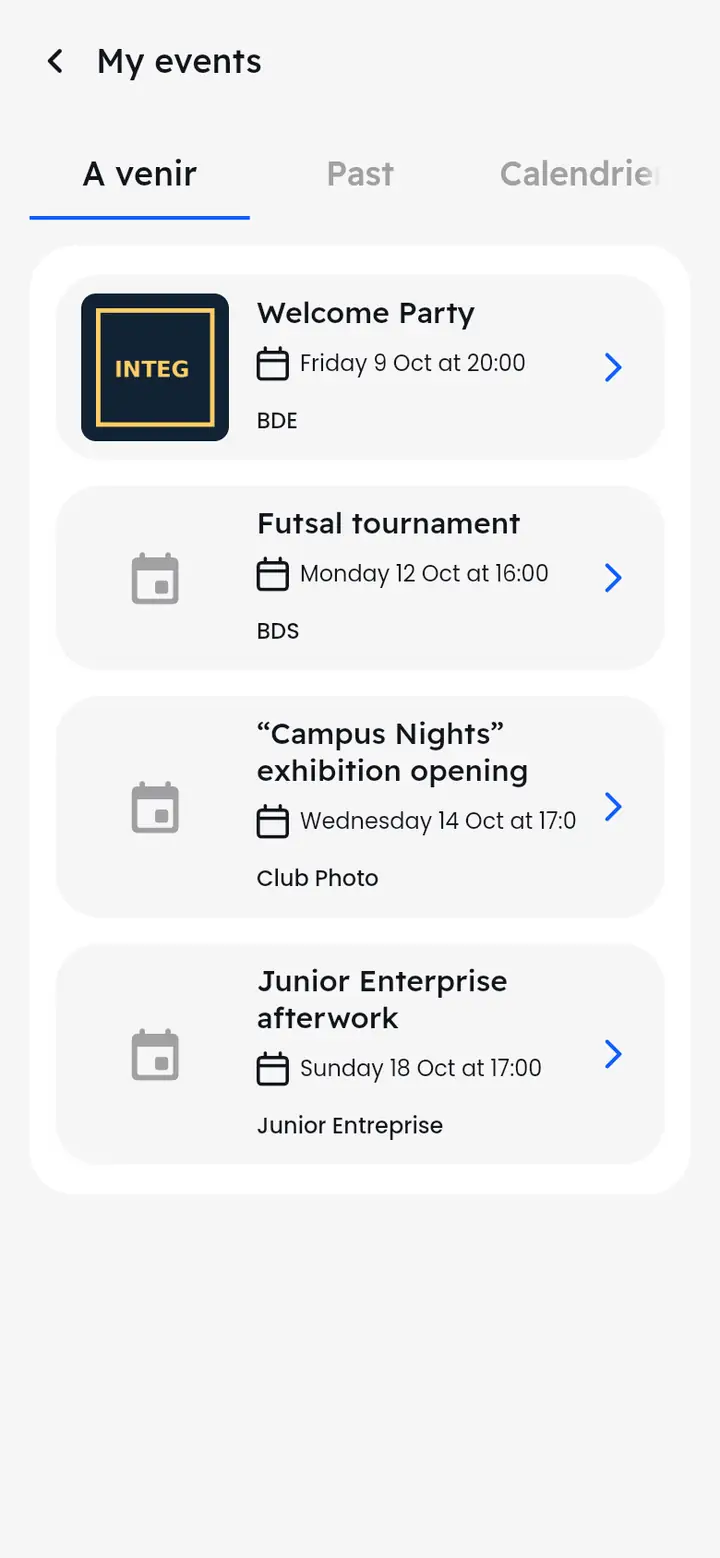
Places not yet allocated (pending applications) appear under “My applications”.
Messages
Private conversations, year and society groups, reactions, mute.
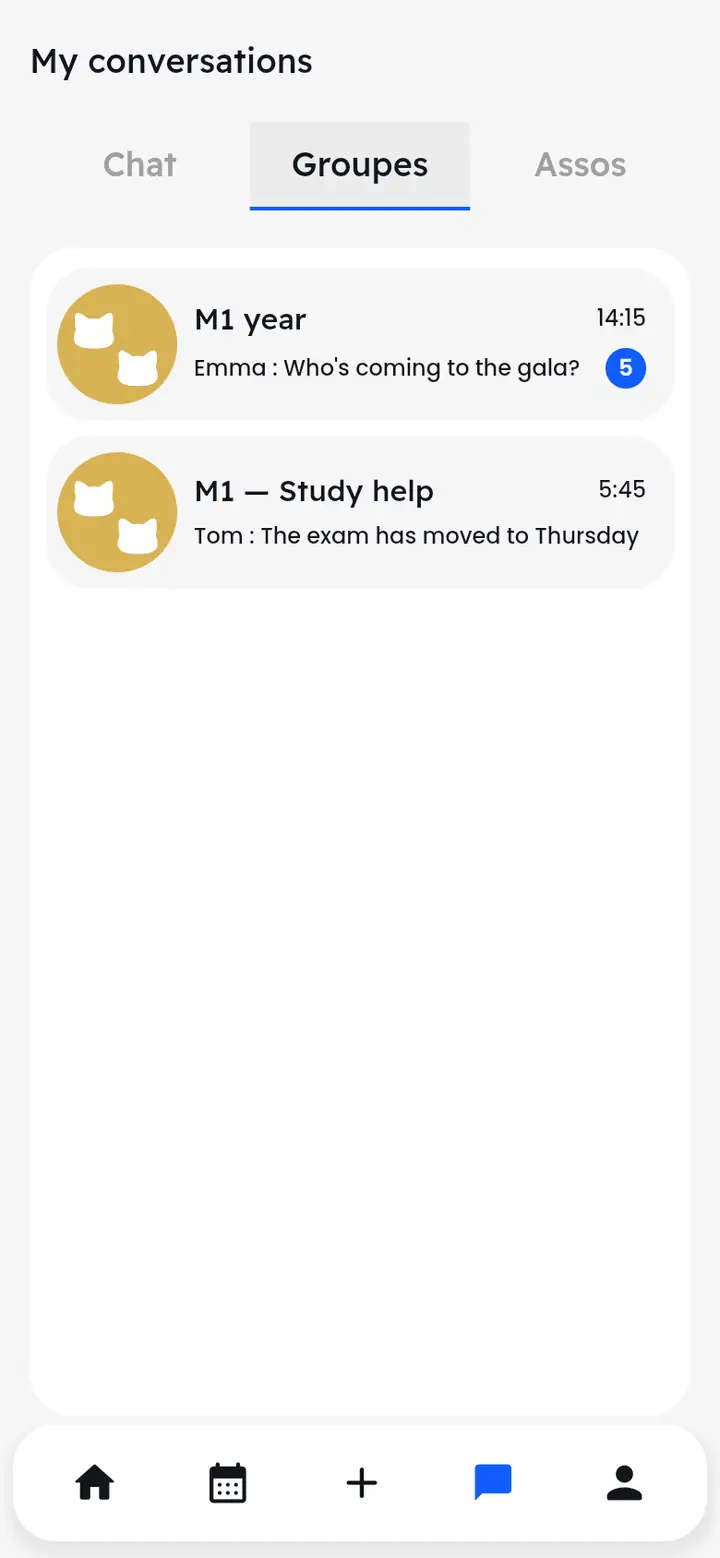
How are my conversations organised?
Three tabs: Chat, Groups, Societies.
The bubble in the bottom bar opens “My conversations”:
- “Chat”: your private conversations, and the “TeleChat team” thread if you've written to support.
- “Groups”: your year's groups.
- “Clubs”: the societies' chats.
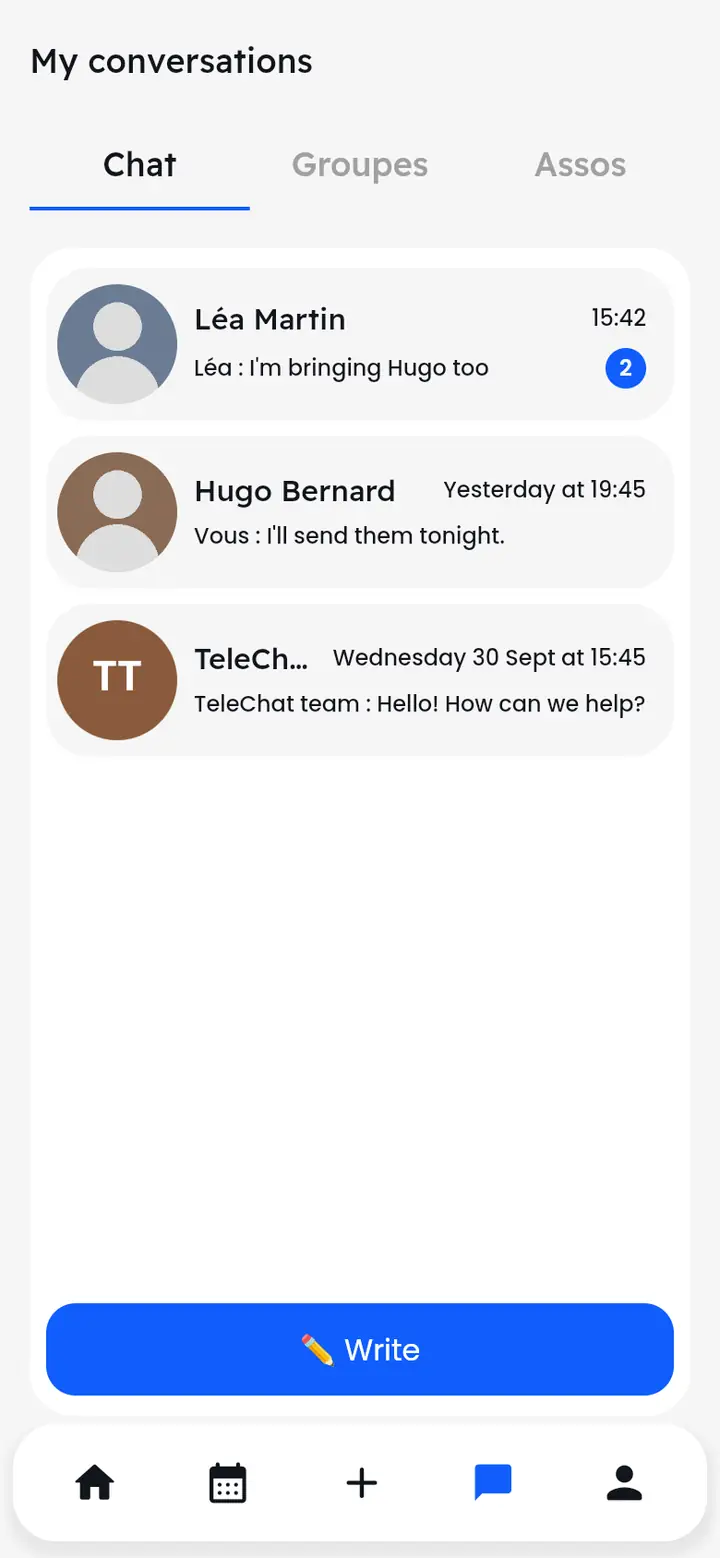
A badge shows the number of unread messages; each conversation's second line shows the last message and who sent it.
How do I message someone?
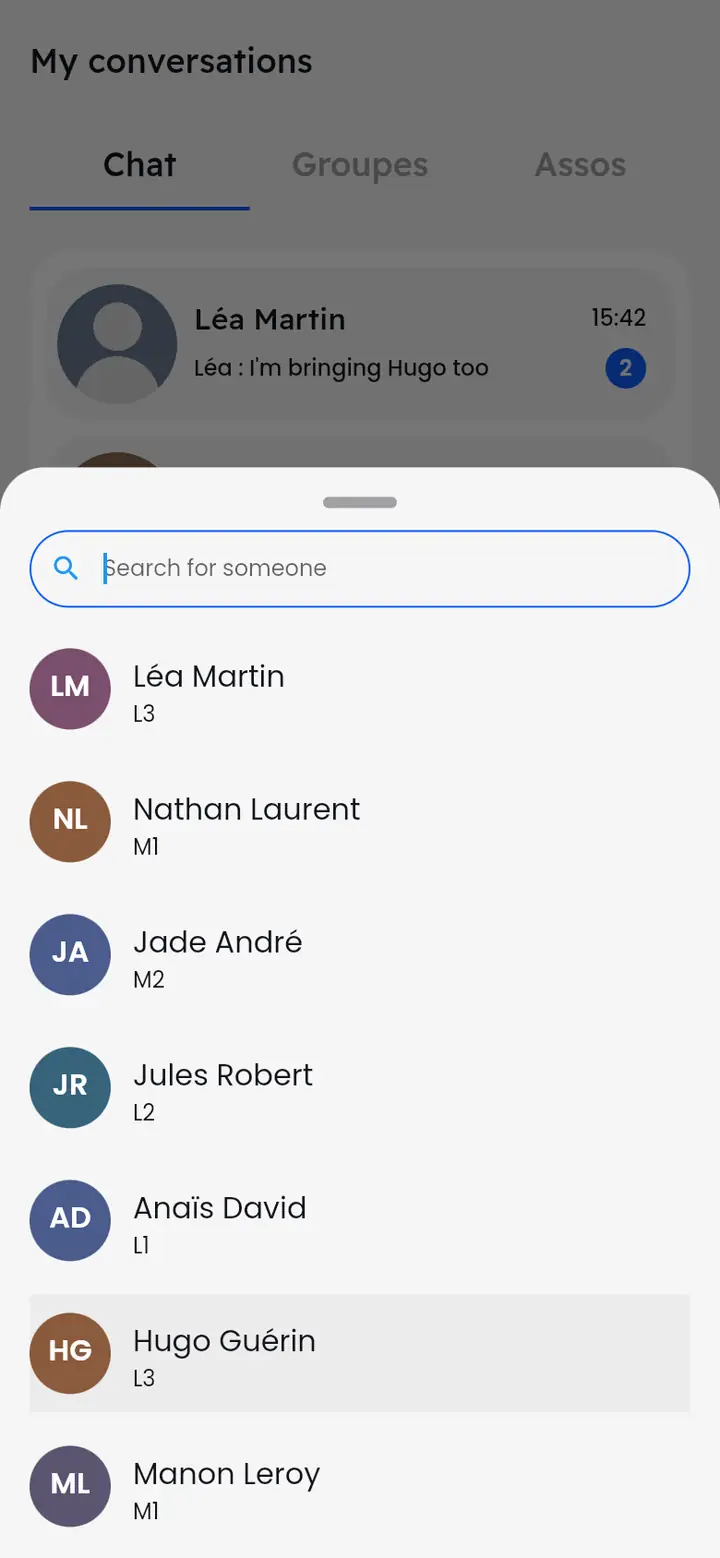
The Write button, or the bubble on a profile.
- In “My conversations”, tap “✏️ Write”.
- Search for the person by name.
- Tap their name: the conversation opens.
Send a photo, a document, a poll or an event
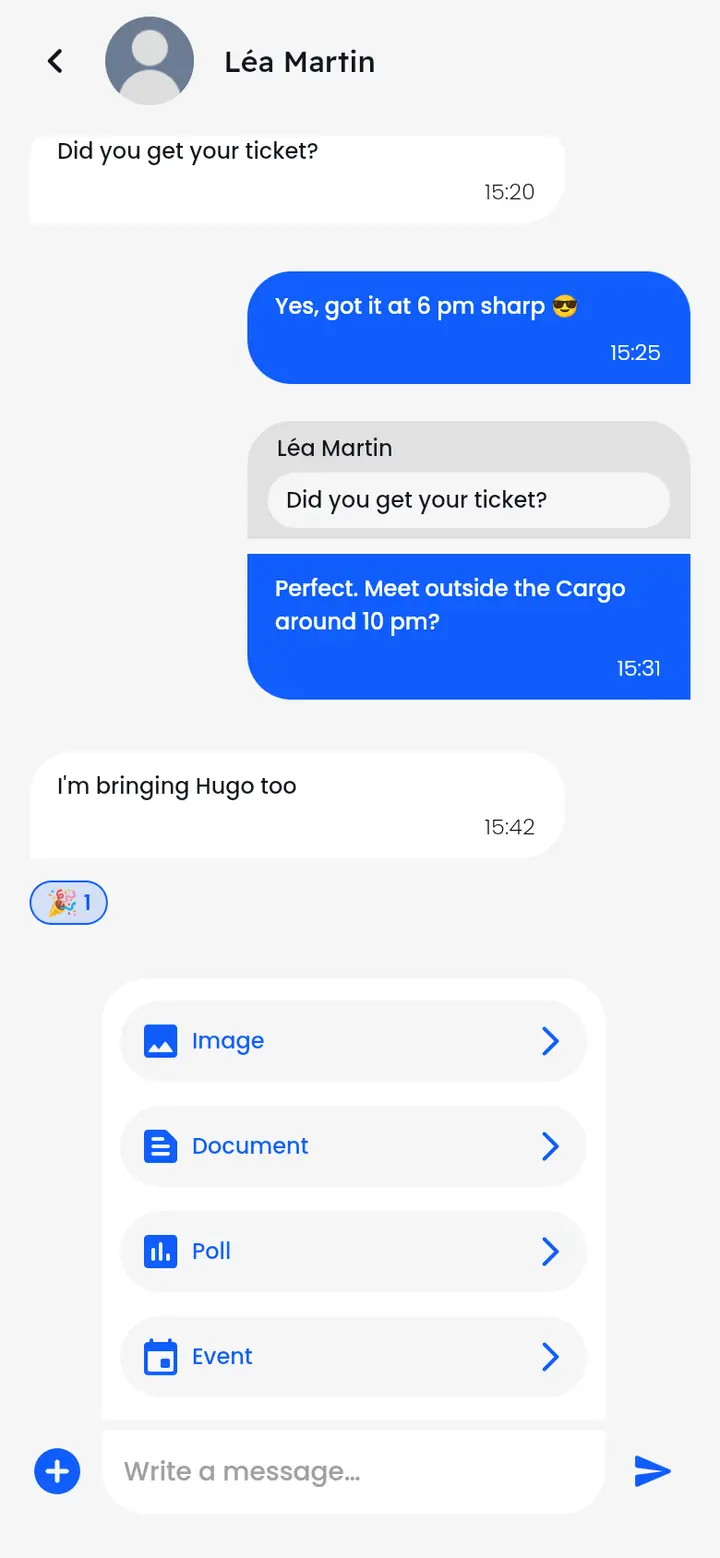
The + to the left of the message box.
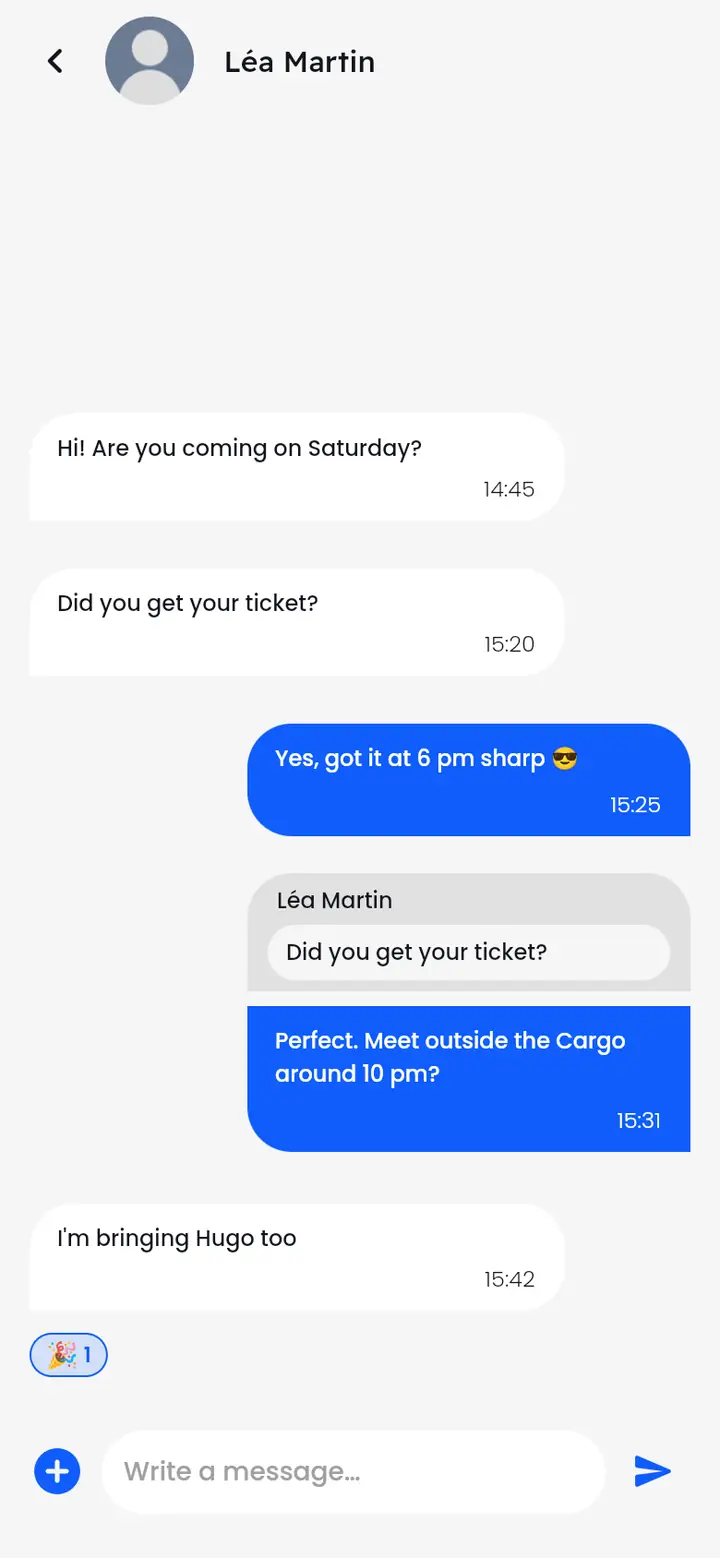
Type in the box at the bottom, then tap the arrow to send. The + on the left offers: “Image”, “Document”, “Poll” and “Event” (to share an event from the calendar).
Reply to a message, react, delete
A long press on the message.
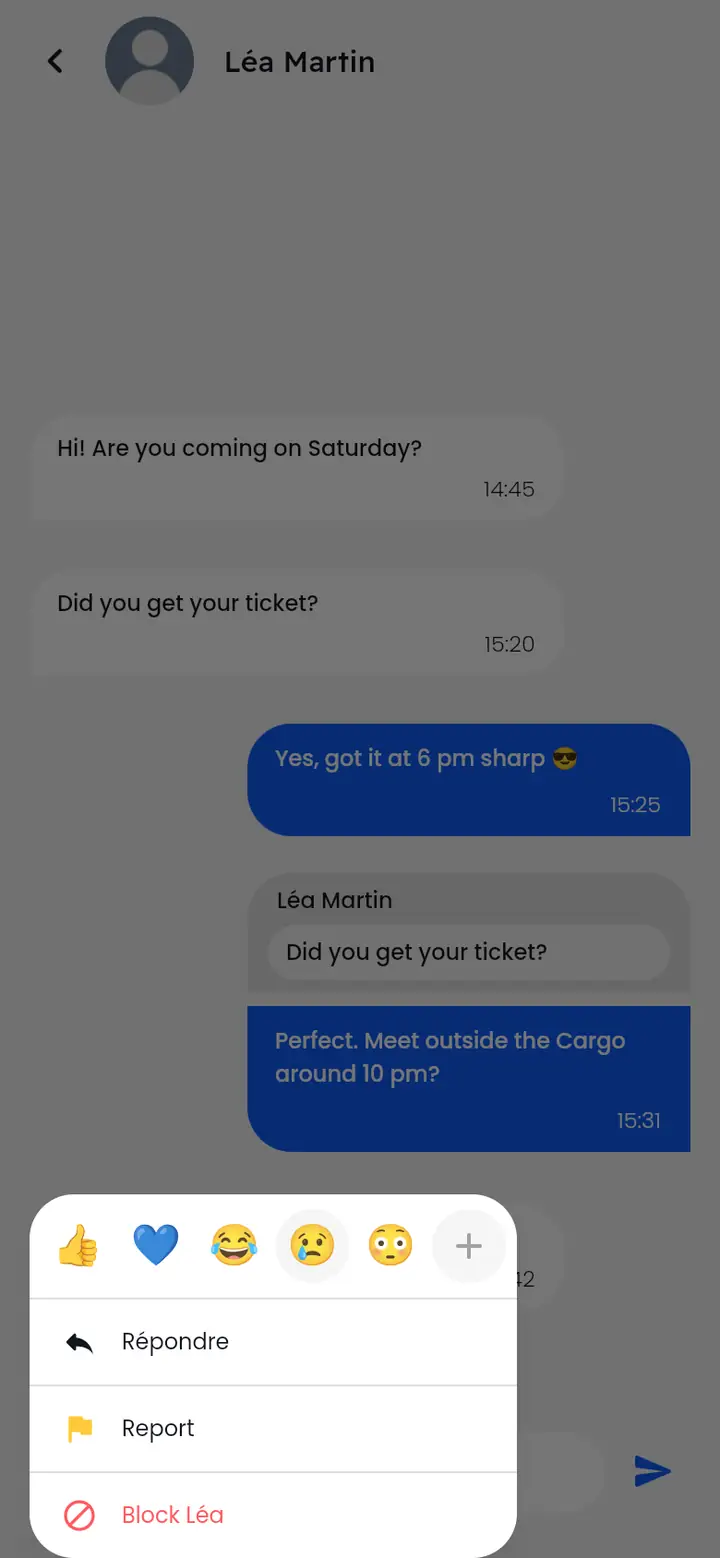
Press and hold a message: a row of emojis lets you react (the + opens every emoji), and a menu offers “Reply”, “Report” and blocking its author, or deleting it if it's your own message.
Join a group, see its members
A group's details page.
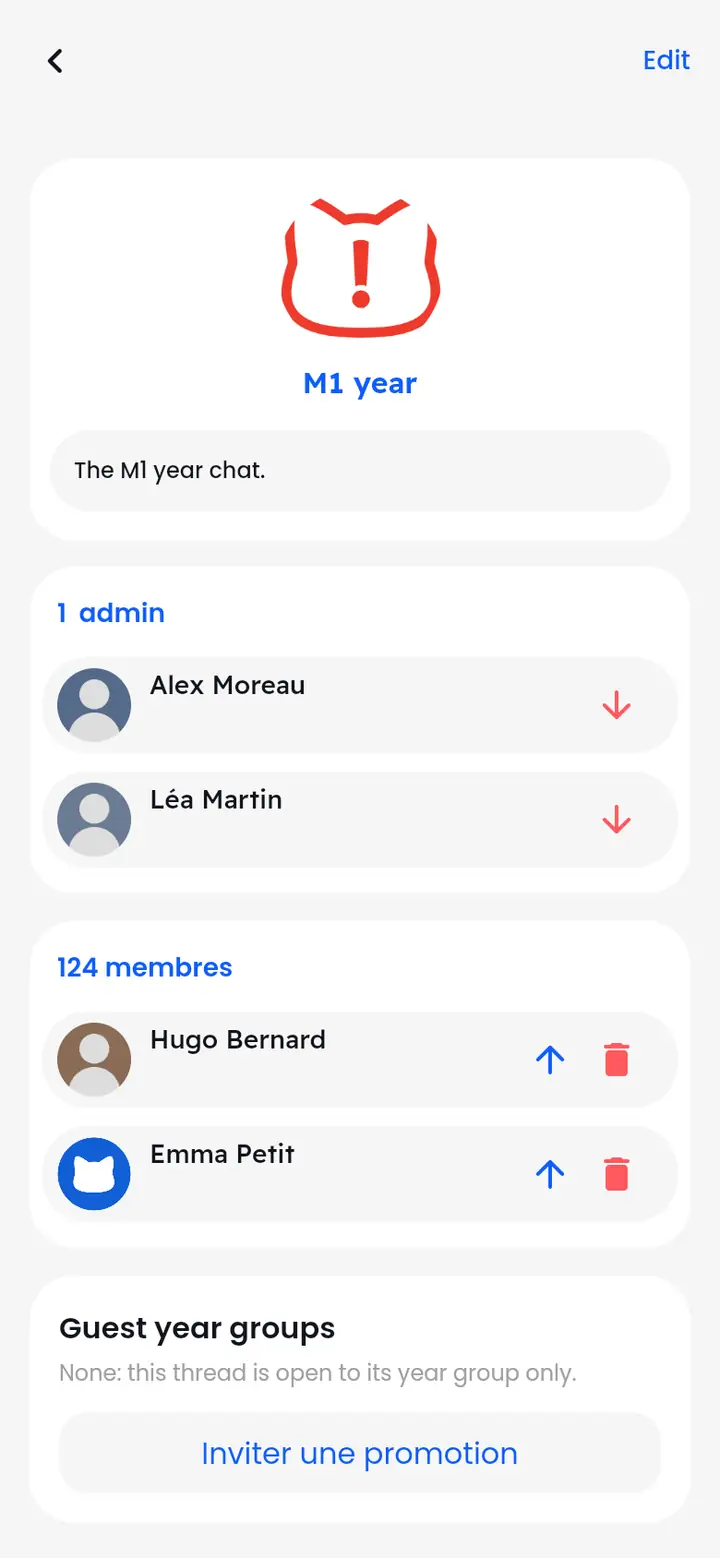
In a group, tap its name at the top: you see its description, its admins and its members. A group admin can “Edit” its name and picture, appoint or remove other admins, remove a member, and invite other years into a year group.
How do I mute a conversation?
A long press on the conversation, then Mute.
- In “My conversations”, press and hold the conversation.
- Tap “Mute” and choose how long: “1 hour”, “3 hours”, “1 day” or “Always”.
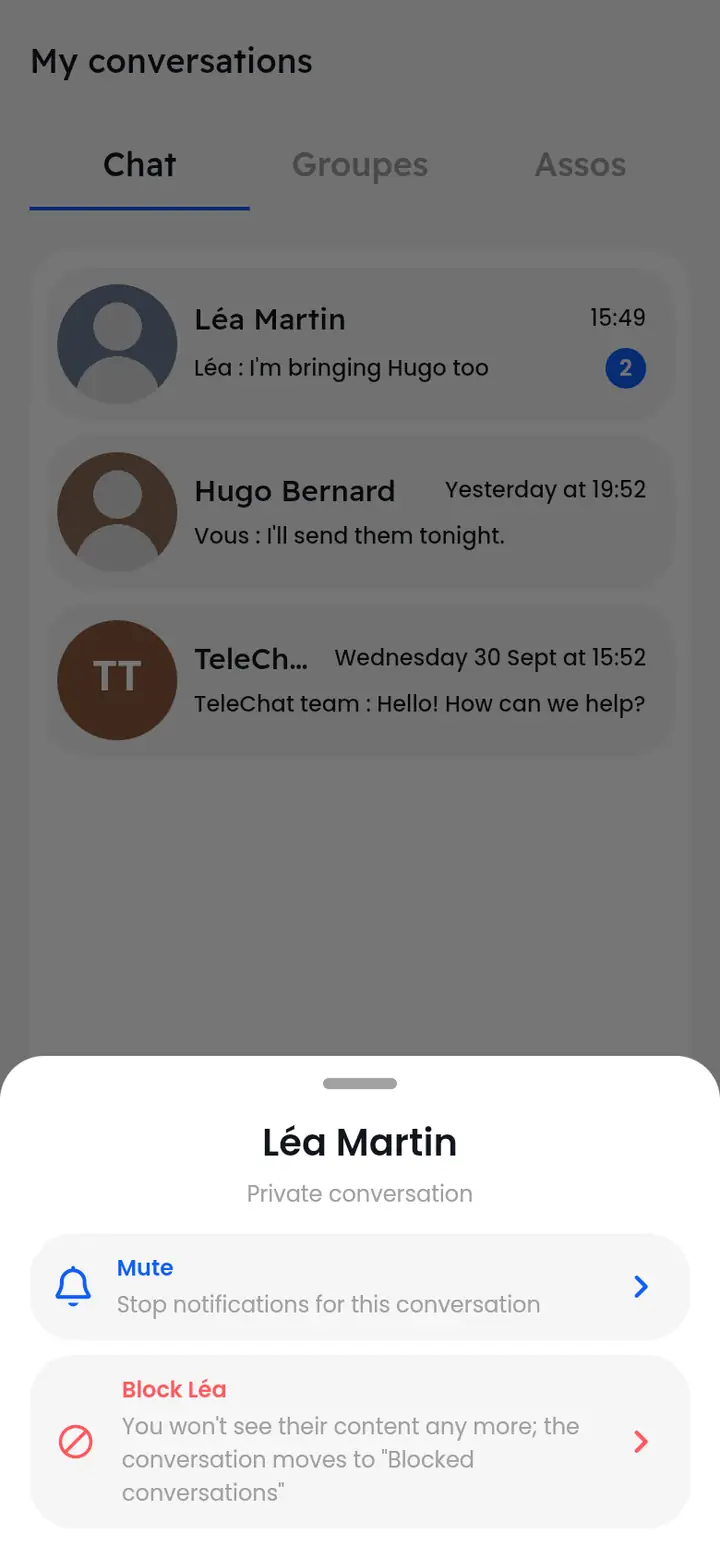
For a private conversation, the same sheet also offers to block the person. “Turn notifications back on” turns sound back on.
My profile
Photo, bio, contacts, account details, societies, memberships, grant status.
What does my profile show?
Your photo, year, bio, societies and upcoming events.
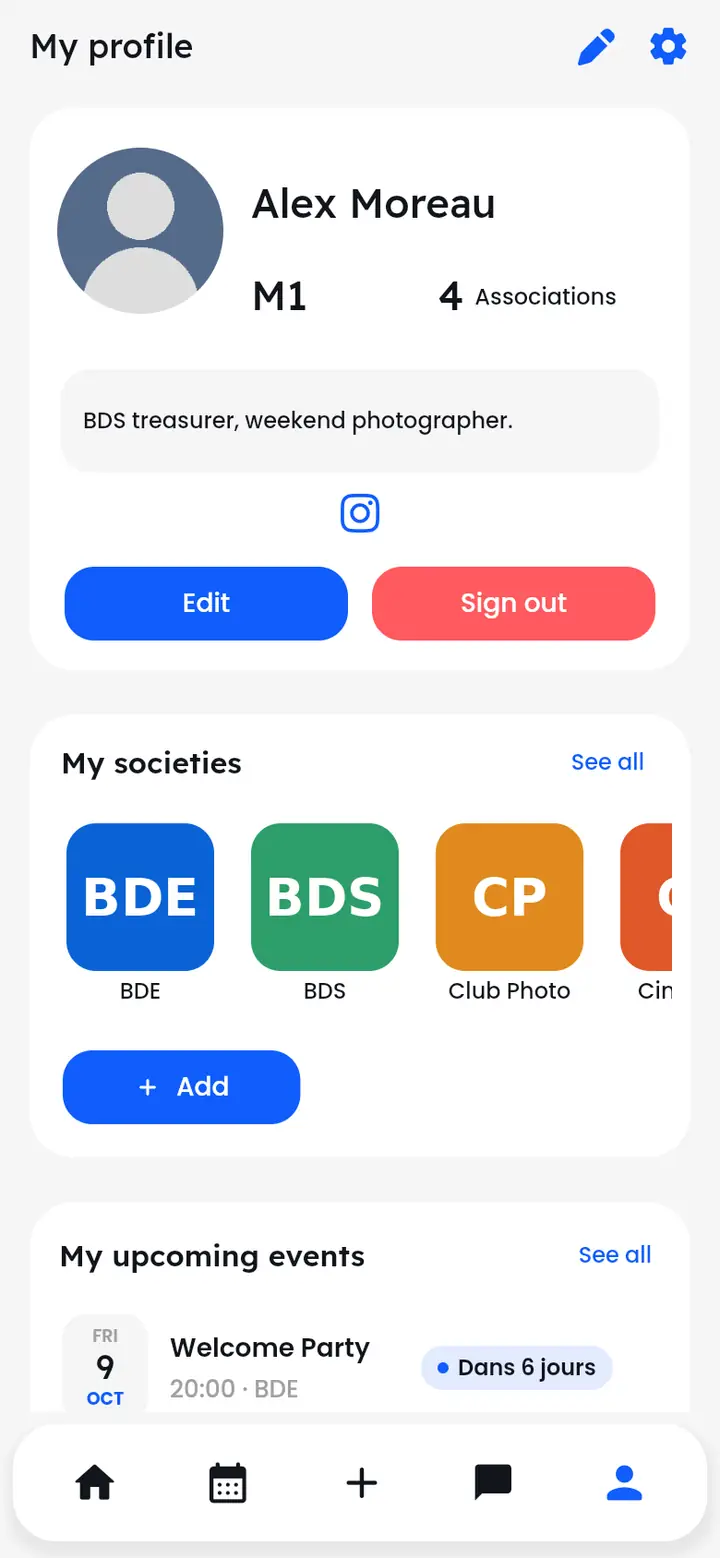
The person icon in the bottom bar opens “My profile”: photo, year, number of societies, bio, social links, “My societies” and “My upcoming events”. The pencil edits your profile, the gear opens settings.
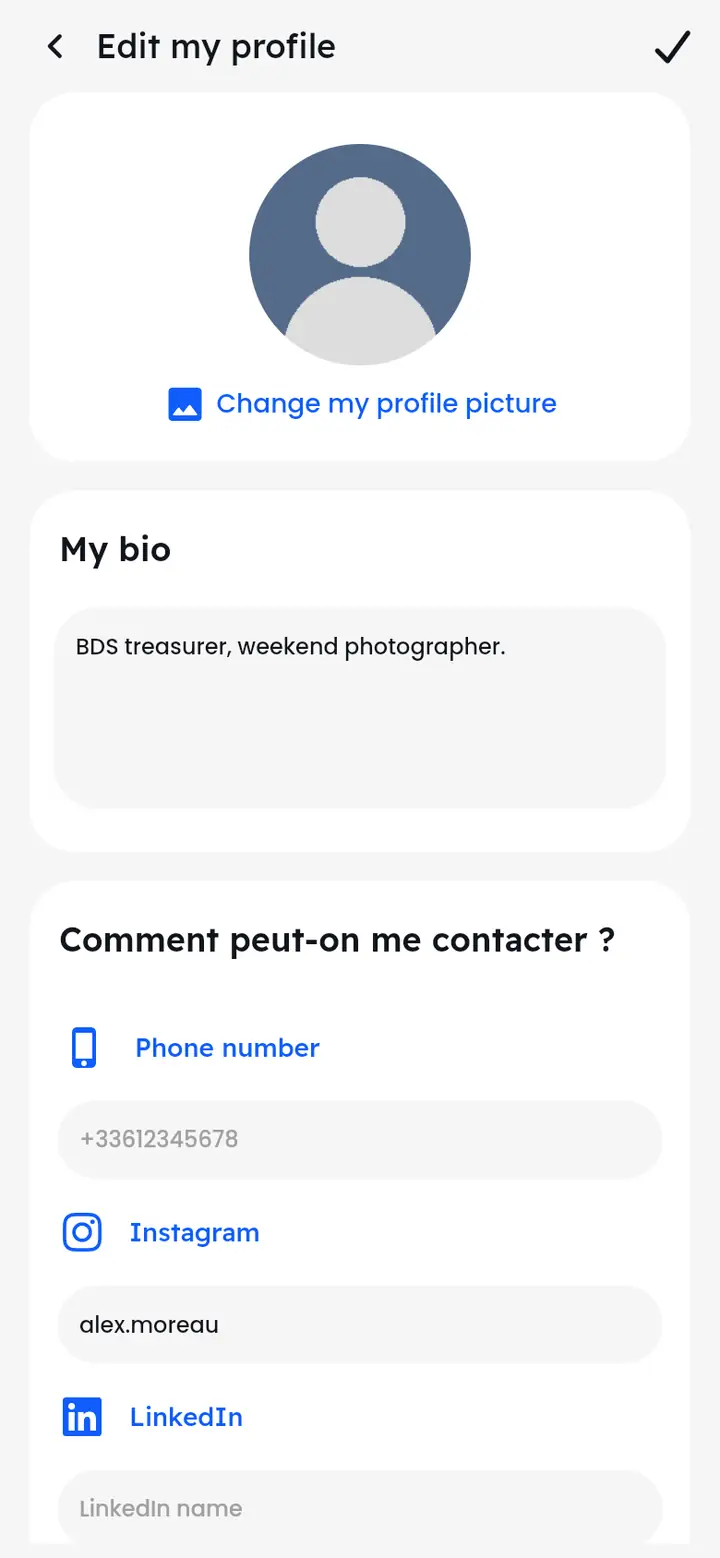
How do I change my photo, bio and contacts?
Profile > Edit.
- In your profile, tap “Edit” (or the pencil).
- “Change my profile picture”: choose a photo, then crop it.
- Write your bio, and the contacts you want to share (phone, Instagram, LinkedIn, Facebook); the “Make this visible” switch decides whether others see them.
- Save with the tick at the top right.
Change my name, e-mail address or password
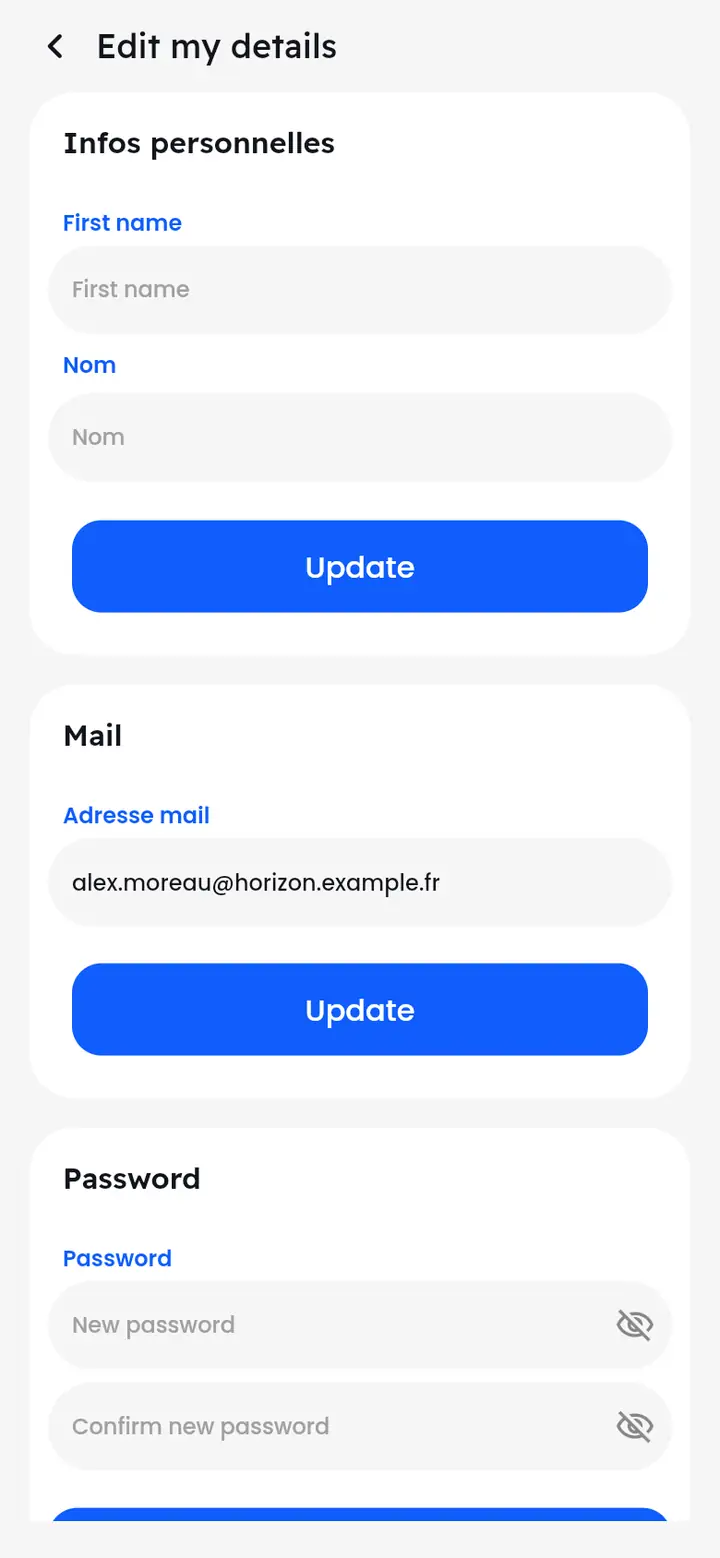
Settings > Edit details.
In Settings, tap “Edit details”. Three blocks, each with its own “Update” button: first and last name, e-mail address, and new password (entered twice).
View someone's profile
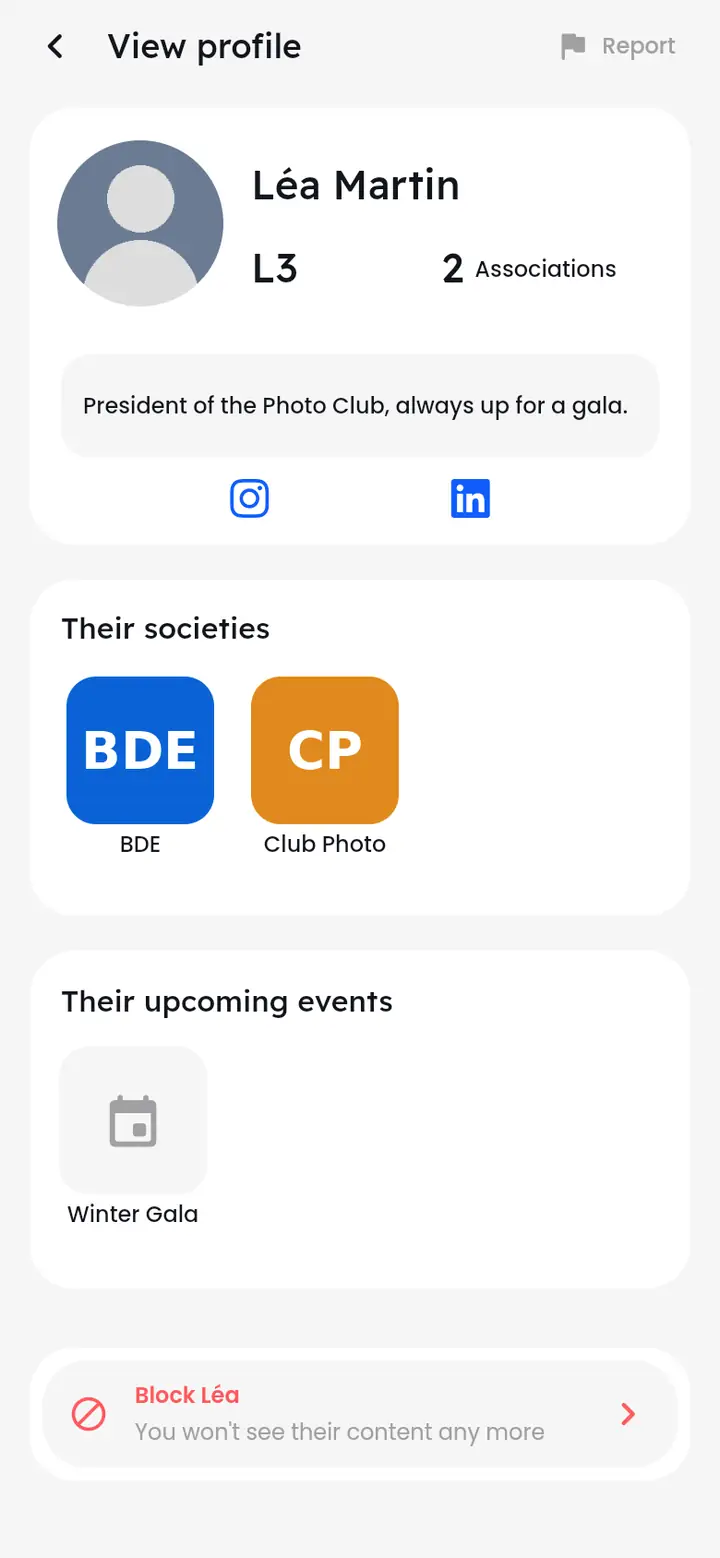
Tap their name or photo.
Tap someone's name or photo (in a post, a conversation, a list) to see their profile: their societies and upcoming events, if they chose to show them, and their shared contacts. At the top right, “Report”; at the bottom, the button to block them.
Where can I see my societies?
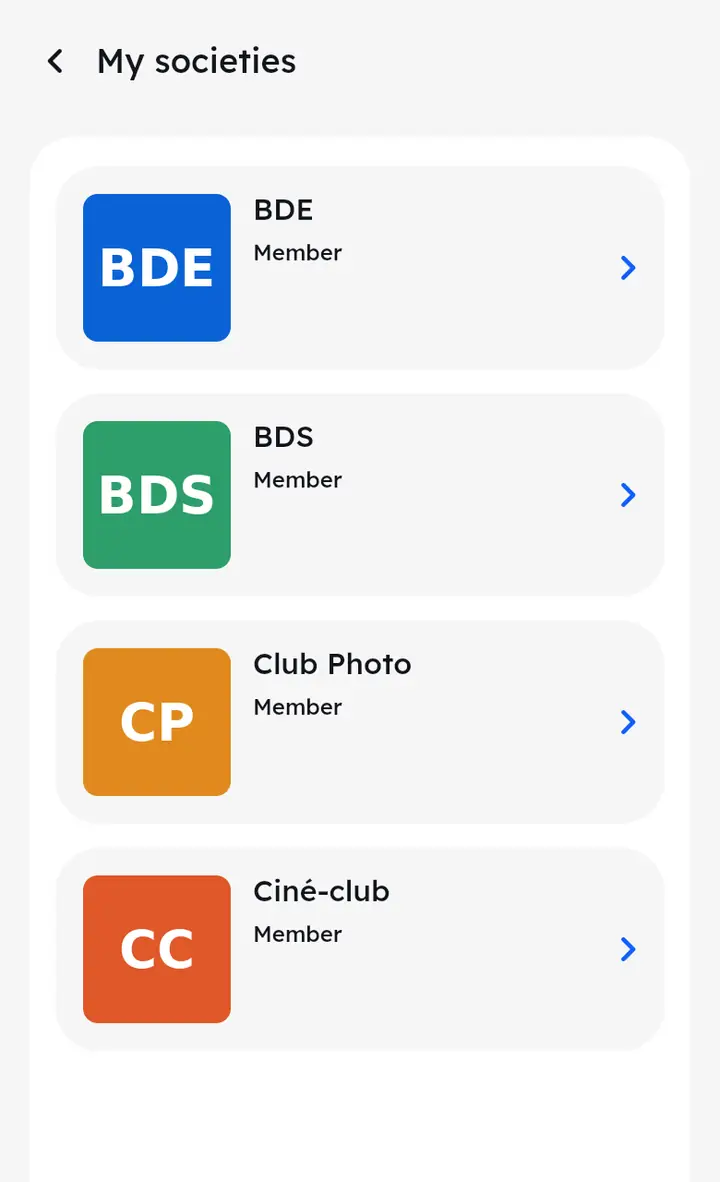
Profile > My Societies > See all.
“My societies” lists the ones you follow, with your role when you have one. Tap a society to open its page; the profile's “Add” button leads to all the school's societies.
Where can I see my memberships?
Settings > My memberships.
“My memberships” shows each membership: the society, the plan, the price, the expiry date and its status (“Up to date” or expired). Membership is taken out from the society's page, if it offers one.
How do I get my grant status recognised?
Upload your proof: your school checks it.
- In Settings, tap “Statut boursier”.
- Upload your Crous grant notice, or any official document proving your status for the current year.
- Your school checks the document; you're told of its decision.
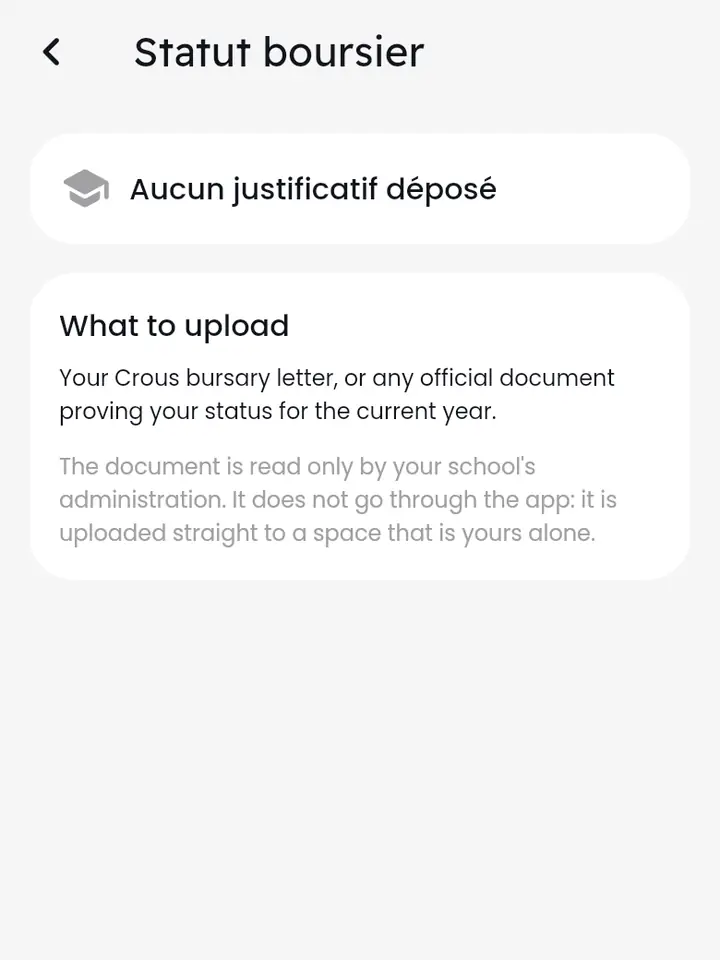
Once approved, the grant-holder price is applied automatically on events that offer one. The document is only read by your school's administration.
Settings
Colour, theme, language, text size, privacy, linked accounts, deleting your account.
Where are the settings?
The gear on your profile.
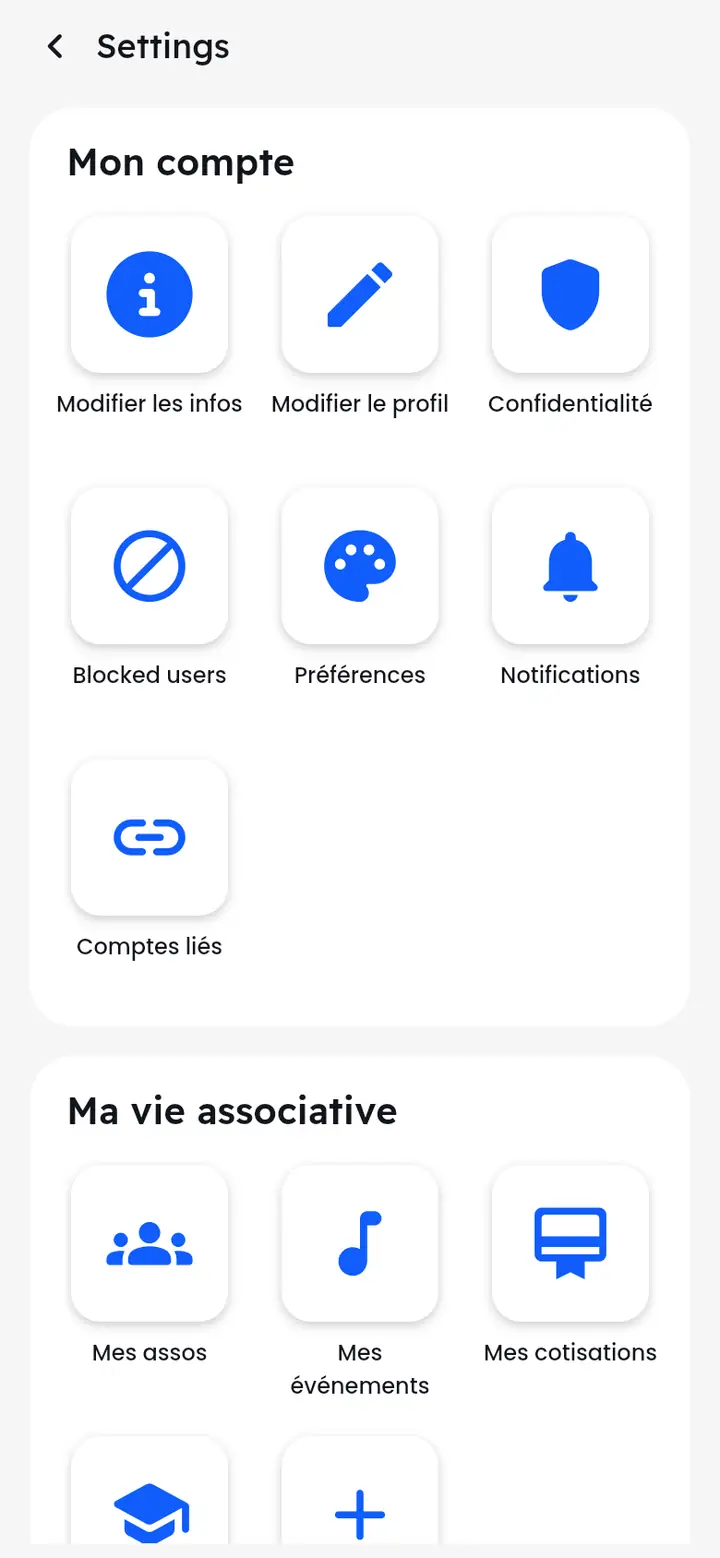
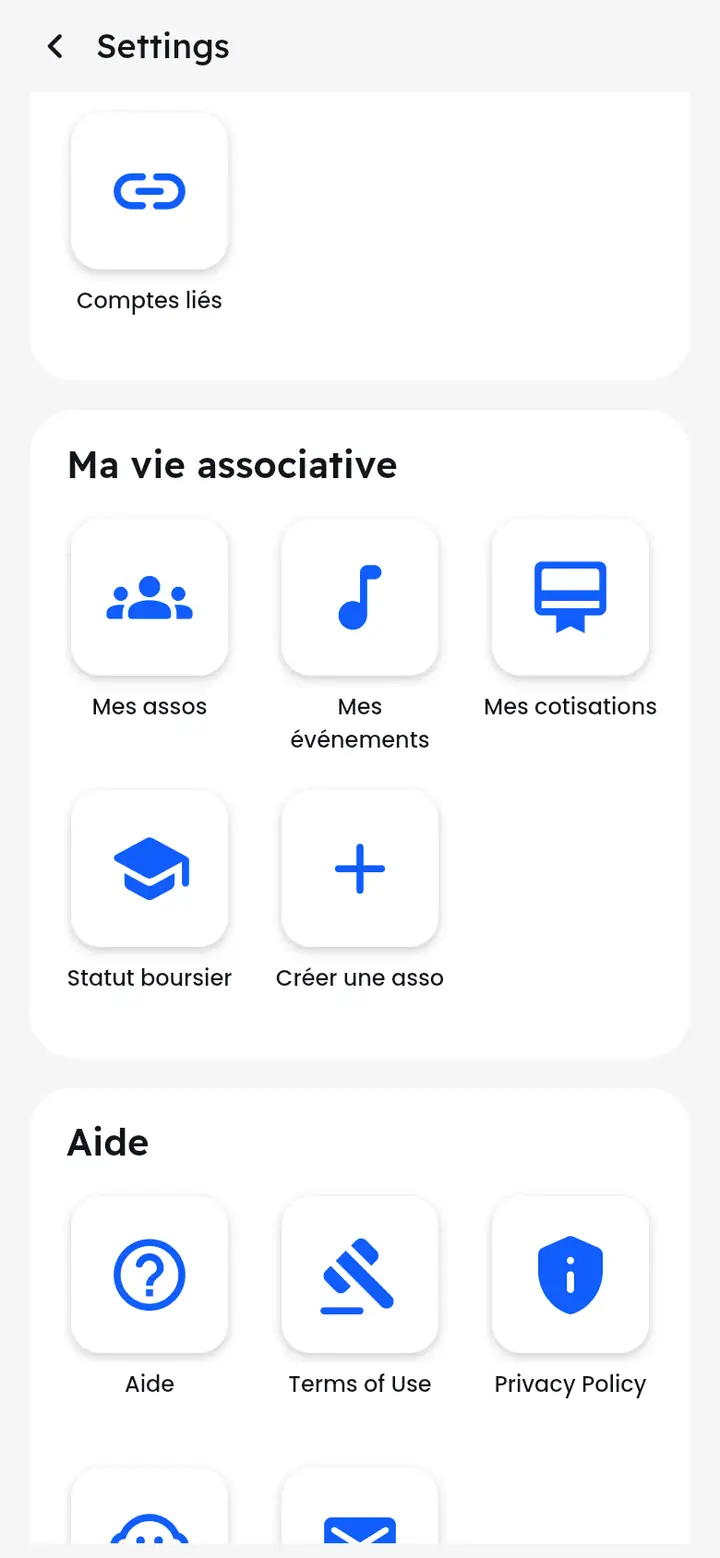
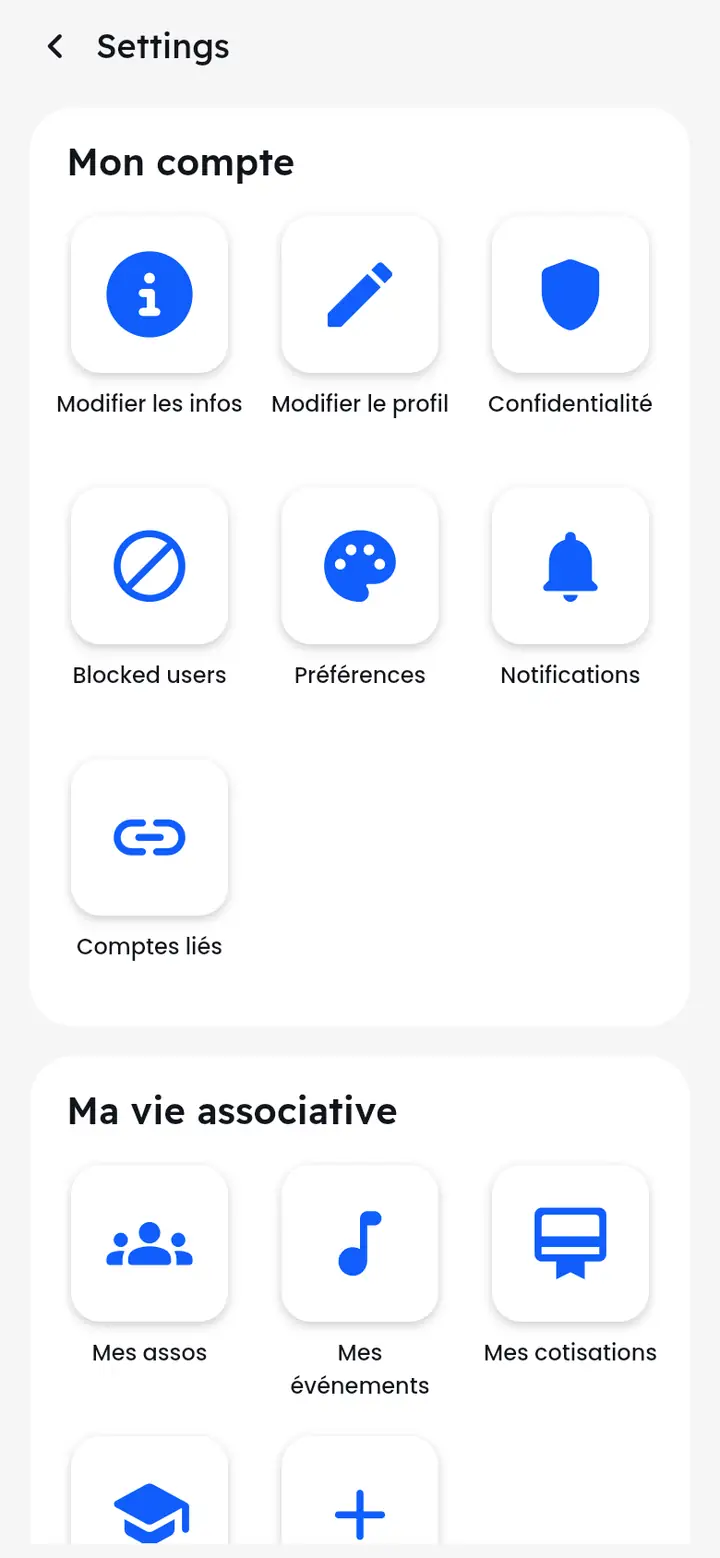
In your profile, tap the gear. “Settings” are grouped into sections: “Mon compte” (details, profile, privacy, blocked users, preferences, notifications, linked accounts), “Ma vie associative” (my societies, my events, my memberships, grant status, create a society), help and legal documents, and at the very bottom “Sign out”.
Change the colour, theme, language or text size
Settings > Preferences.
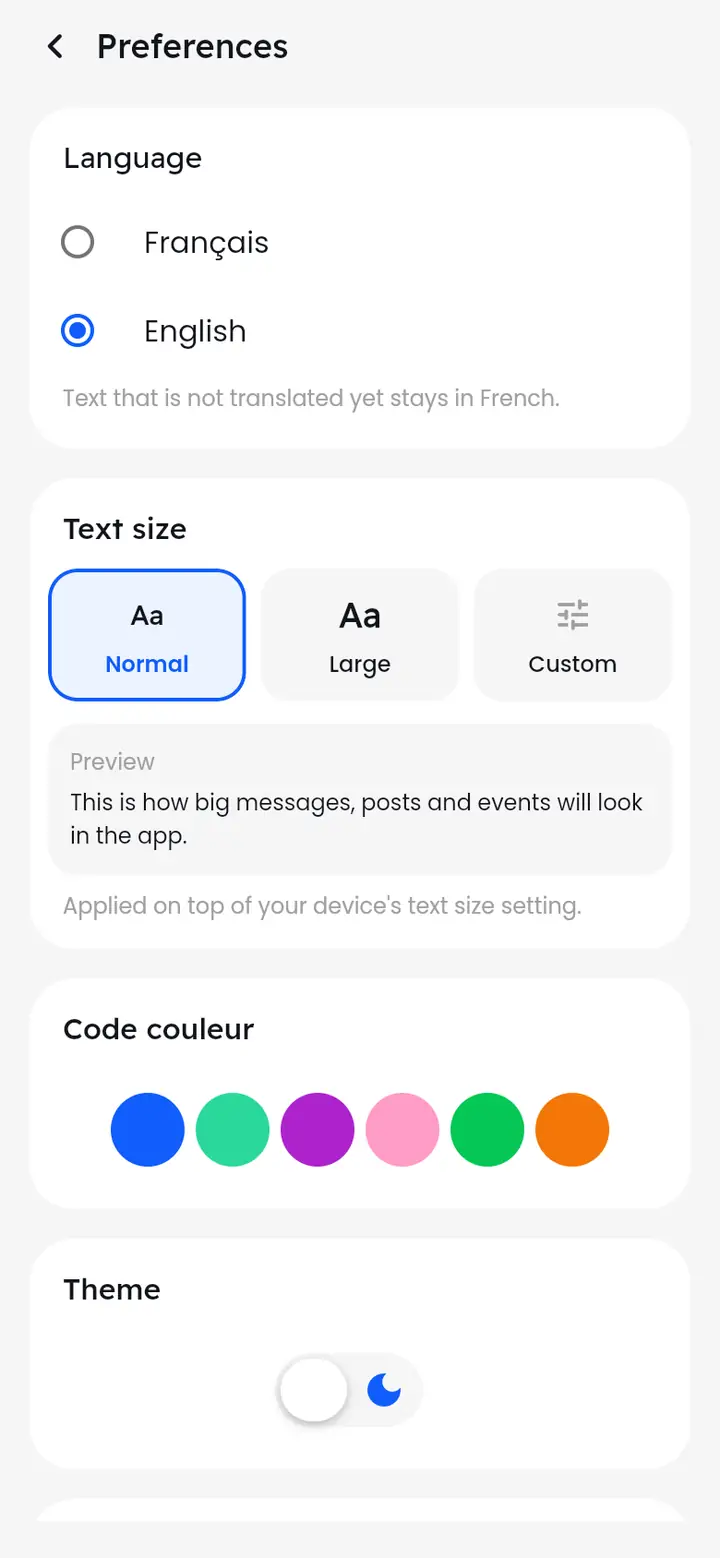
In Settings, tap “Preferences”:
- “Language”: “Français” or “English”. Text not yet translated stays in French.
- “Text size”: “Normal”, “Large” or “Custom”; the preview shows the result. This setting adds to your device's own.
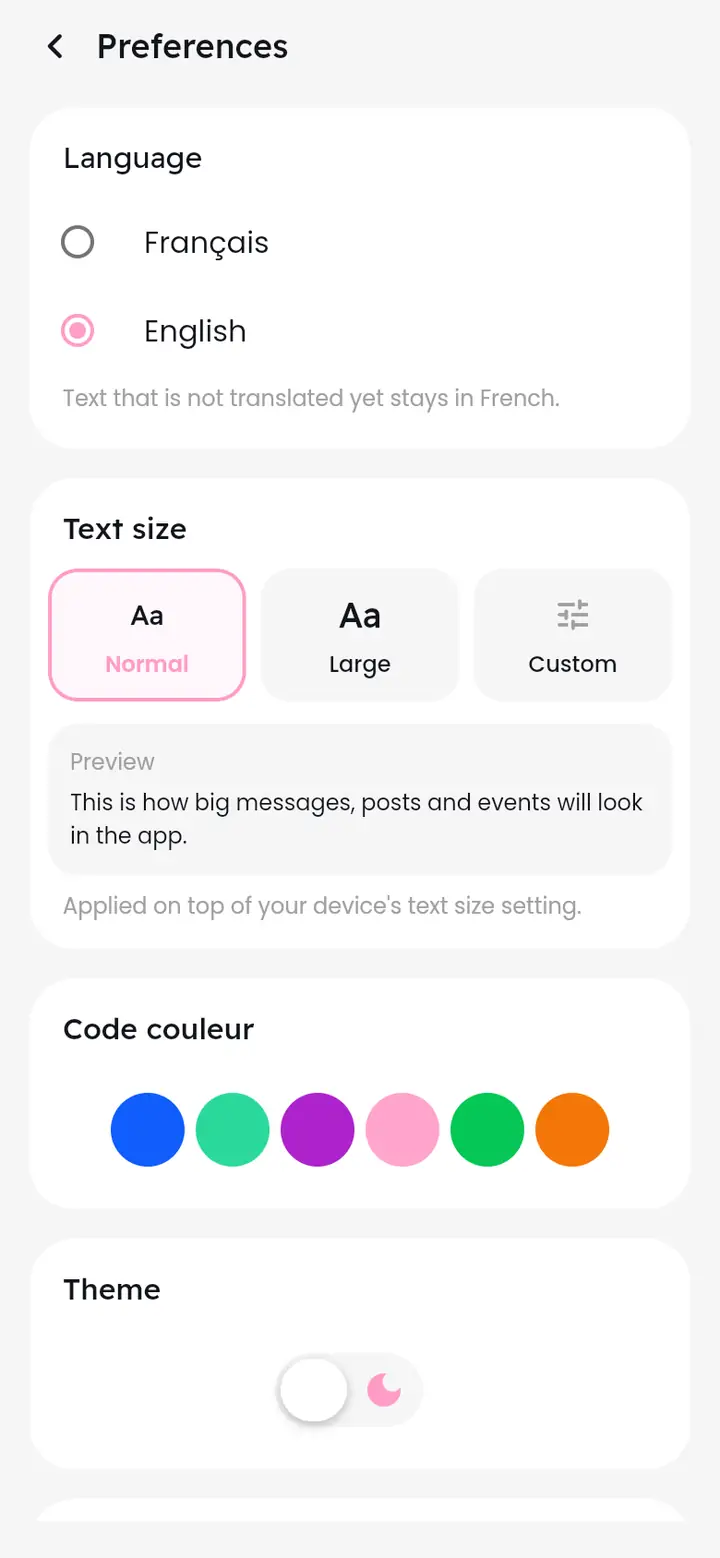
- “Code couleur”: the app's accent colour (buttons, icons, badges). Tap a dot: the whole screen switches at once.
- “Theme”: light or dark.
Who can see my societies and events?
Settings > Privacy.
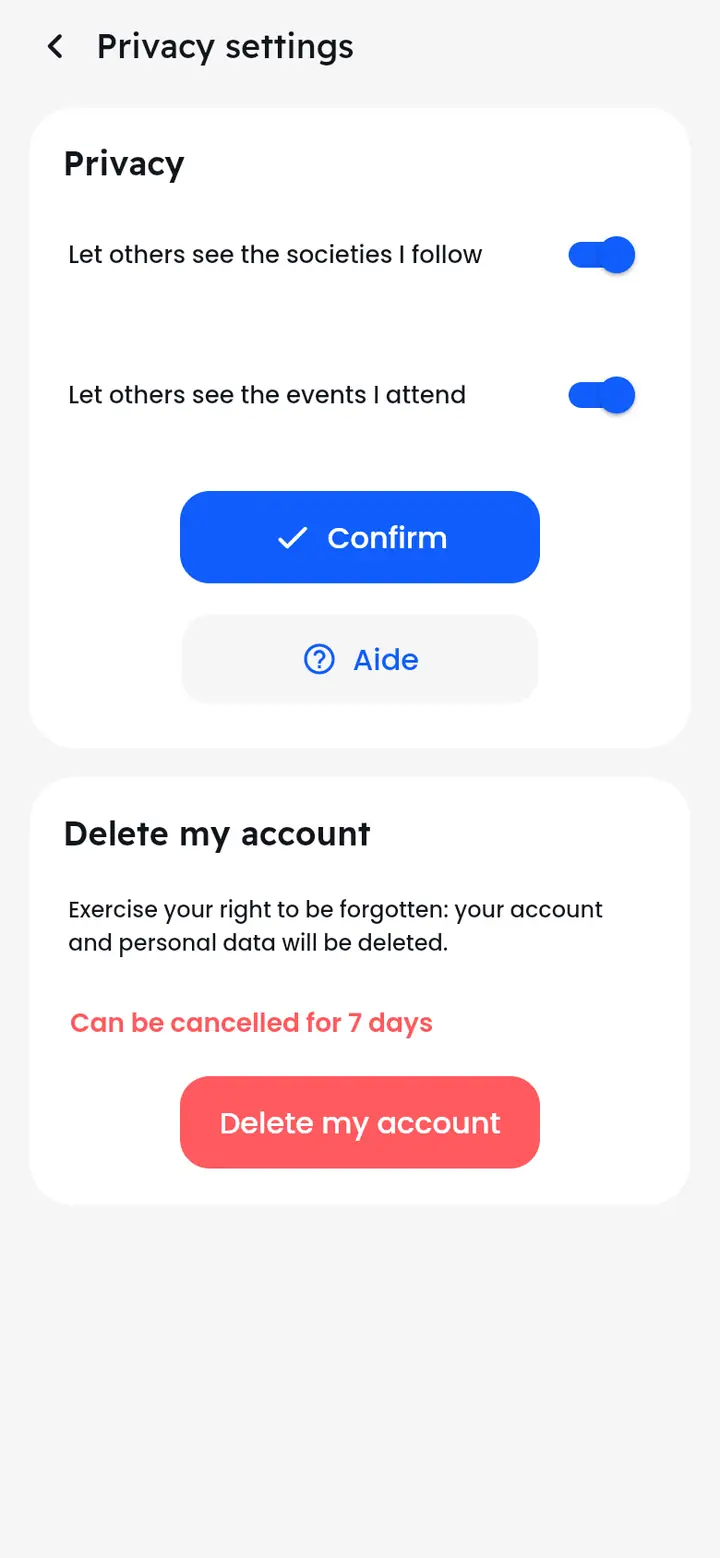
In Settings, tap “Privacy”. The switches decide whether others see, on your profile, the societies you follow and the events you take part in. Tap “Confirm” to save.
How do I turn on notifications on my phone?
Settings > Notifications.
In Settings, tap “Notifications”, then “Turn on notifications” and accept your phone's prompt. TeleChat then tells you about messages, confirmed tickets, places freeing up and announcements from your societies.
Link my Google or Apple account
To sign in faster, without a password.
In Settings, tap “Linked accounts”, then “Link a Google account” or “Link an Apple account” depending on what your device offers. You can then sign in with that account. A linked account is removed from the same screen.
How do I delete my account?
Settings > Privacy > Delete my account.
- In Settings > “Privacy”, tap “Delete my account”.
- Choose: “Delete in {0} days (can be cancelled)” or “Delete now”.
With the delay, your profile is hidden straight away and you can cancel by signing in again before the date. Immediate deletion can't be undone. Either way, your tickets and payments are kept anonymously for the societies' accounts.
Reporting and blocking
Report content or a person, block someone.
How do I report content or a person?
Post, comment, message or profile: anything can be reported.
- A post or a comment: the “⋮” menu, then “Report”.
- A message: long press on it, then “Report”.
- A person: “Report” at the top of their profile.
Choose a reason (“Offensive content”, “Harassment”, “Spam or scam”, “Sexual content”, “Child safety / child abuse”, “Other”), add details if you wish, then “Send report”.
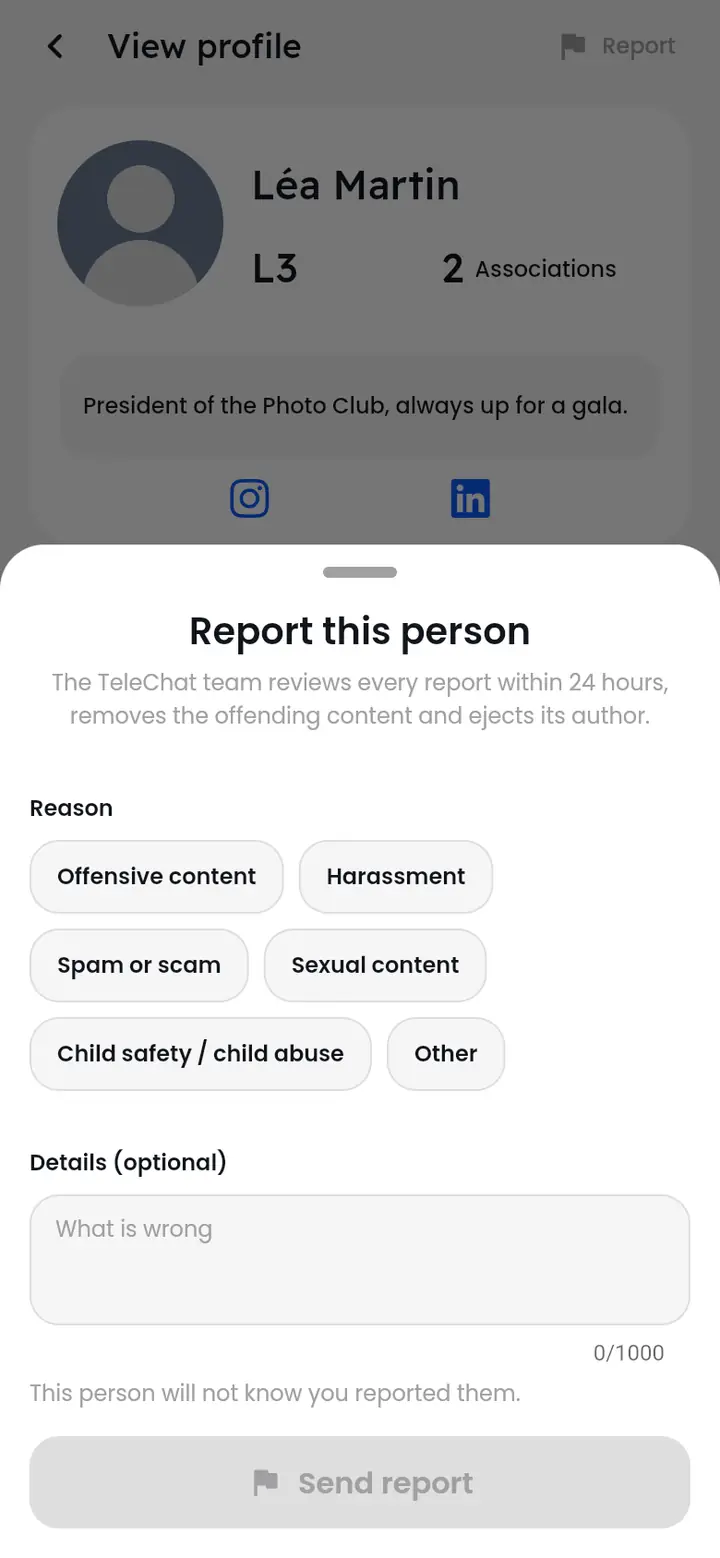
The person doesn't know you reported them. The TeleChat team reviews every report within 24 hours, removes the content concerned and excludes its author if it breaks the terms of use.
How do I block someone?
From their profile, a conversation, a post or a message.
Tap “Block {0}” on their profile (or in a post's or a message's menu, or with a long press on the conversation), then confirm with “Block”.
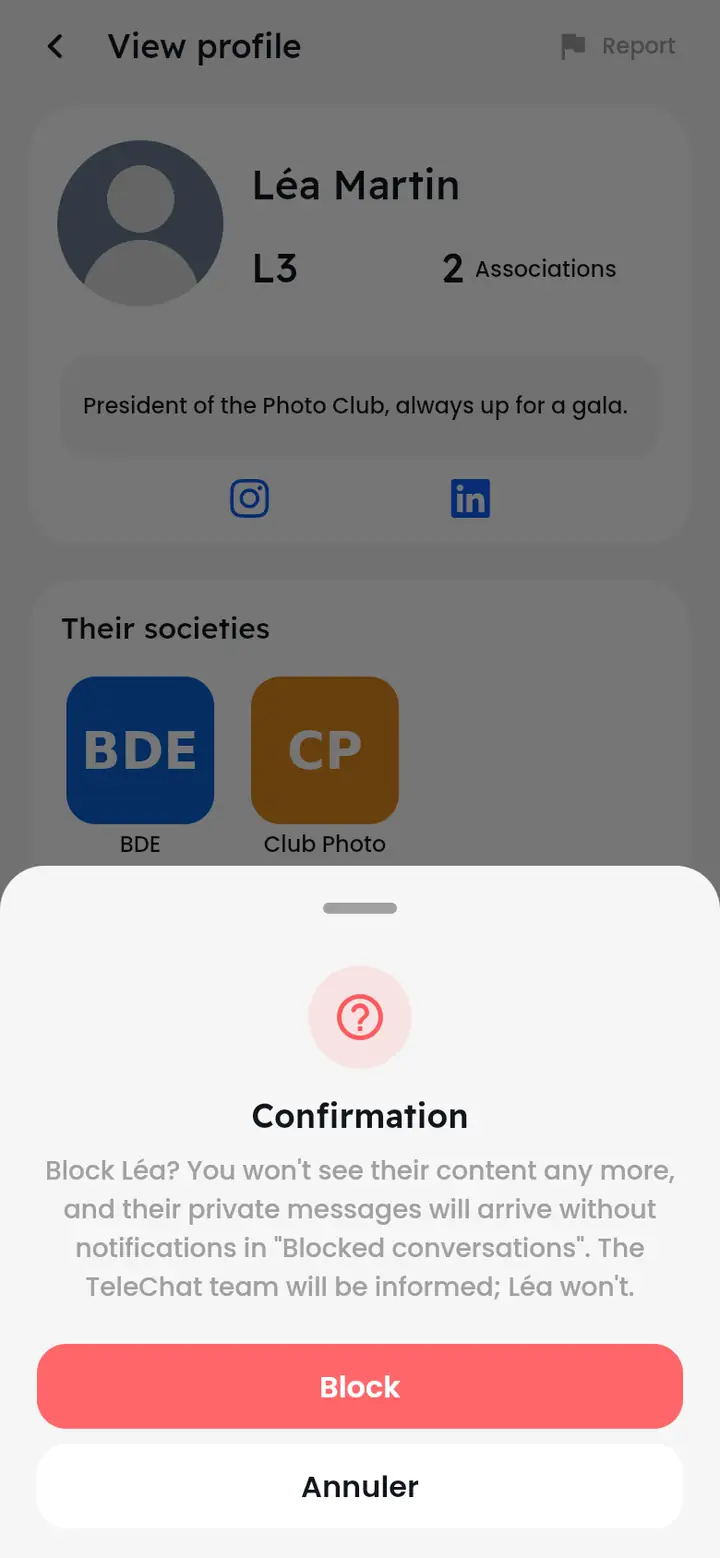
You no longer see their content, and their private messages arrive without notification in “Blocked conversations”, at the bottom of the “Chat” tab. They don't know you blocked them; the TeleChat team is informed.
Where can I find the people I've blocked?
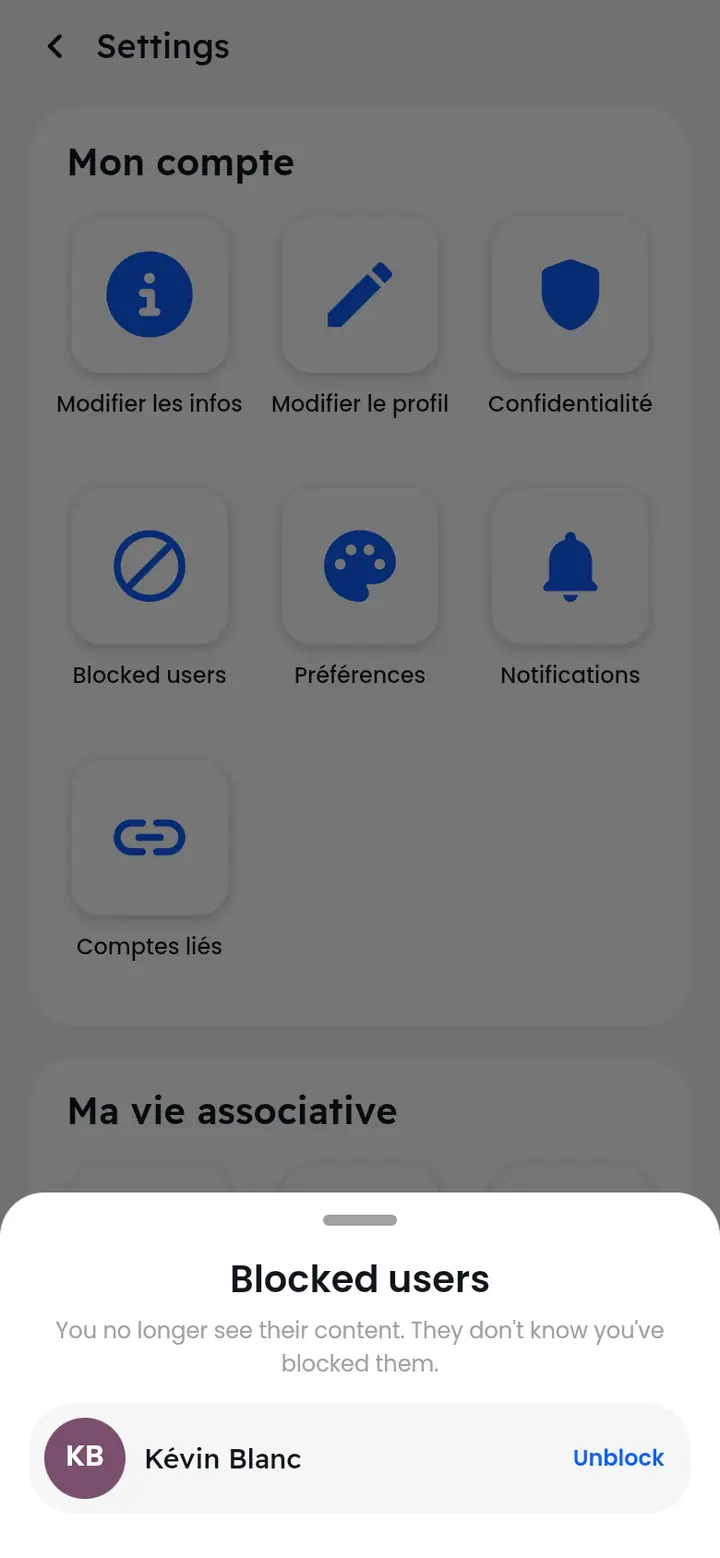
Settings > Blocked users.
In Settings, tap “Blocked users”: the list appears, with “Unblock” next to each name.
My account is “read-only”: what does that mean?
A temporary restriction set by the school or the TeleChat team.
A banner shows it at the top of the screen, with the end date. Meanwhile you can browse everything and book events, but no longer post, comment or send messages. If your account is excluded, the app tells you when you sign in and offers to contact us.
Help
Chat with support, e-mail the team, bugs, this guide.
Where is Help?
Settings > Help.
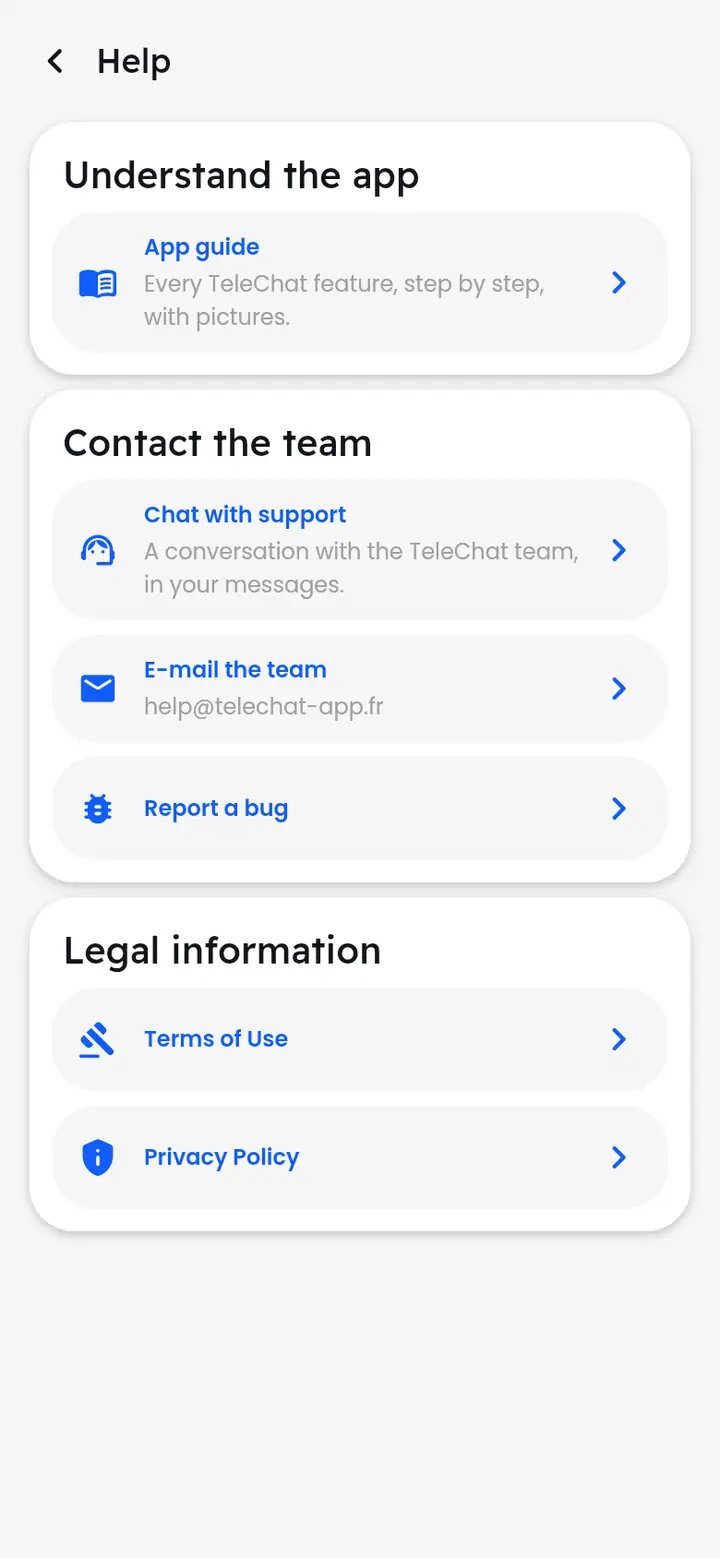
In Settings, Help section, tap “Aide” (the question mark). The society, event and school admin screens also lead there (“Need help?”). You'll find:
- “App guide”: this guide.
- “Chat with support”: a conversation with the TeleChat team.
- “E-mail the team”: an e-mail to help@telechat-app.fr.
- “Report a bug”: a pre-filled e-mail to describe the problem.
- The “Terms of Use” and the “Privacy Policy”.
How do I chat with support?
A private thread with the whole TeleChat team, in your messages.
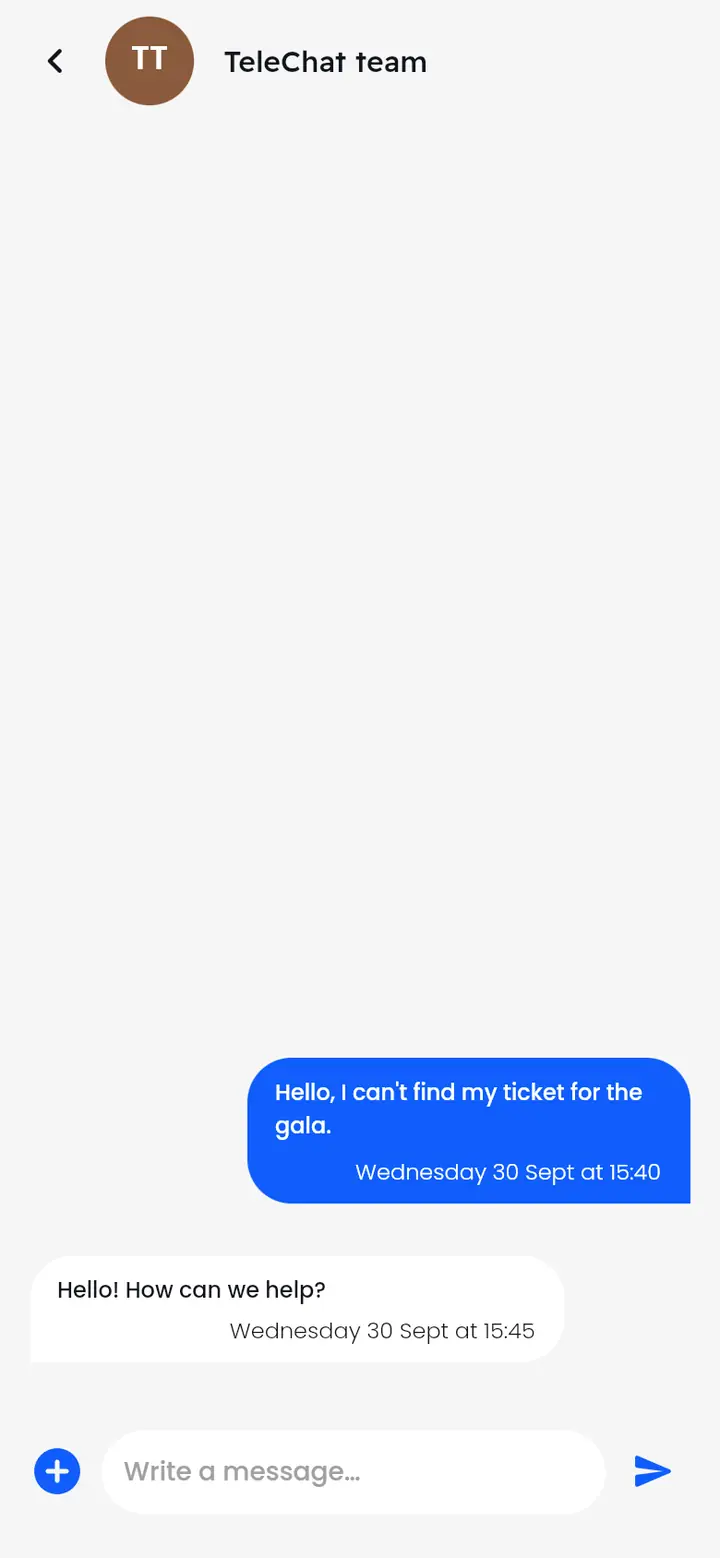
Tap “Chat with support”: the “TeleChat team” conversation opens (or reopens if it already exists). Write your question: the whole team sees it and answers you here. You'll find this thread in the “Chat” tab of your messages.
E-mail the team, report a bug
help@telechat-app.fr
“E-mail the team” opens your mail app on help@telechat-app.fr. “Report a bug” does the same with the subject “Rapport de bug”: describe the problem as precisely as you can (screen, what you were doing), and attach screenshots if you can. If no mail app responds, the address is copied so you can paste it wherever you like.
How do I use this guide?
Chapters by topic, a search, screenshots.
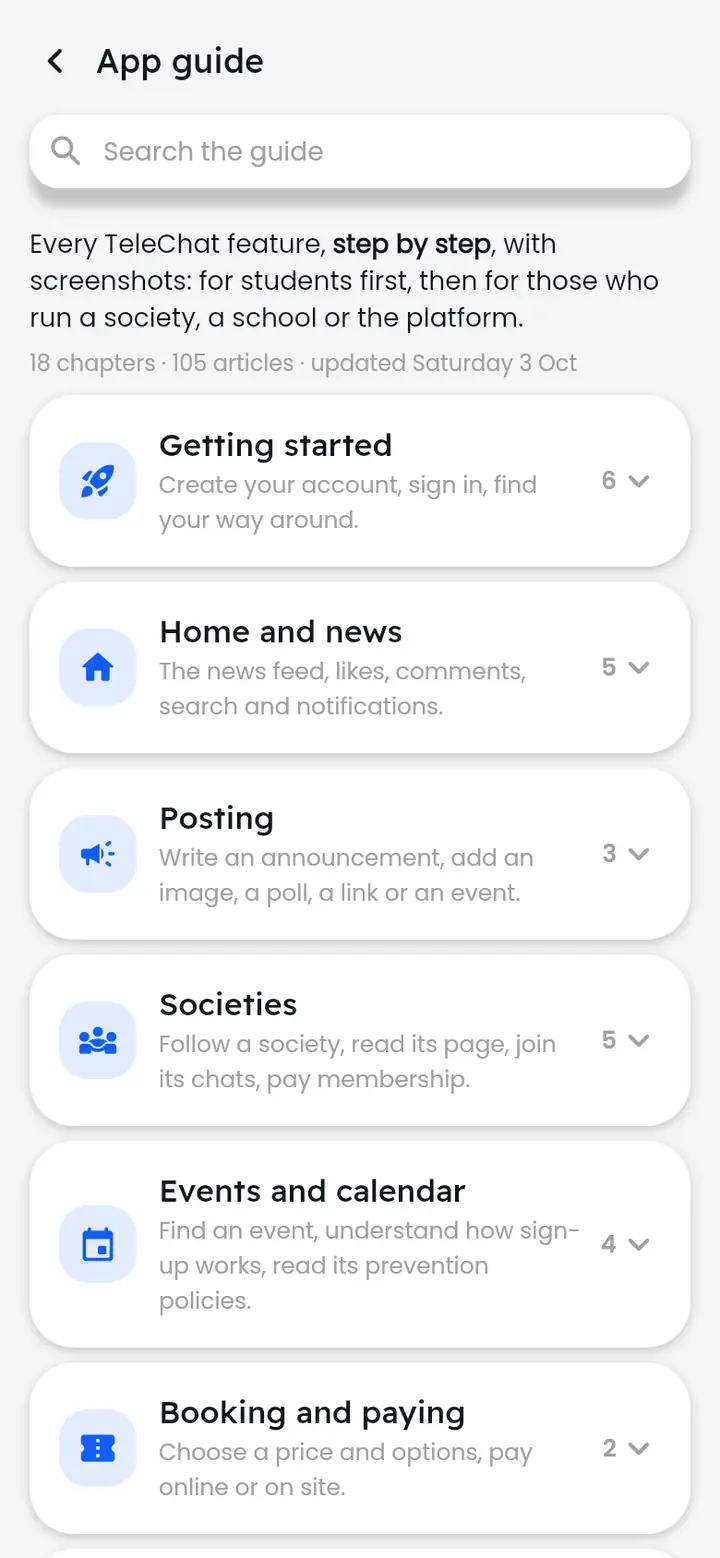
Chapters open onto their articles; the “Search the guide” bar finds an article from a word. The guide and its images download when you read them: you need a connection, but nothing clutters your phone, and the guide is always up to date.
Running a society
For a society's admins and managers: page, members, moderation, posts.
How do I open my society's admin?
The dashboard: to-do, upcoming events, shortcuts.
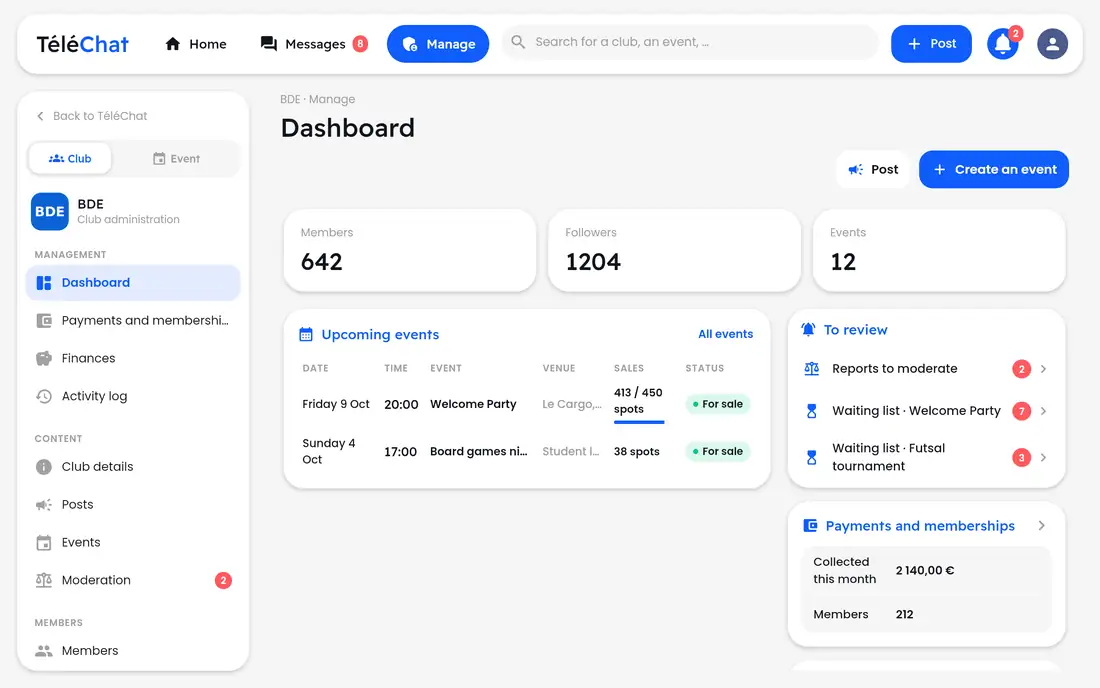
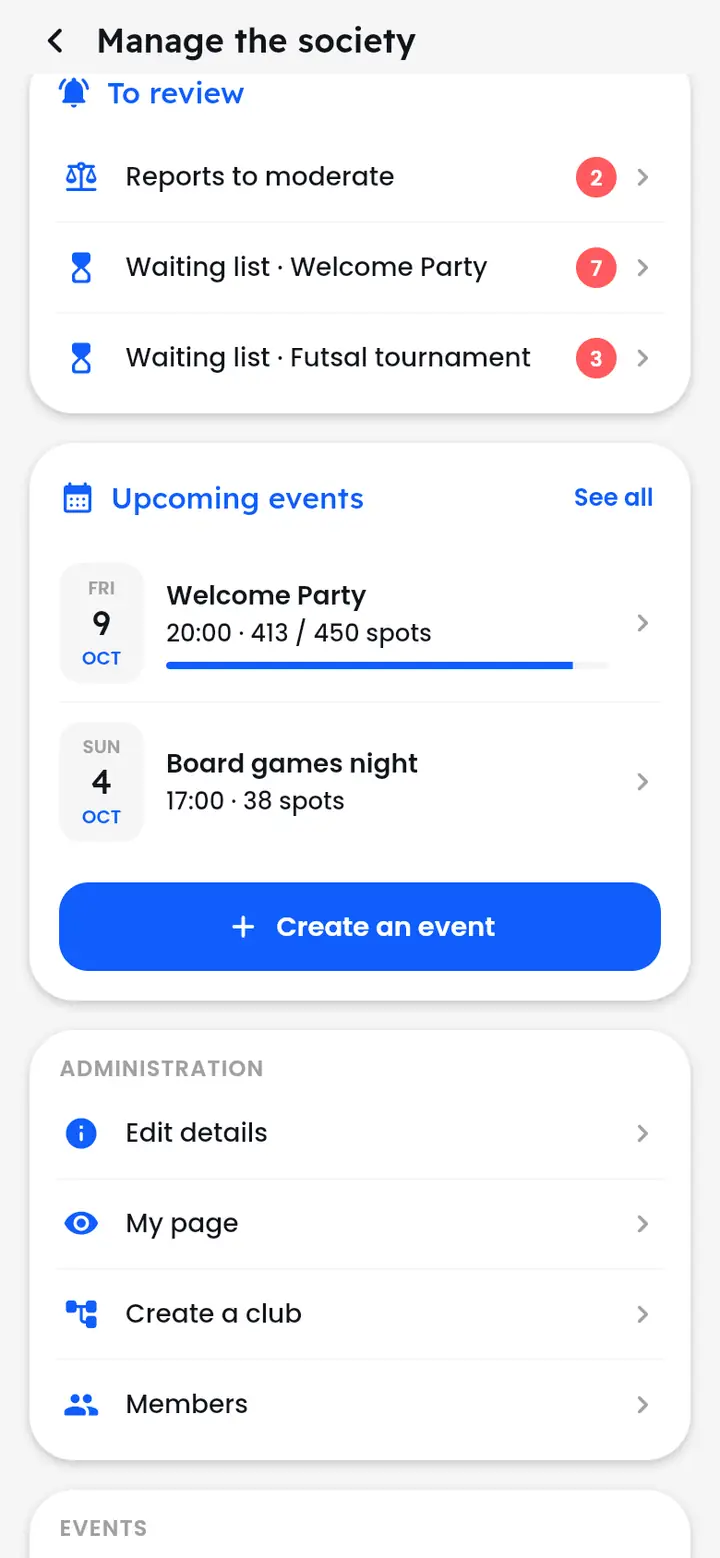
On your society's page, tap the “Admin” button (or the admin icon at the top): it only appears to those allowed to run it.
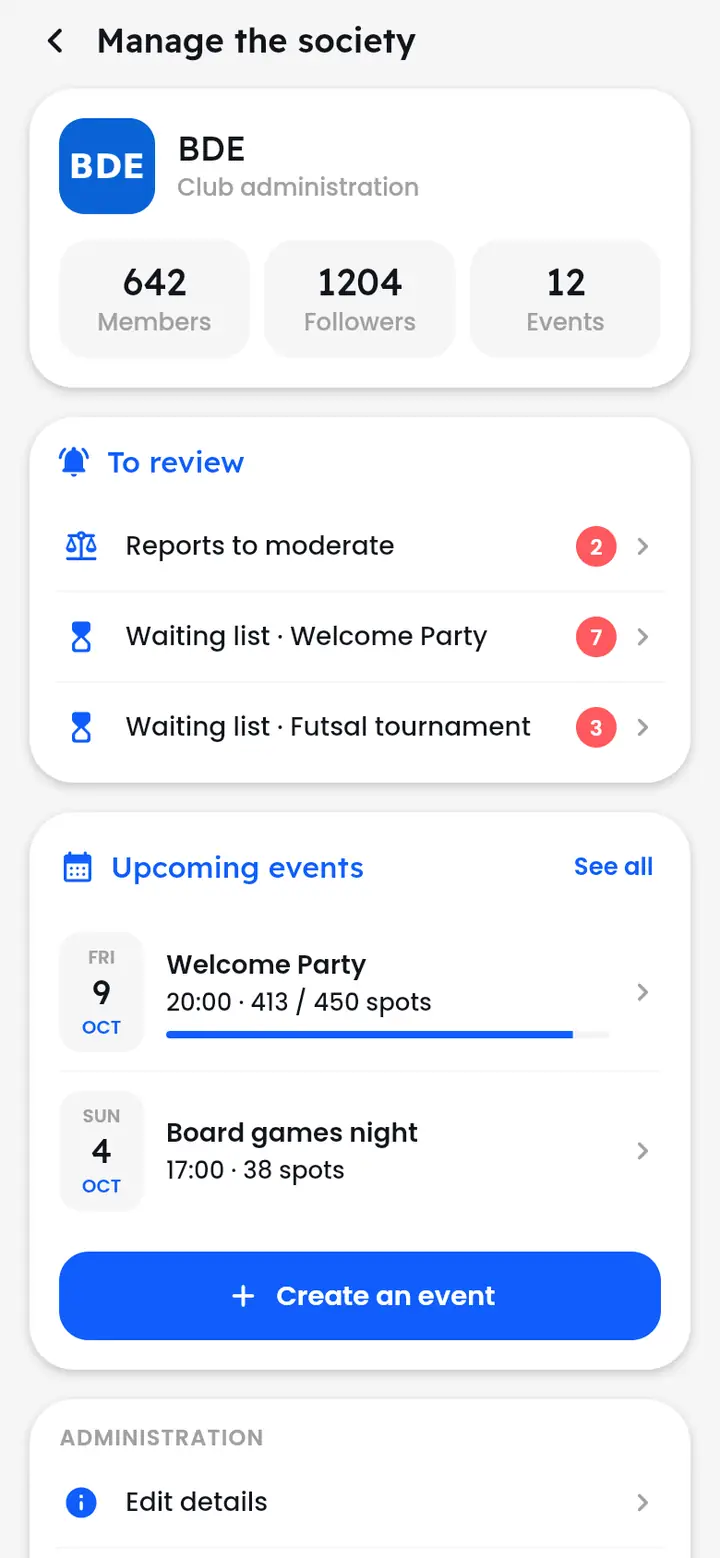
“Manage the society” shows:
- key figures (members, followers, events);
- “To review”: reports to moderate, waiting lists and applications in progress;
- “Upcoming events” and their sales, with “Create an event”;
- admin shortcuts: details, page, clubs, members, events, blacklist, posts, moderation, money, log.
Admin, manager, member: who can do what?
A society's roles.
A society has admins (all rights, including appointing other admins), managers (they help day to day: events, posts, ticketing), paying members and members. Independently of the role, someone can be a board member, with a title (president, treasurer…) shown on the board page.
How do I manage members and roles?
Manage members: add admins and managers, edit, revoke.
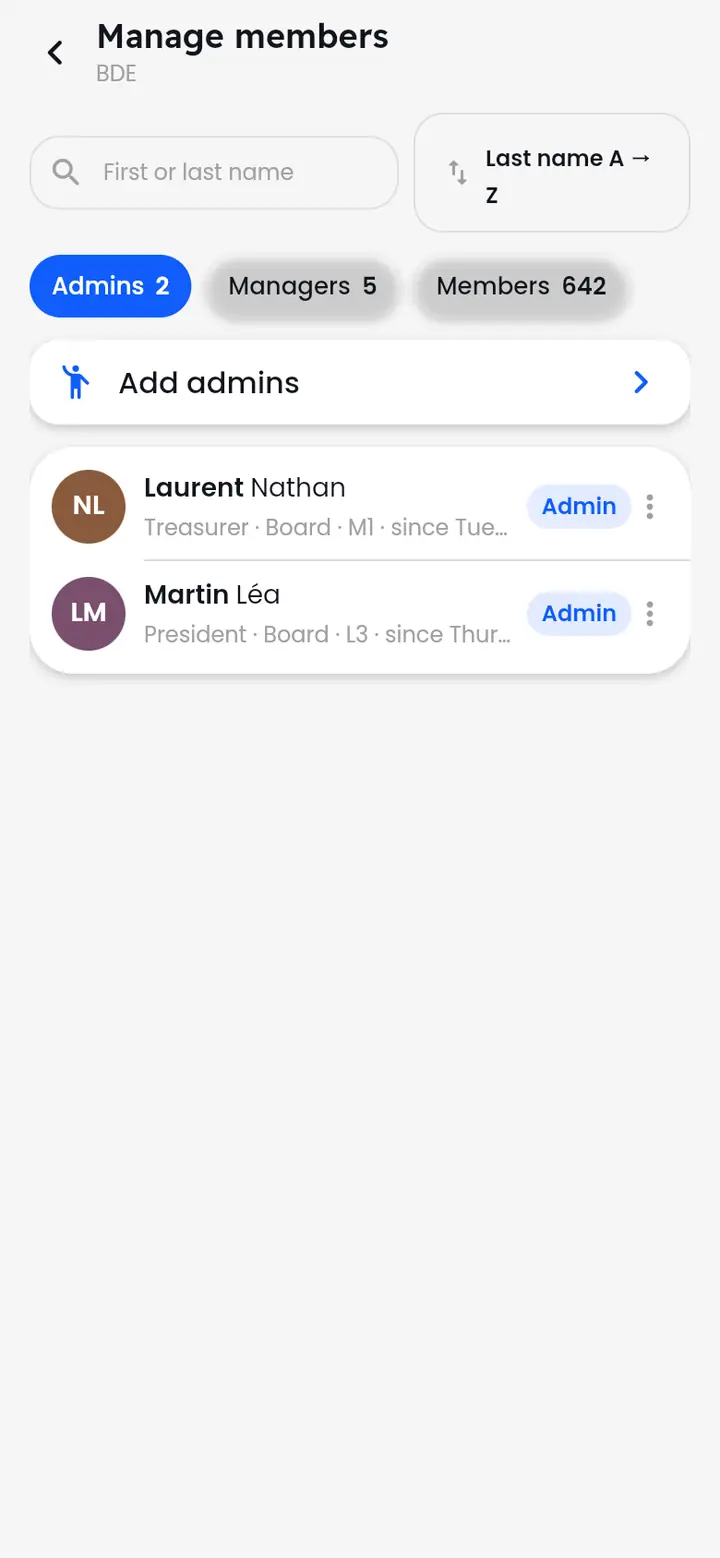
- In admin, tap “Members”.
- The “Admins”, “Managers” and “Members” tabs separate the roles; search and sorting help find someone.
- “Add admins” (or “Add managers”): search for the person and confirm.
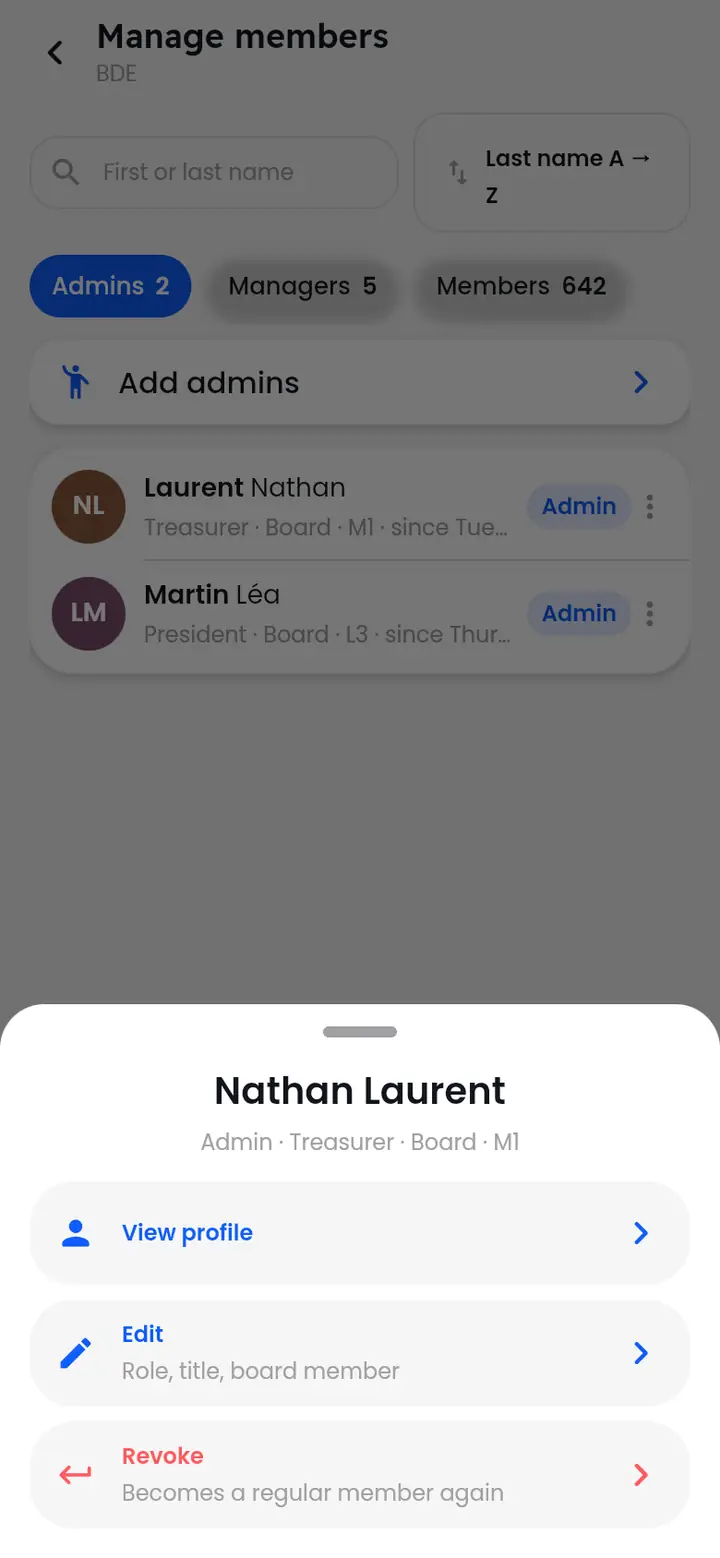
- A person's three dots: “View profile”, “Edit” (role, title, board member) or “Revoke” (they go back to plain member).
Edit the society's details and page
Logo, name, location, description, and what your page shows.
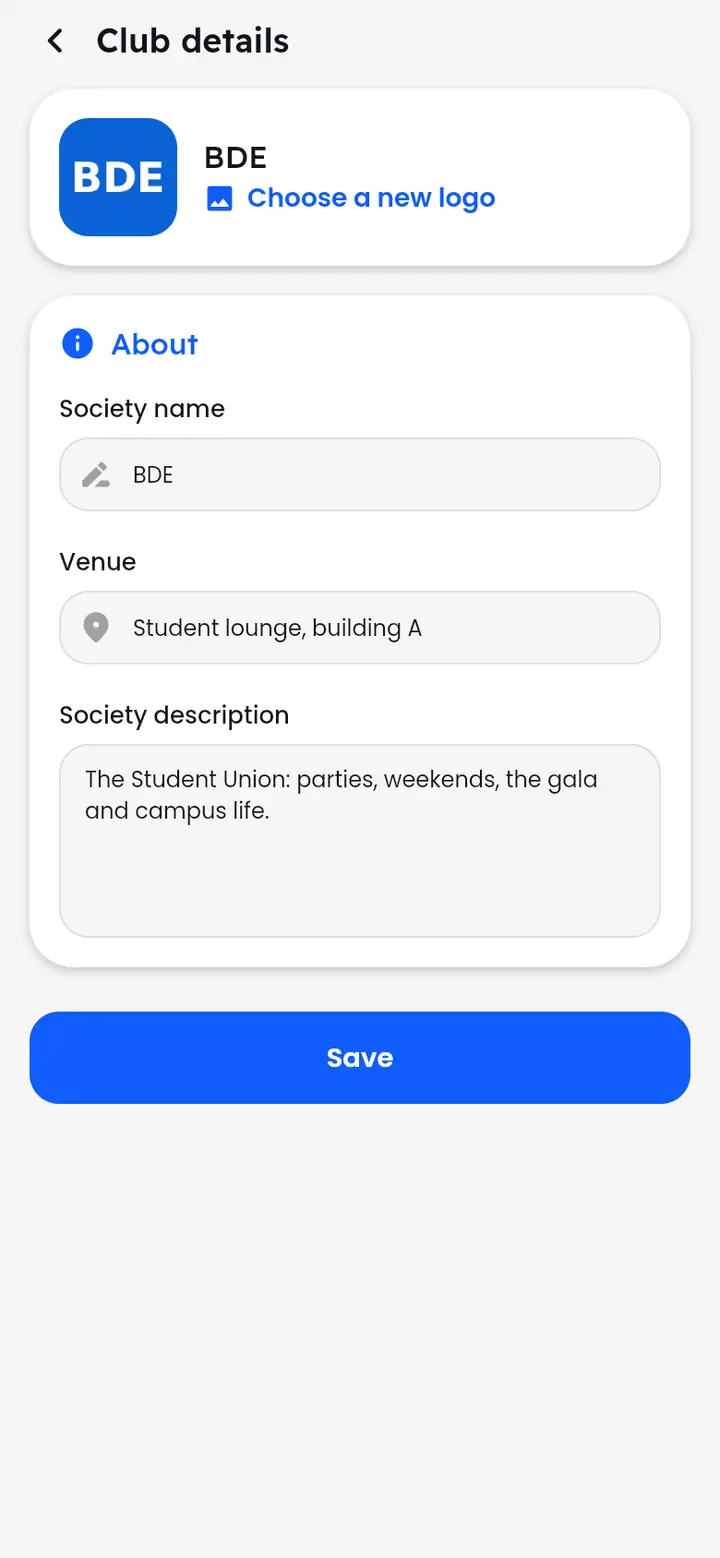
“Edit details”: change the logo (“Choose a new logo”), the name, the location and the description, then “Save”.
“My page” sets what your public page shows: tick the blocks to display (founding date, number of members, photos…); the order of the ticked blocks is the page's order.
Post on behalf of the society and manage its posts
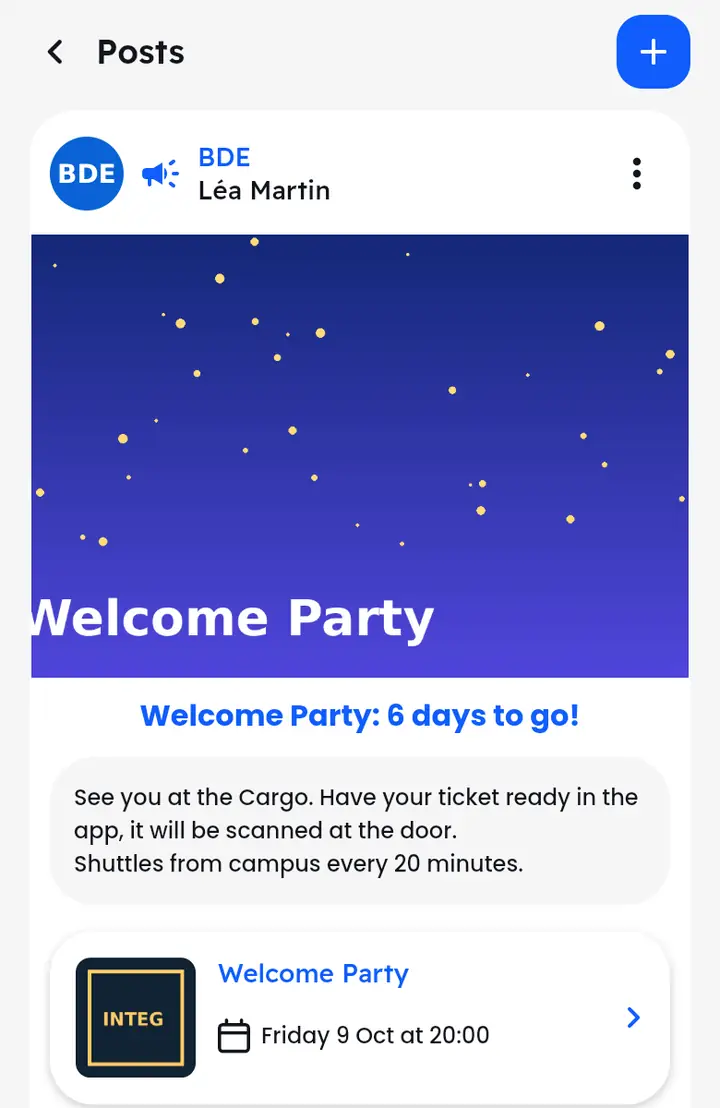
The + in the bottom bar, or Posts in admin.
In the editor (the +), choose your society at the top instead of “Moi”. The chip on the right sets the audience: the whole school, or members only. “Posts” in admin lists all the society's posts; their “⋮” menu lets you edit or delete them.
How do I moderate reports?
The moderation queue: remove, keep, or blacklist.
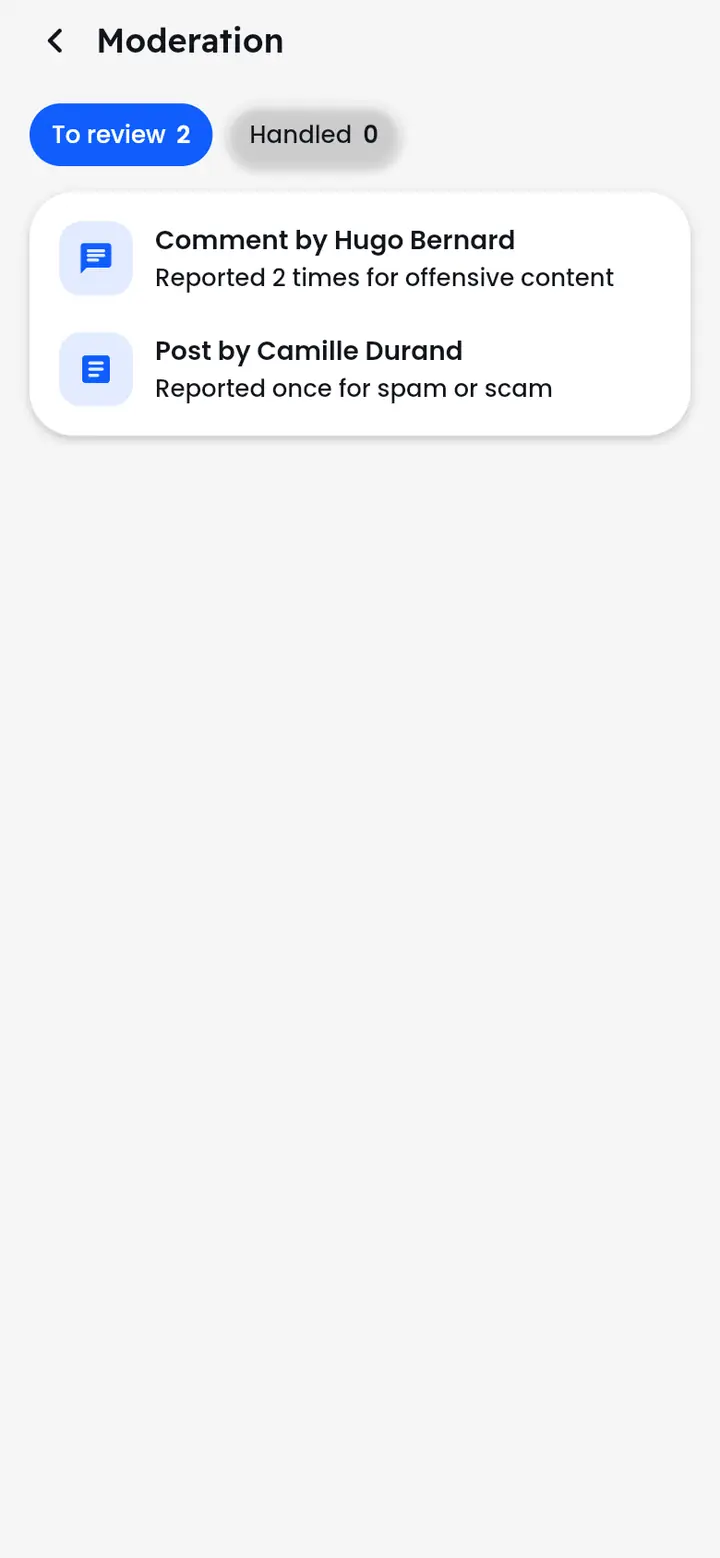
“Moderation” lists the reported posts and comments in your society (“To review”, then “Handled”). Tap a report: you see the content, the reason and who reported it. “What to do?” offers to remove the content, keep it (“All clear, keep”), or blacklist its author.
How do I blacklist someone?
For a while or permanently: they can no longer sign up for your events.
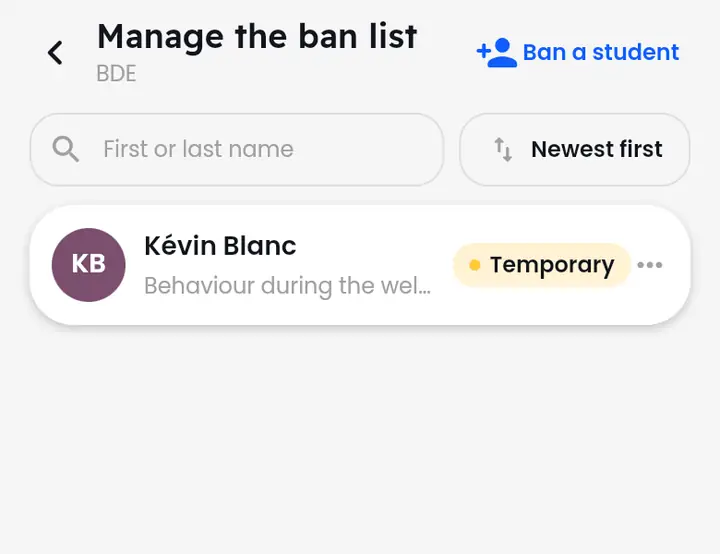
“Blacklist” in admin: “Ban a student” at the top right, choose the person, the duration (temporary or permanent) and the reason. The person leaves the society and can no longer sign up for your events. A row's three dots let you “Restore” them.
How do I create a club?
A club attached to your society.
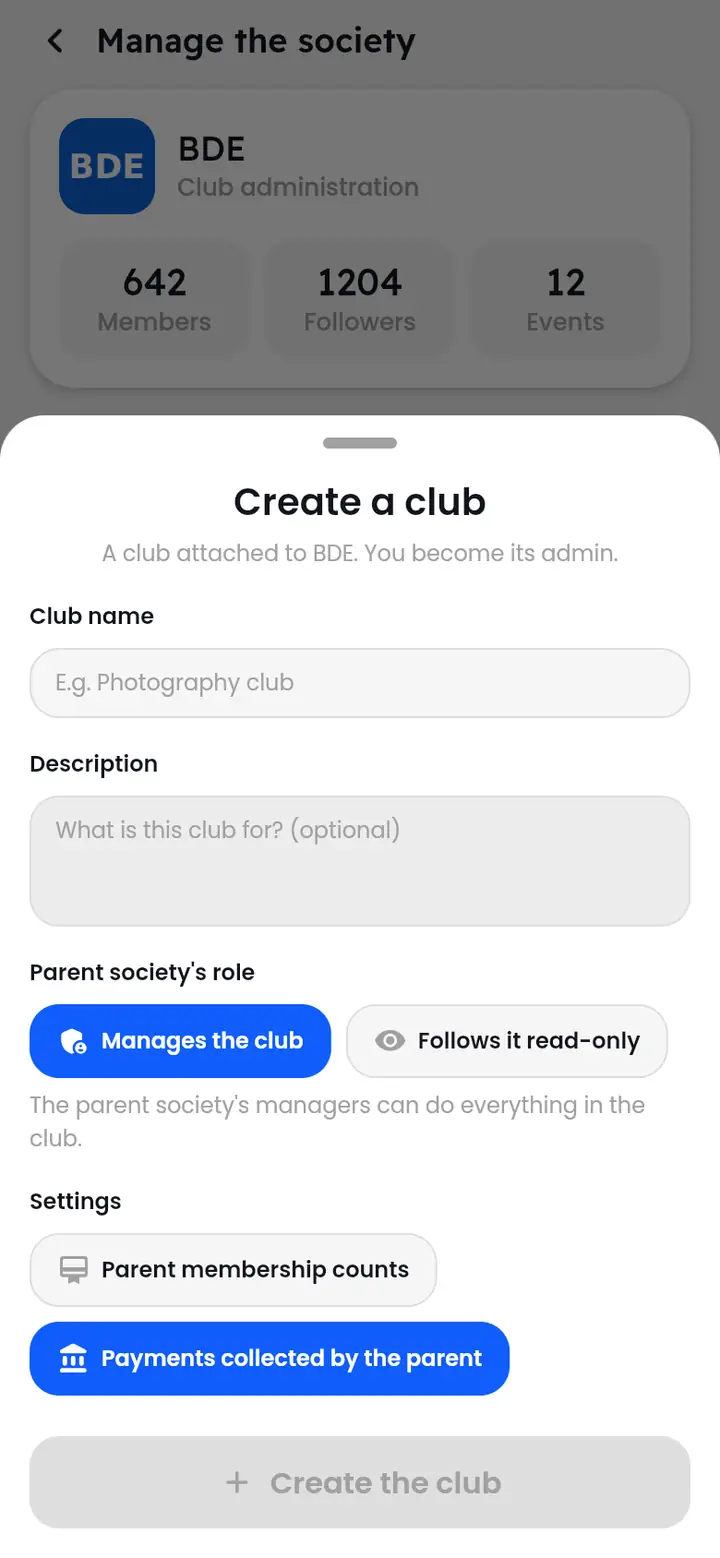
“Create a club” in admin: give a name and a description, then choose the parent society's role: “Manages the club” (its leaders can do everything there) or “Follows it read-only”. Possible settings: the parent's membership is valid for the club, and the club's payments are collected by the parent. You become the club's admin.
Create a chat for the society
The Chats tab on the society's page.
On the society's page, “Chats” tab, tap “Create a group”: choose a picture, a name and who has access. The members and followers concerned see it in the “Clubs” tab of their messages and can join it.
Who did what? The activity log
Every admin action, dated.
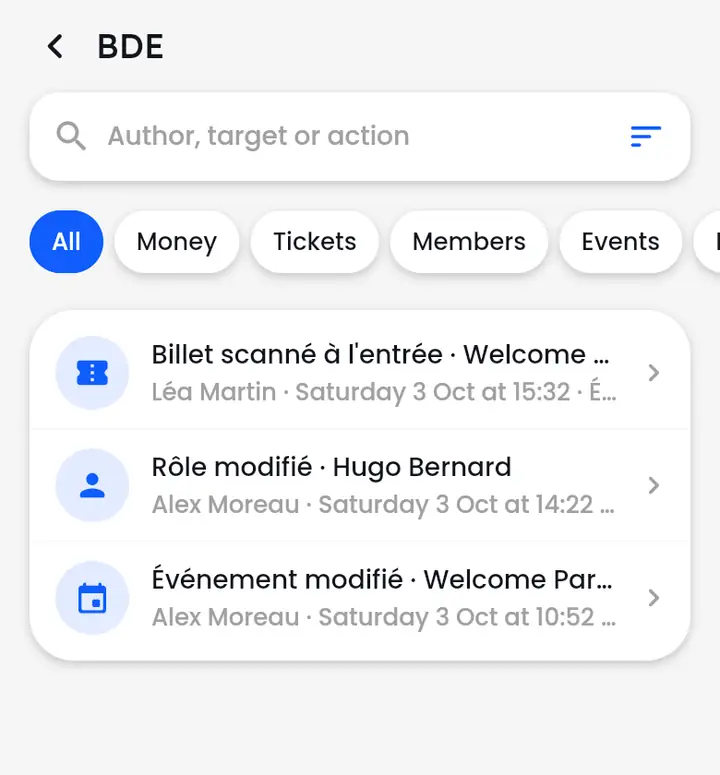
“Log” in admin lists the actions taken in the society: roles changed, events edited, money, tickets, members… Search by author, target or action, and filter by family (“Money”, “Tickets”, “Members”, “Events”…).
Money: payments, memberships, finances
Take online payments, offer membership, track the society's money.
How do I turn on online payments?
The society's Stripe account, and the accepted payment methods.
In admin, “Payments and memberships” > “Online payment”: “Activer les paiements en ligne” starts the society's Stripe sign-up (identity, company number, bank details). Once approved, ticket and membership money goes straight to the society's account, minus the TeleChat commission shown.
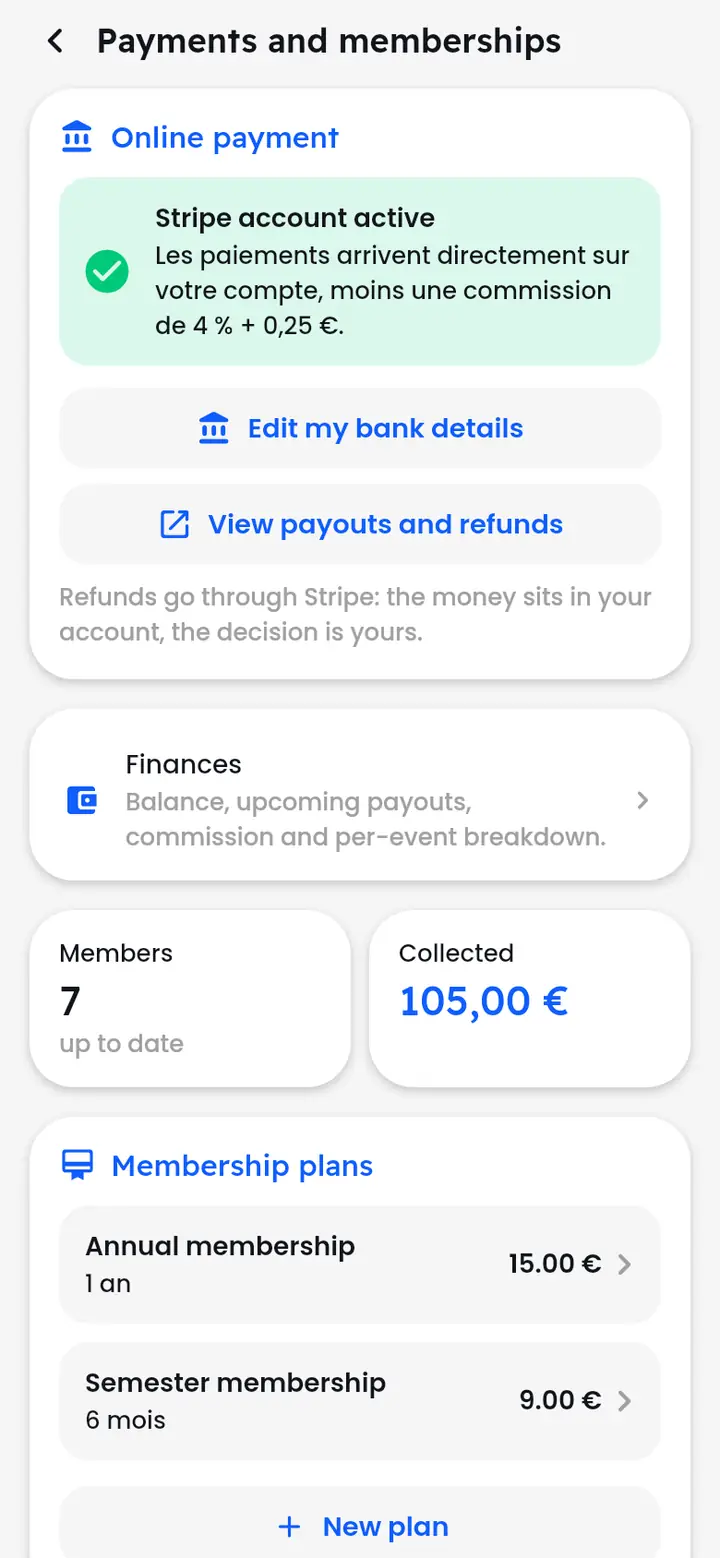
A club can choose to receive money “To the parent society's account” (if it has no company number or bank account of its own) or “To the club's own account”. Further down, “Ticket payment” decides what the society accepts: “Cash, at the society” and/or “Online”. Refunds are made from the Stripe space (“View payouts and refunds”).
How do I offer membership?
Membership plans: name, price, duration.
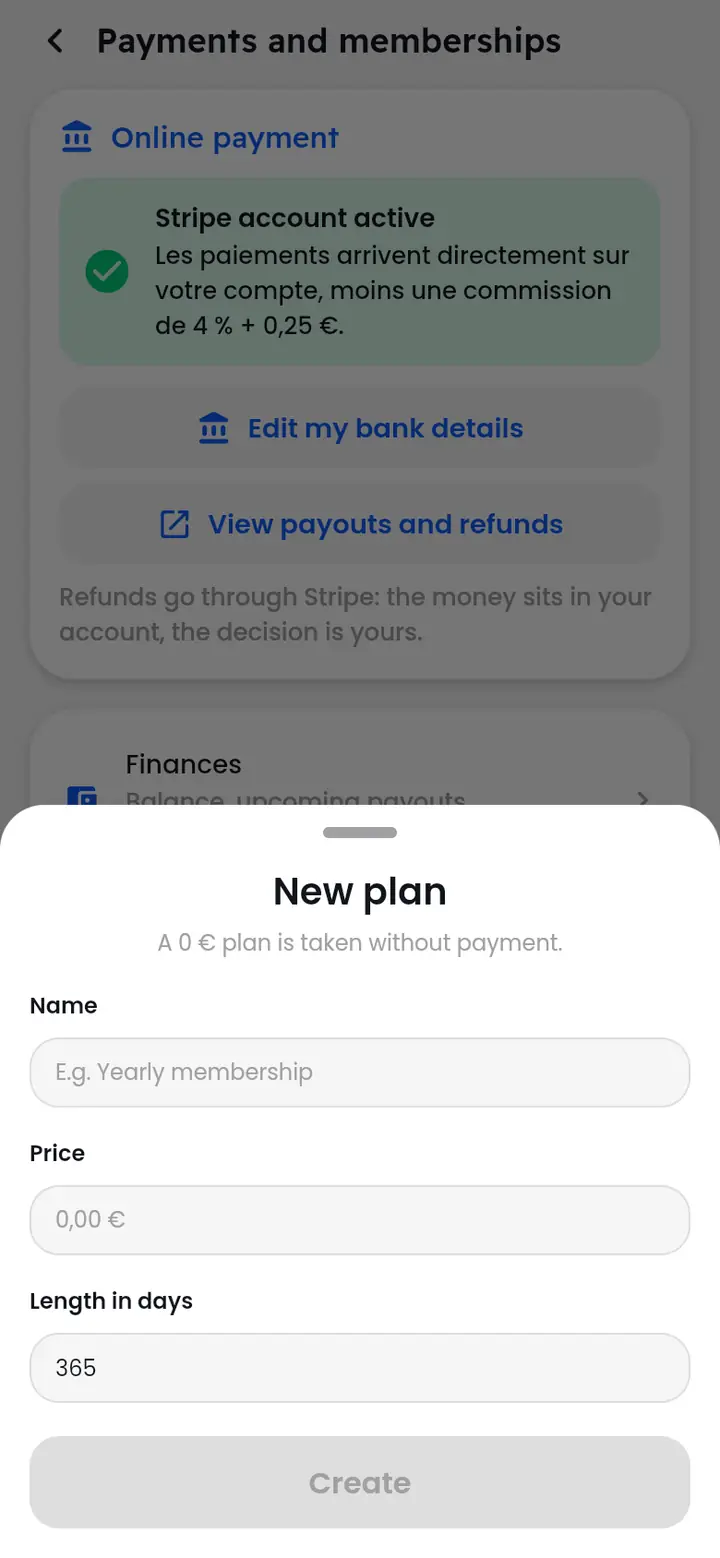
- In “Payments and memberships”, tap “New plan”.
- Give a name (e.g. “Annual membership”), a price (€0 = no payment) and a duration in days (empty = no expiry).
- Tap “Create”.
Membership gives its members the member price on your events and expires by itself. A plan can be edited or withdrawn from sale: memberships already paid keep their price and expiry date.
Record a membership paid on site
Register a member: free, or paid on site.
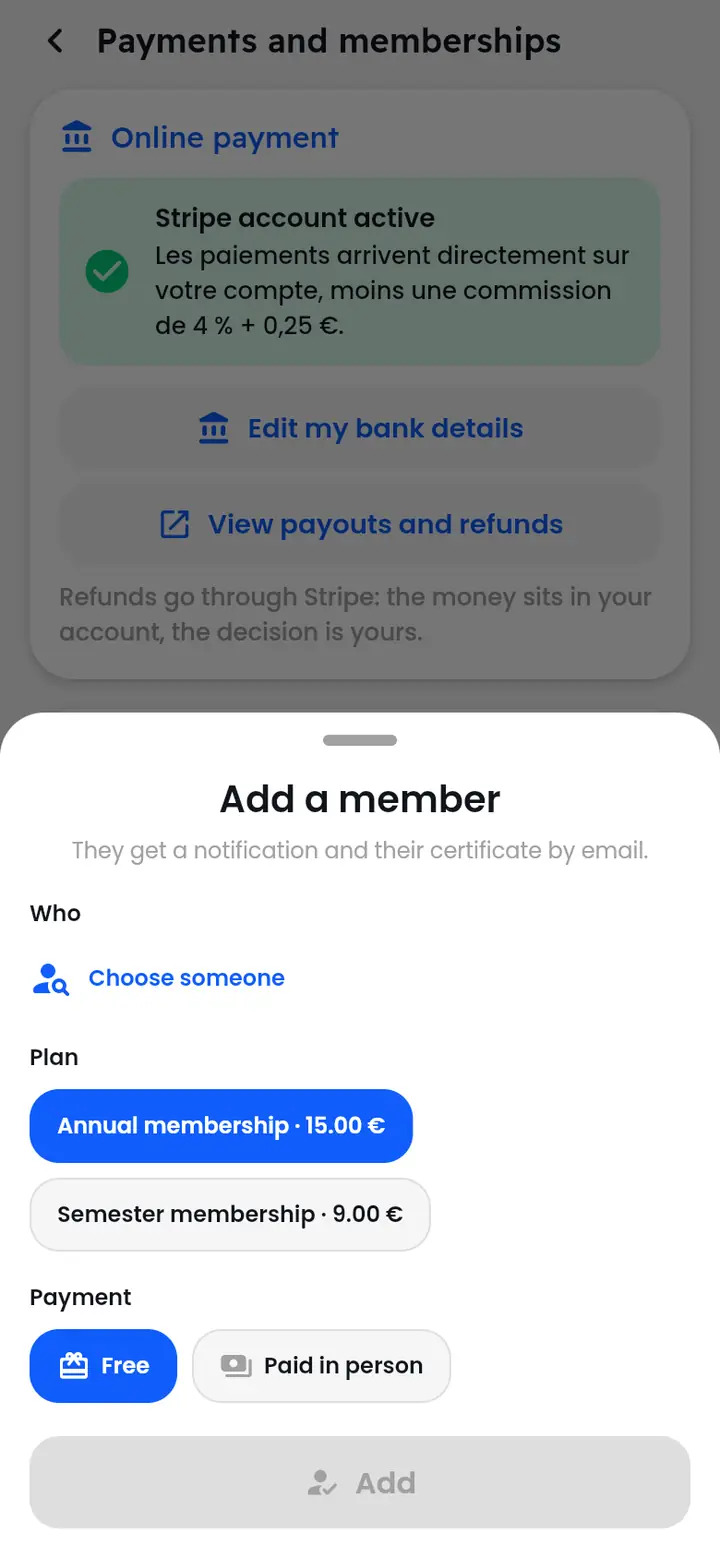
“Record a membership”: choose the person, the plan, and the payment (“Free” or “Paid in person”, with the method). The person gets a notification and their certificate by e-mail. The “Latest members” list then lets you resend the confirmation, refund, or end a membership.
Track the society's finances
Balance, payouts, takings, commission, per-event detail.
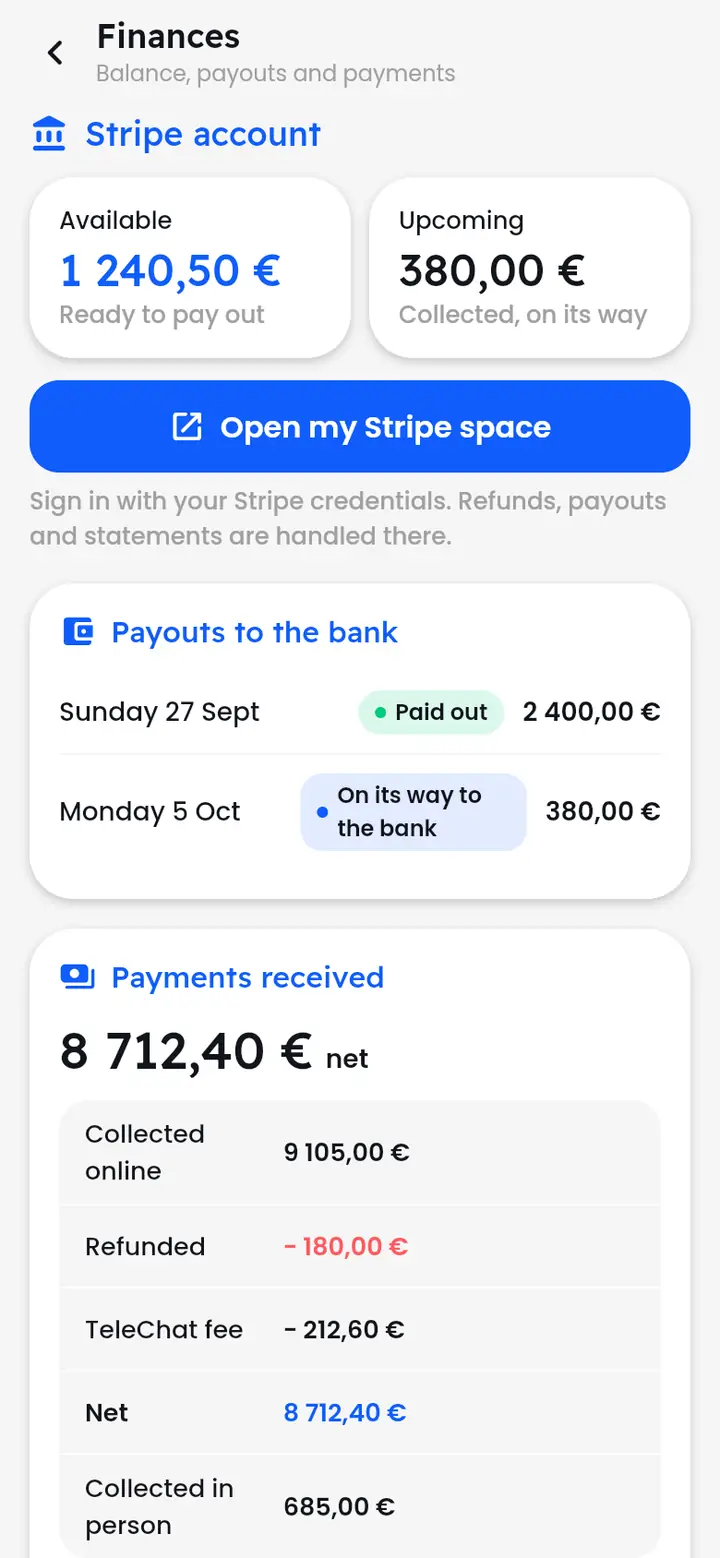
“Finances” (from “Payments and memberships”) shows the Stripe balance (“Available”, “Upcoming”), “Payouts to the bank”, “Payments received” from gross to net (online, refunded, TeleChat commission, on site), the “By event” breakdown, memberships and “Latest transactions”. Filter the period at the top: “This month”, “30 days”, “This year”, “All”.
Organising an event
Create the event, its prices and options, follow attendees, scan at the door.
How do I create an event?
Four steps: Details, Date and venue, Ticketing, Prevention.
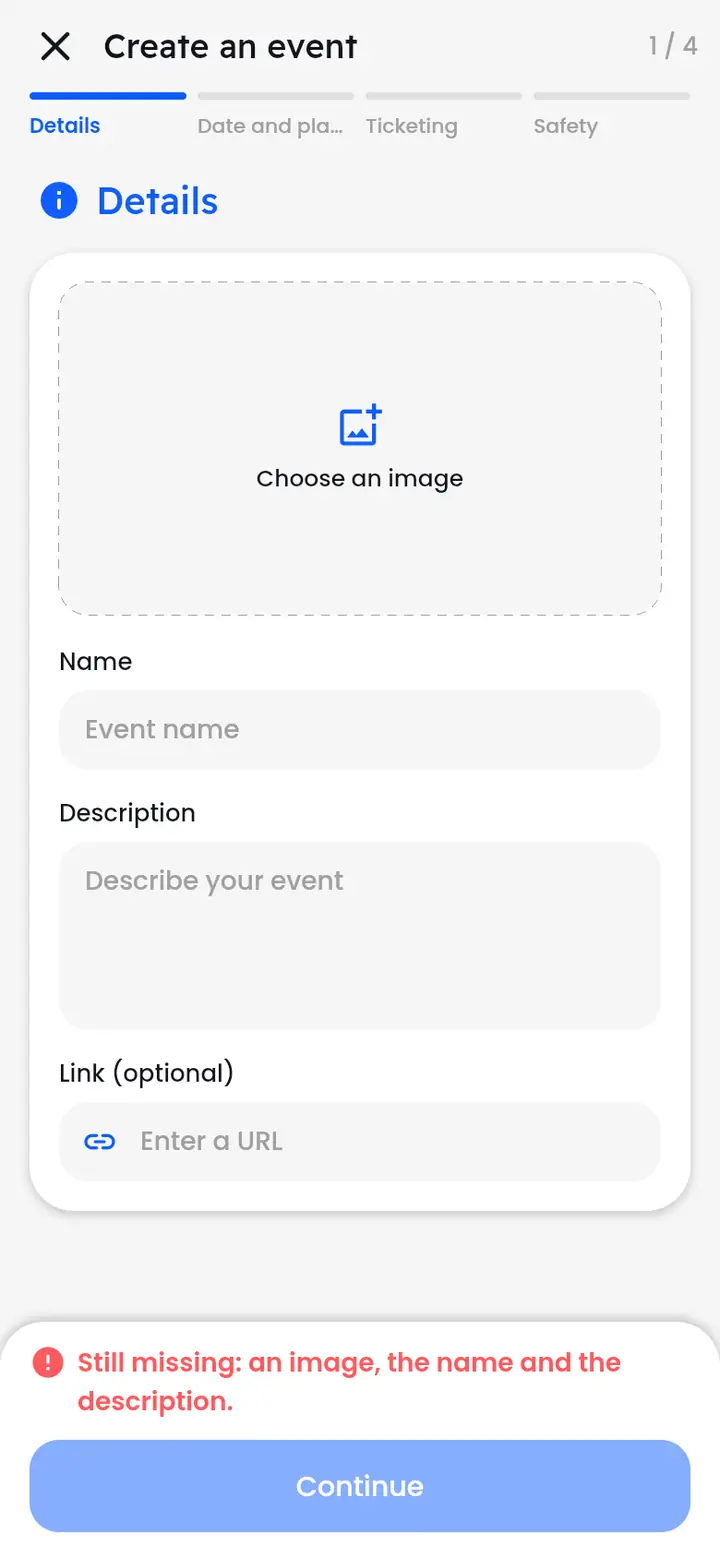
In the society's admin, tap “Create an event”. The form goes through four steps; at the bottom, the app says what's still missing.
- “Details”: an image, the name, the description, an optional link.
- “Date and place”: the date, the start, last entry and end times, the venue.
- “Ticketing”: the sign-up mode (“Open registration, no capacity limit”, “First come, first served at opening time” or “By application, you approve”), when bookings open, the number of places, and whether the event is paid, offers options, is open to external guests.
- “Safety”: risks of sexual and gender-based violence and whether there's alcohol; then describe your measures, which participants will see.
Once the event is created, add at least one price to open bookings.
How do I create and set prices?
Price, places, who it's for, cancellable, transferable, opening time.
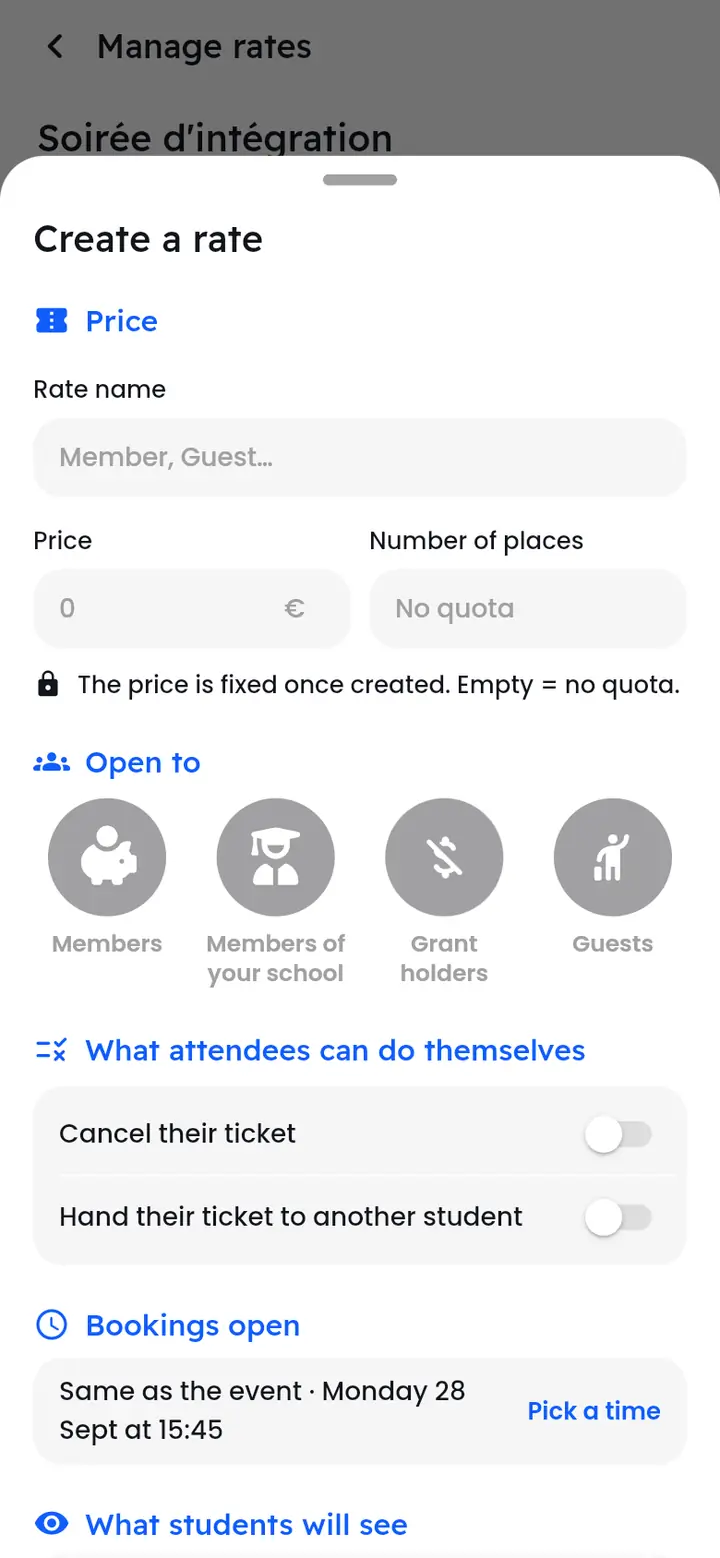
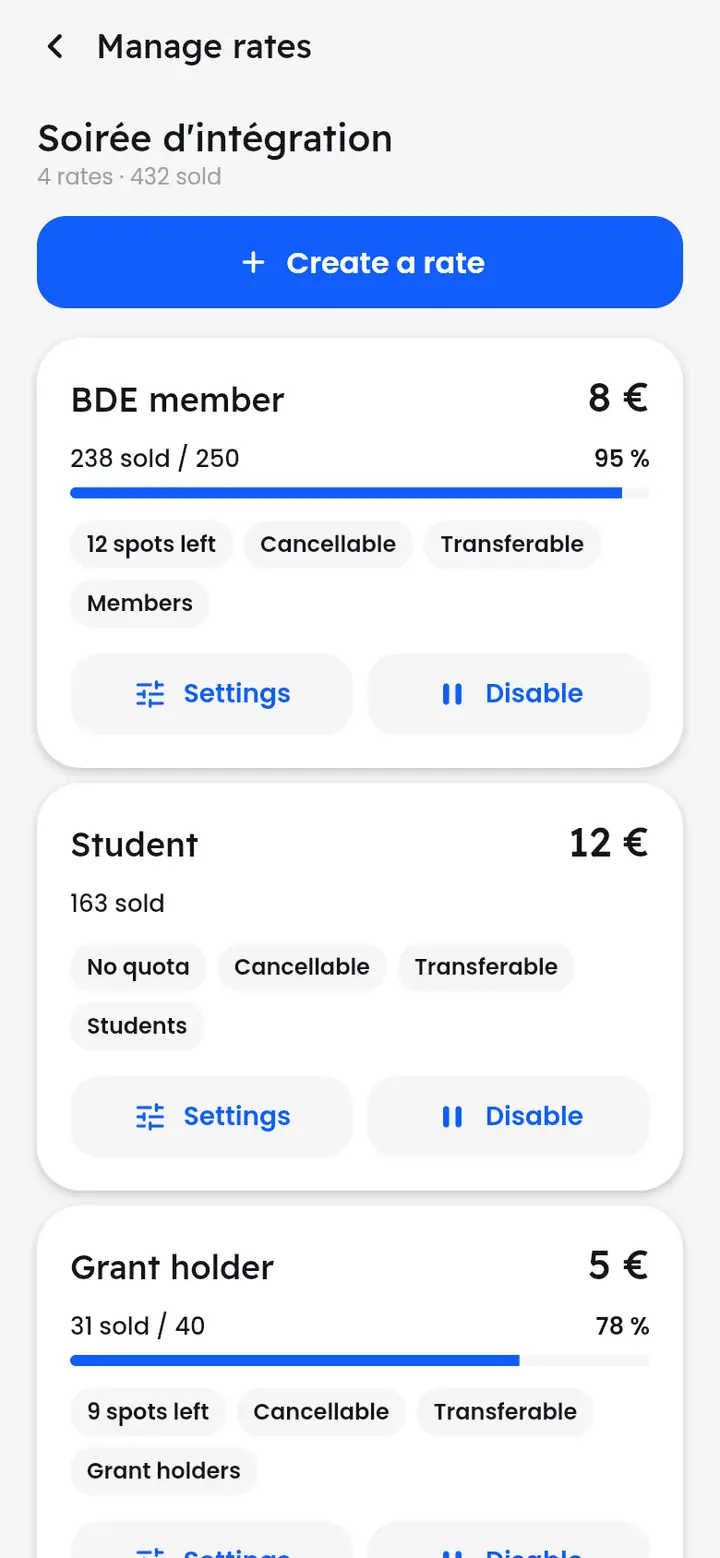
- In the event's admin, “Prices”, then “Create a rate”.
- Give a name, a price (fixed once created) and a number of places (empty = no quota).
- “Open to”: “Members”, “Members of your school”, “Grant holders”, “Guests”.
- “What attendees can do themselves”: “Cancel their ticket”, “Hand their ticket to another student”.
- “Bookings open”: same as the event, or a time specific to this price.
Offer options (drinks, cloakroom…)
Manage options: name, price, image, prices concerned.
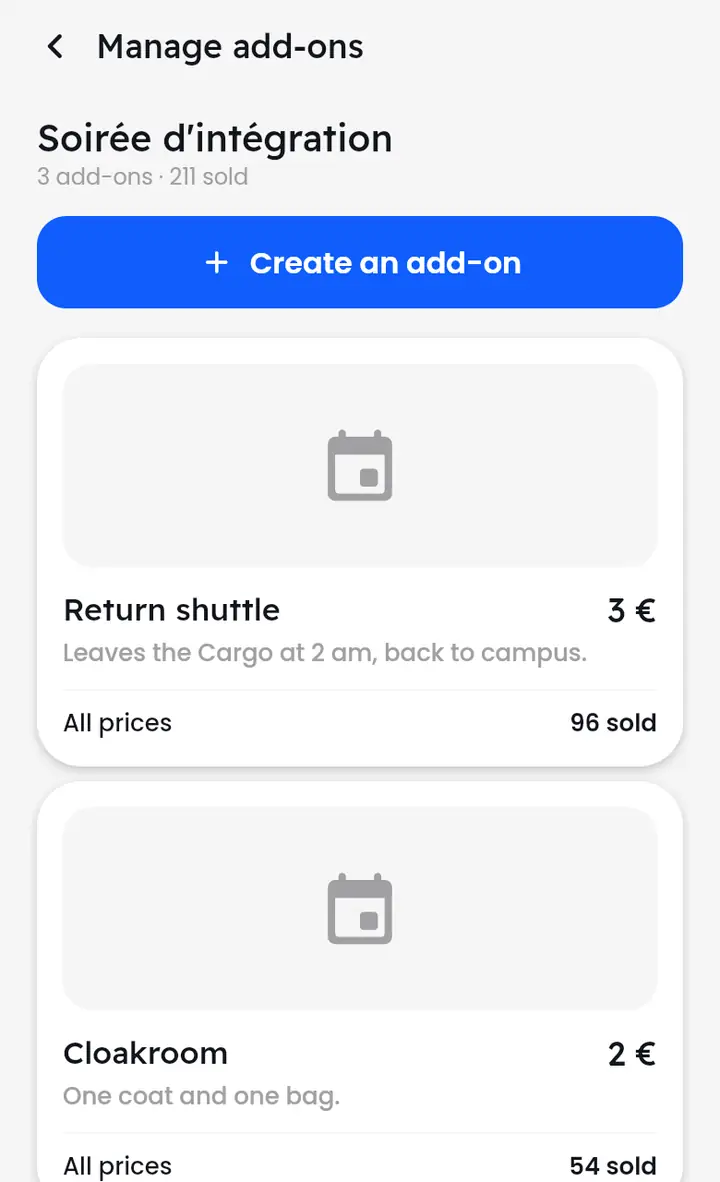
“Extras” in the event's admin, then “Create an add-on”: name, description, price (0 for free), image, and “Available with” all prices or just one. Attendees add them when booking, or later from their ticket; you redeem them at the door, the bar or the cloakroom.
Follow your event: the overview
Ticketing, entries, revenue, latest sign-ups, announcements.
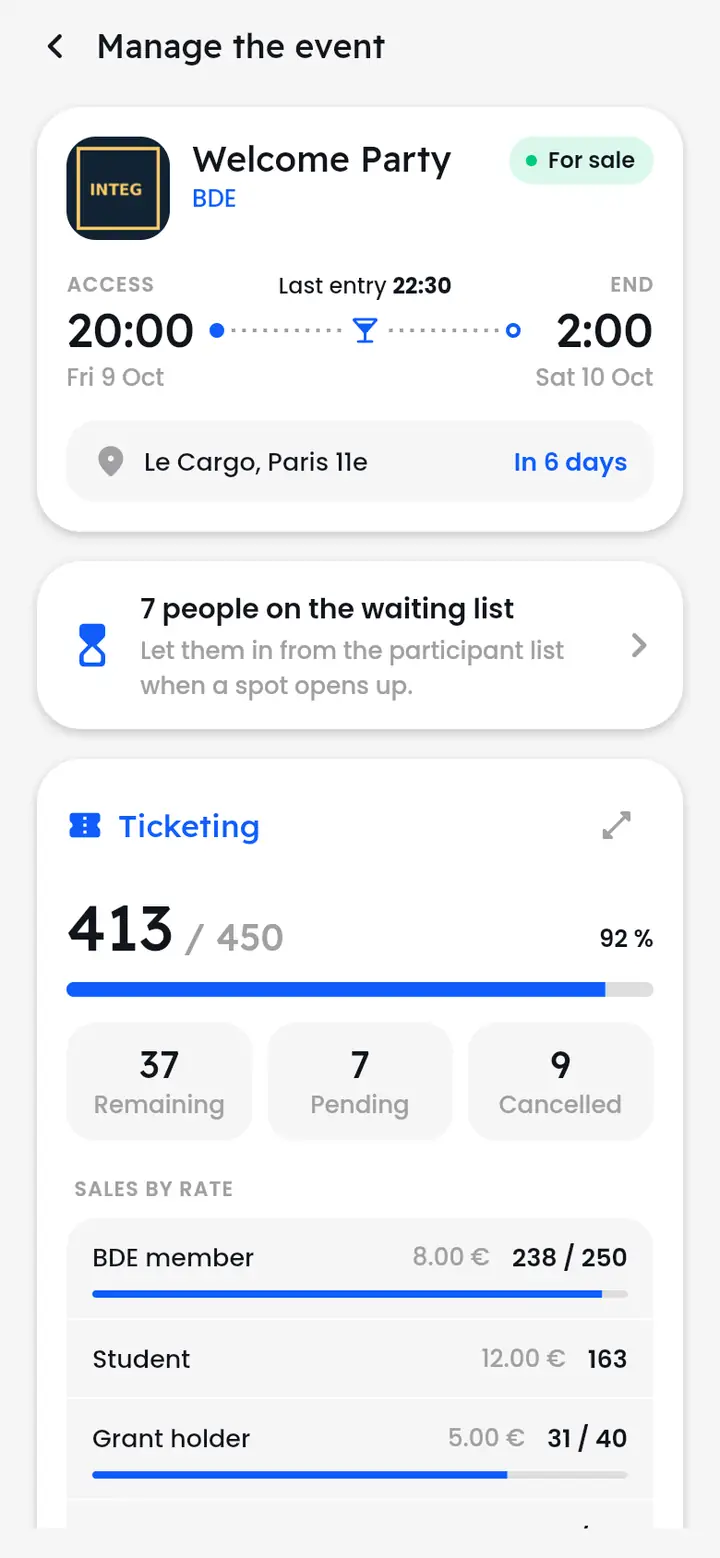
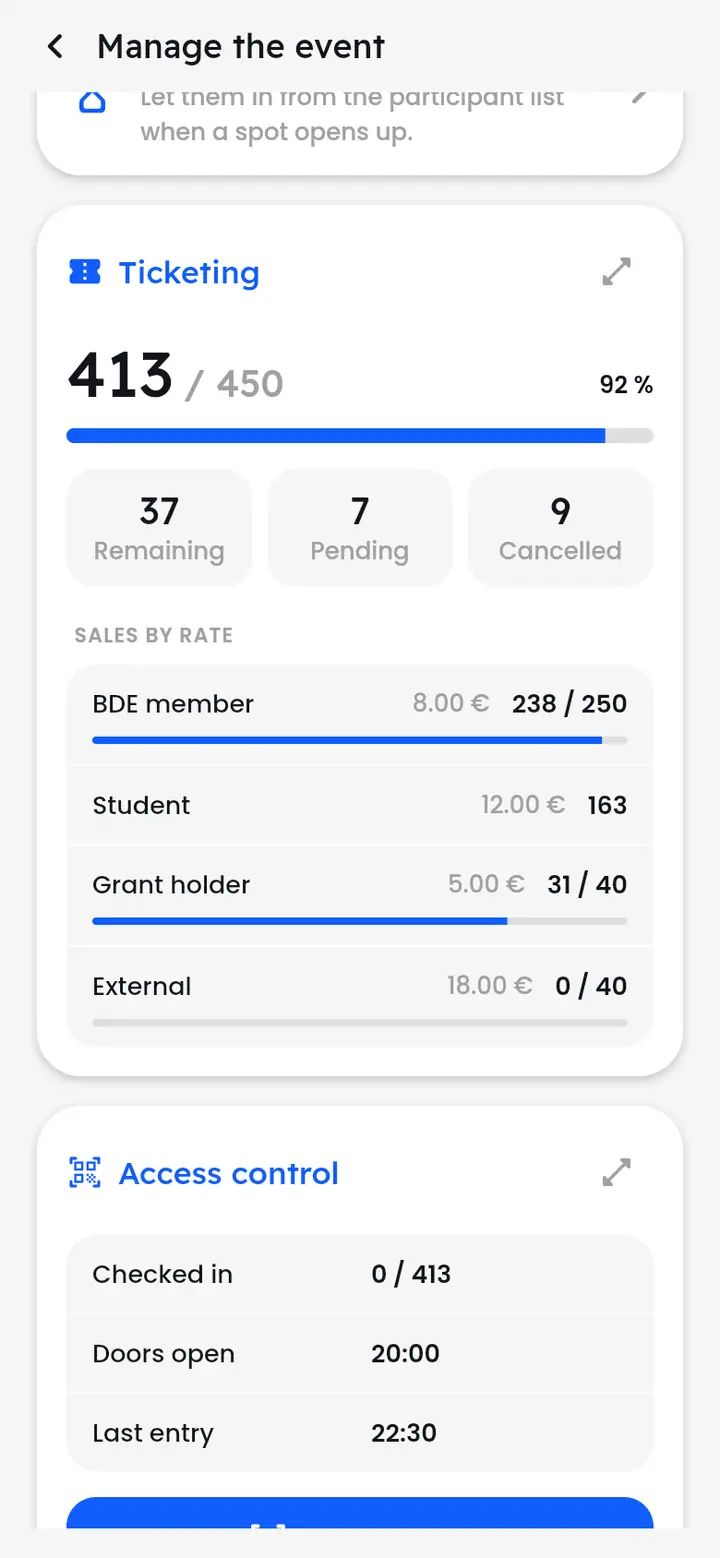
Open the event from the society's admin (“Manage events”): “Manage the event” sums everything up. At the top, the times and status (“For sale”, “Sold out”…); then what needs handling (applications, waiting list), “Ticketing” (registered, left, pending, cancelled, sales per price), “Access control”, “Revenue” and “Latest bookings”.
Make an announcement to attendees
Posted on the event and sent to the society's members.
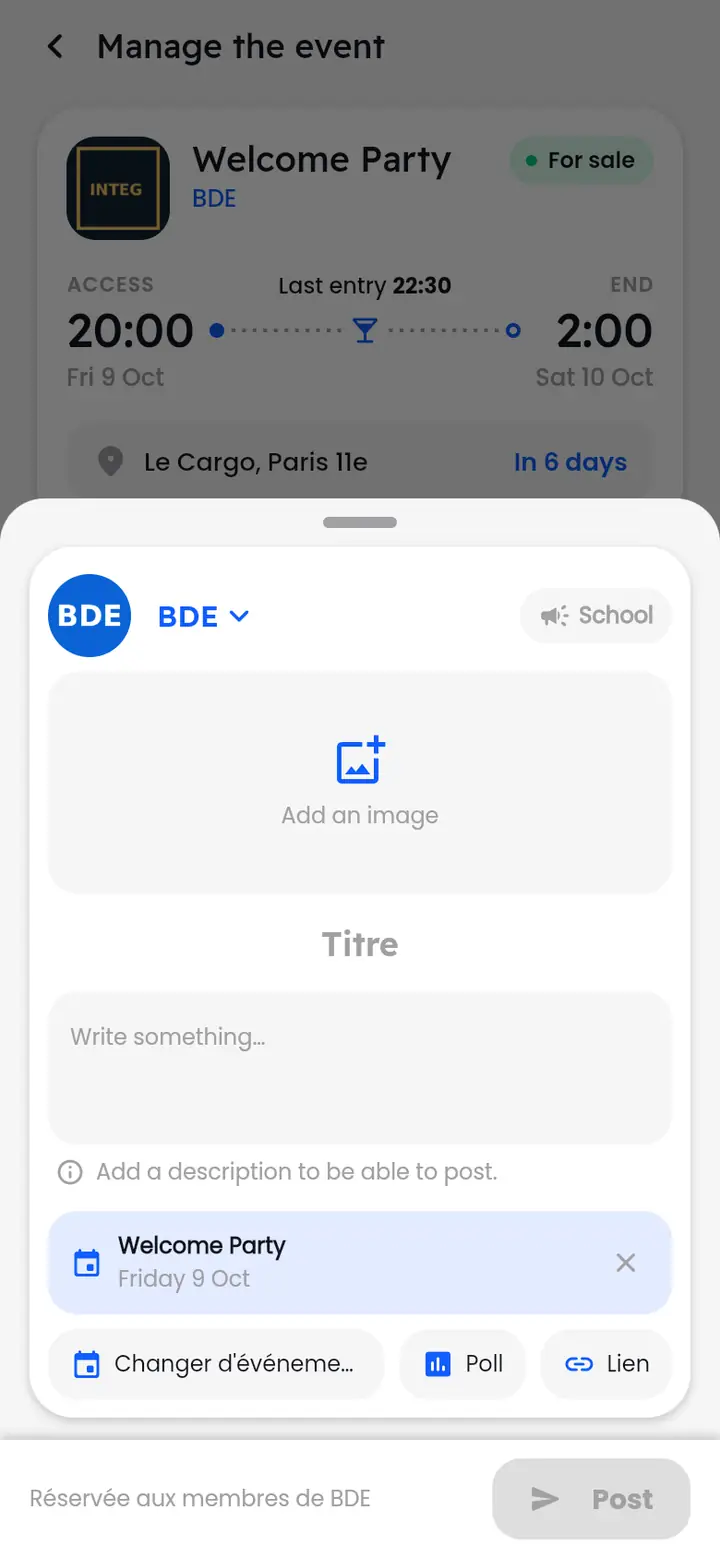
In the overview, “Make an announcement” offers ready-made templates to adapt (“Reminder”, “Spots still available”, “Venue change”, “Time change”) or “Write an announcement” freely. The editor opens with the event already attached.
Manage attendees, applications and the waiting list
The attendee list, its filters and actions.
“Participants” lists the tickets: search by name or reference, filter by status (“All”, “Waitlist”, “Cancelled”, “Checked in”) and by price. Each row shows the price, options and what's paid against what's due. At the top, totals paid, still due and entered.
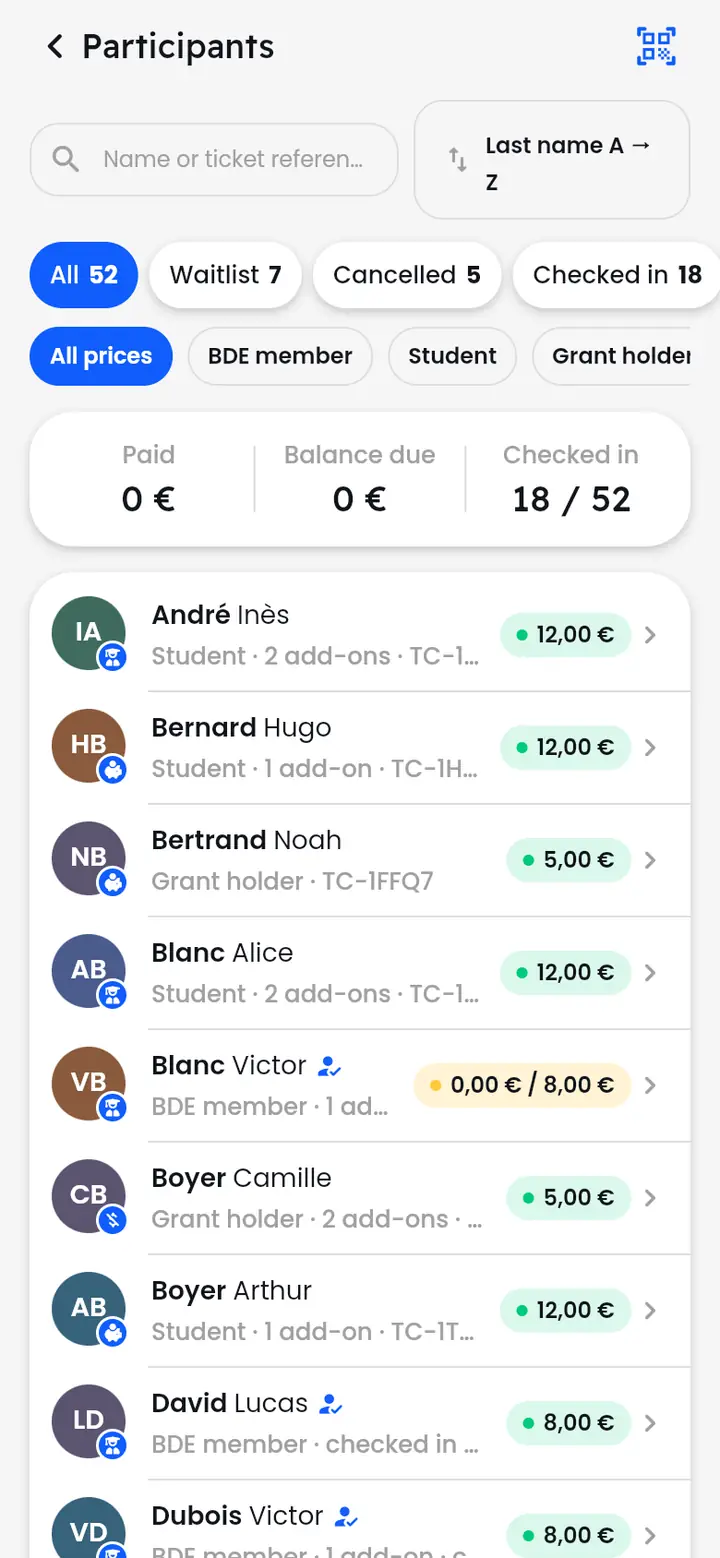
To accept an application or move someone off the waiting list when a place frees up, open their ticket and confirm it.
A ticket's record: payments, discount, refund, transfer
Everything you can do with a ticket.
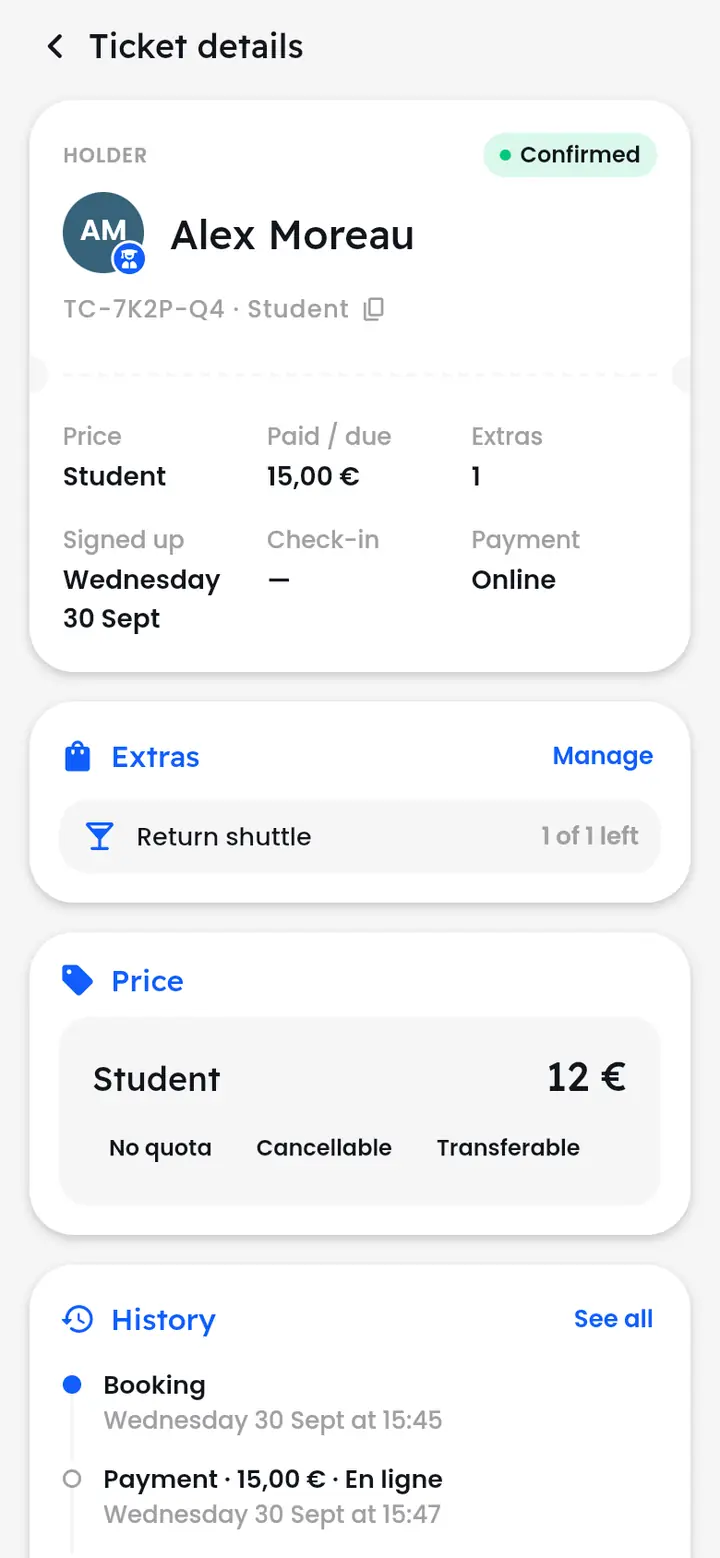
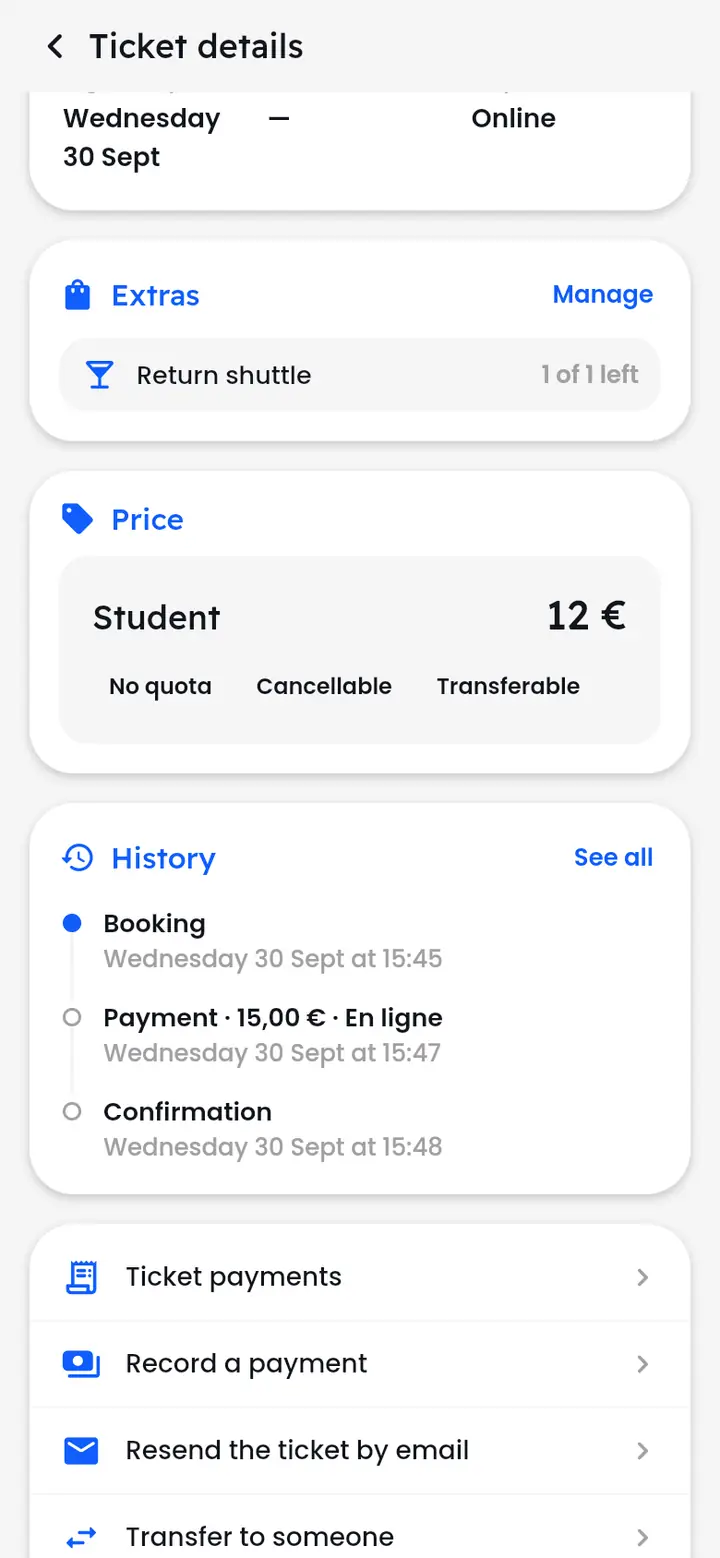
Tap an attendee: “Ticket details” shows the holder, the price, what's paid, the options and the history. The actions:
- “Record a payment”: an on-site payment (cash, card, cheque, transfer), or a refund made in person.
- “Discount or goodwill gesture”: in % or euros, with a reason.
- “Refund online”: return all or part of a card payment (can't be undone).
- “Resend the ticket by email”, “Transfer to someone”.
- “Confirm ticket” (application, waiting list), “Cancel the ticket” or “Restore ticket”.
Give or reserve a place for someone
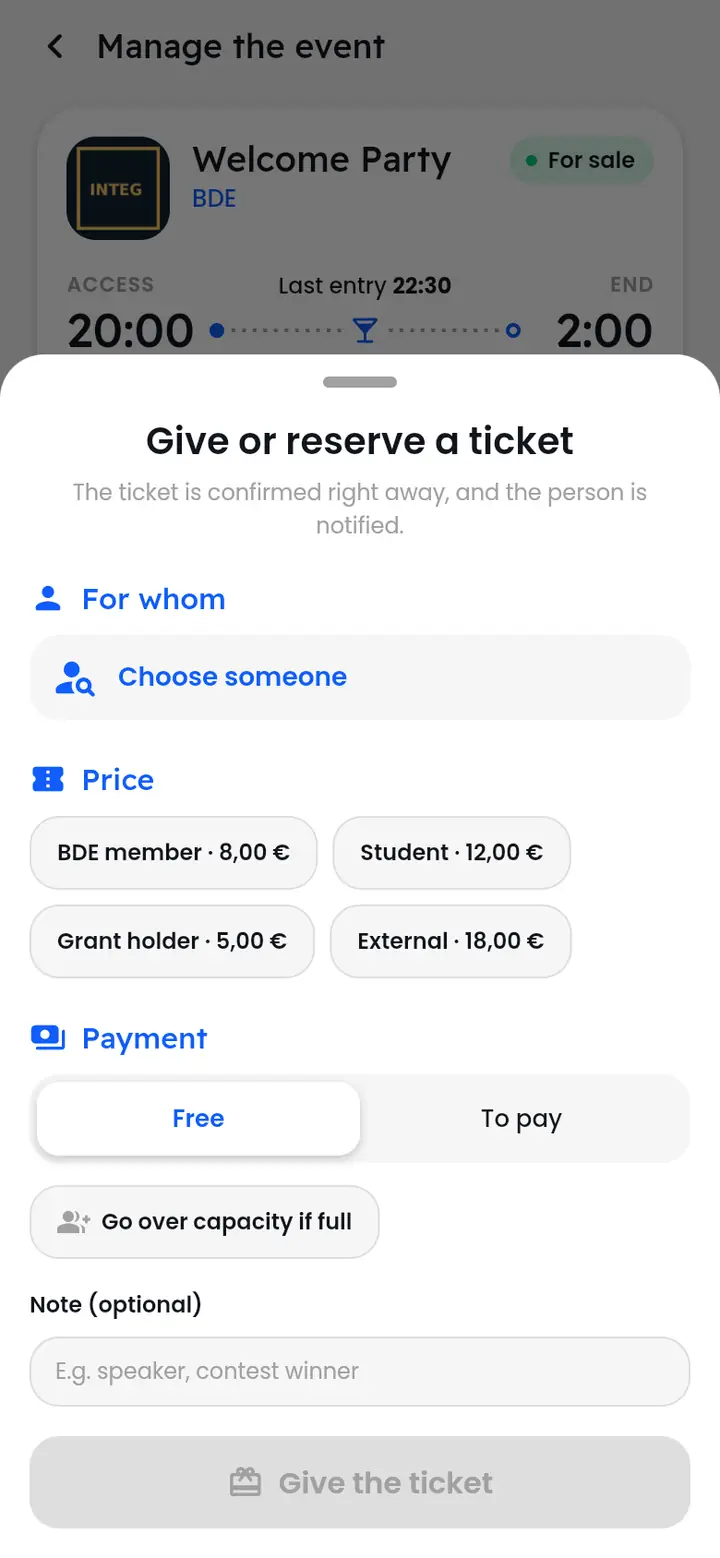
The ticket is confirmed straight away, and the person notified.
“Give a free spot” in the overview (or the attendee list): choose the person and the price, then “Free” or “To pay” (with an optional discount). “Go over capacity if full” lets you add a place beyond capacity; an internal note says why (speaker, competition winner…).
How do I scan tickets at the door?
Access control: scan, check, let in.
- In the event's admin, open “Access control”.
- Tap “Scan tickets” and point at the attendee's QR code; or type the ticket reference then “Check”.
- The verdict shows: “Checked in”, already in, waiting list, cancelled, old QR code… Tap “Scan next”.
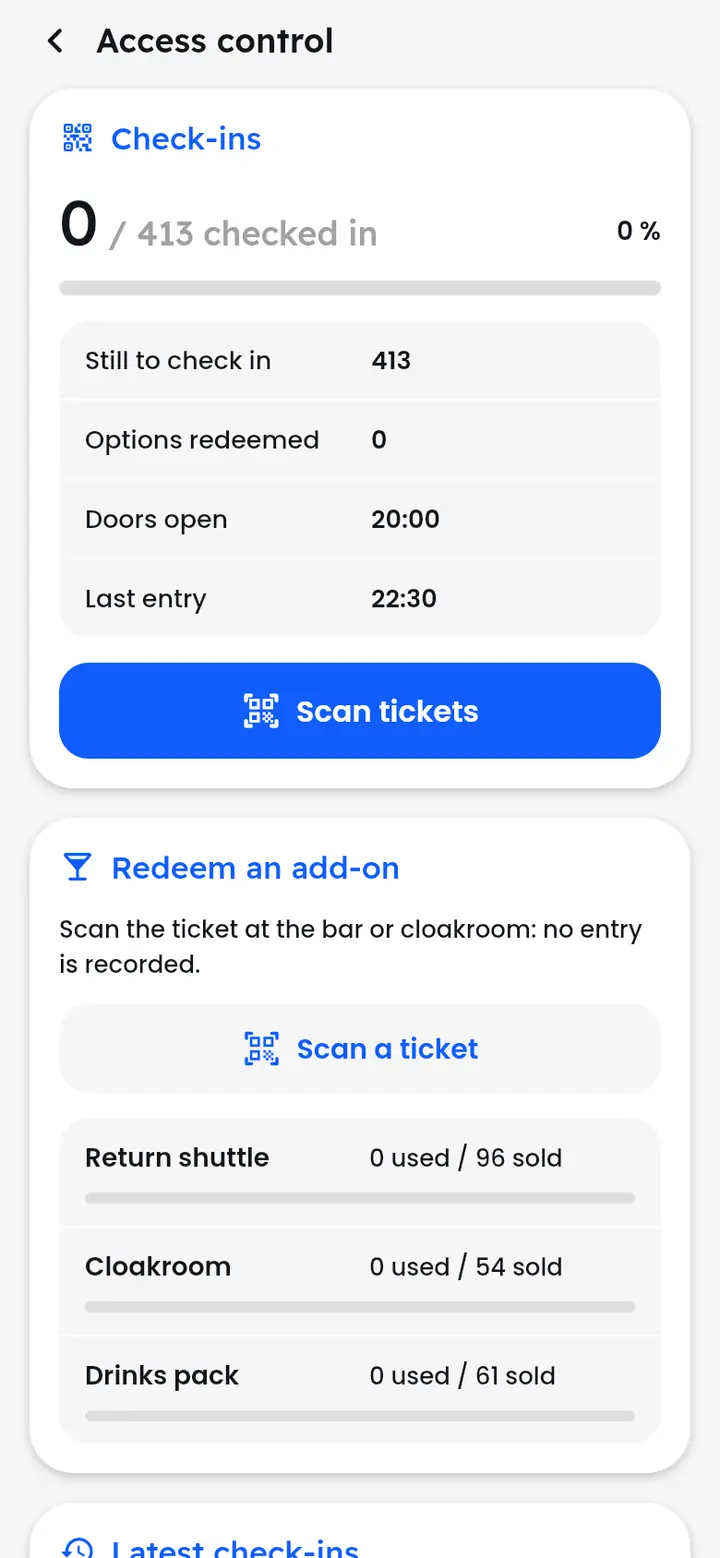
After the last entry time, the ticket is refused but “Force entry” is still possible. If an amount is still due, “Collect payment” records it on site. The “Check-ins” counter tracks who's in.
Set up ticket resale
Open resale, free pricing or not, priority, payouts.
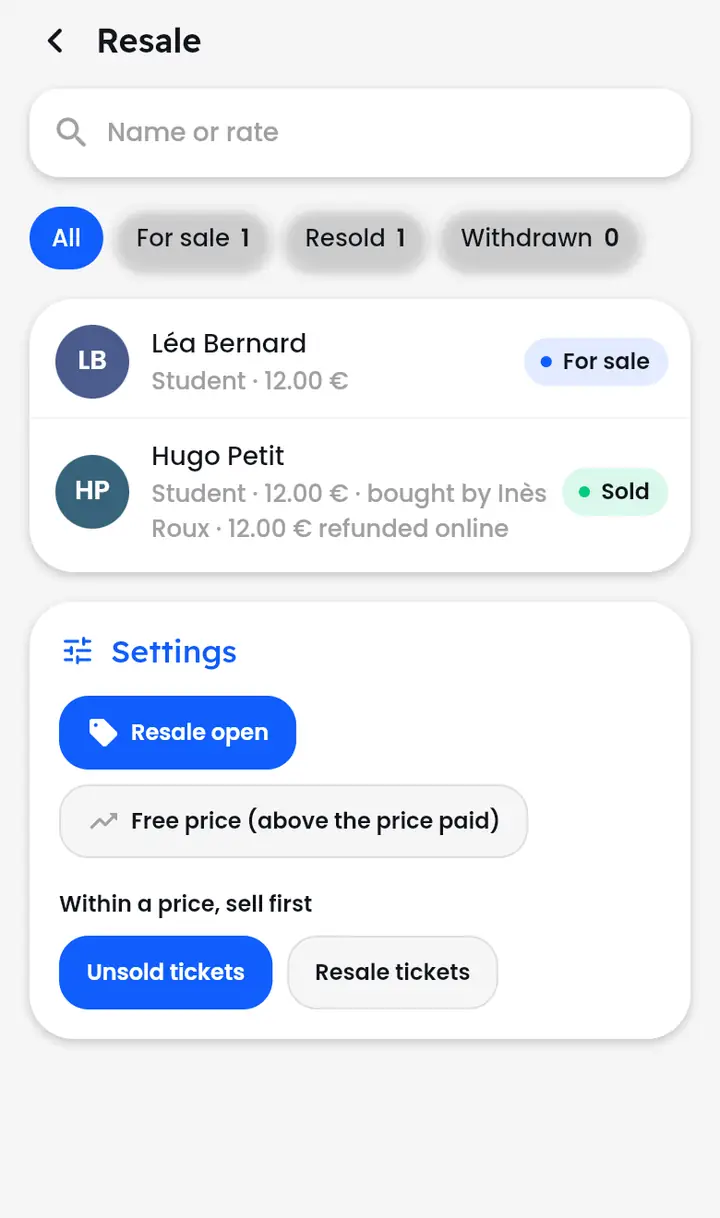
“Resale” in the event's admin: “Resale open” or closed, “Free price (above the price paid)” or not, and within a price, sell “Unsold tickets” or “Resale tickets” first. The list shows each place put up for sale, its seller, its buyer and what's left to pay out; “Done” records a payout made by hand.
See an event's revenue
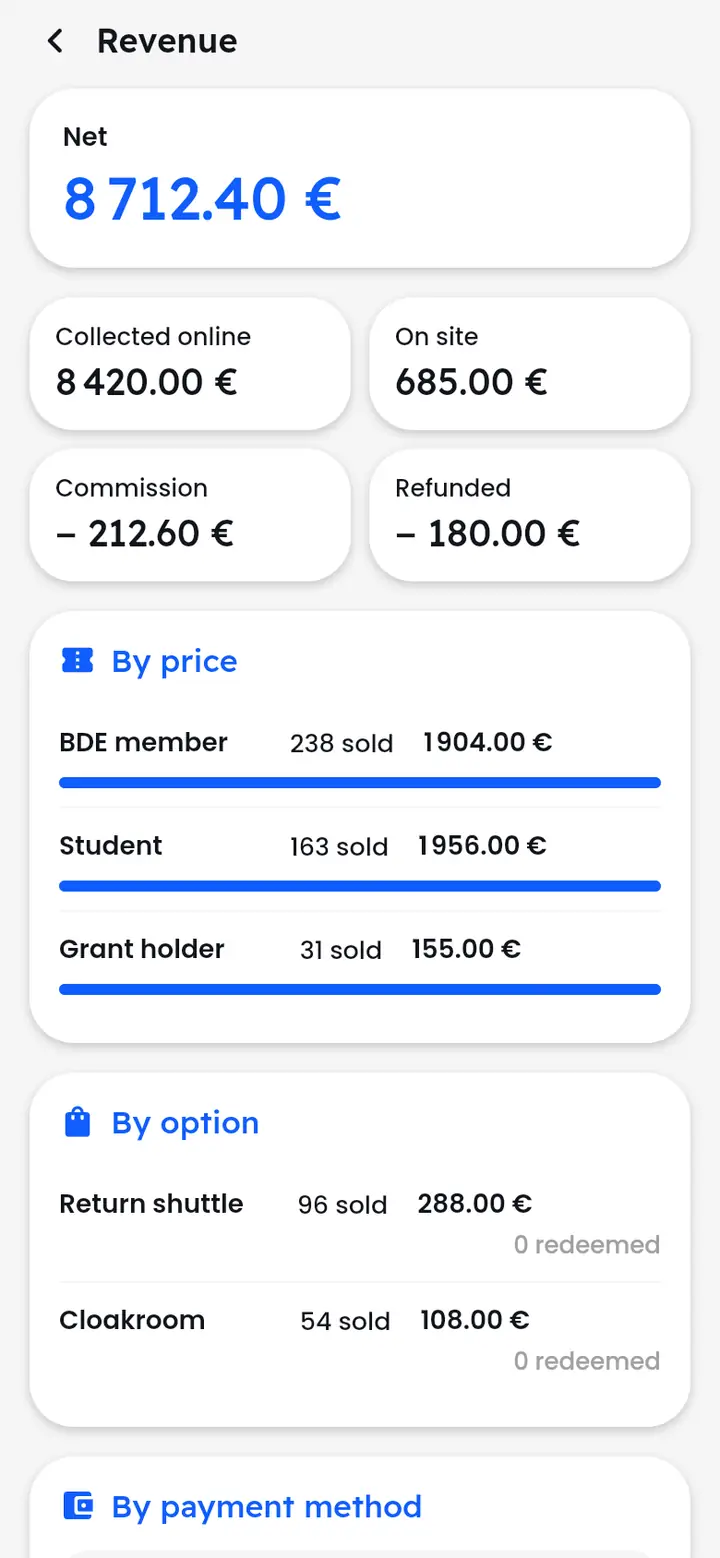
Net, online, on site, commission, per price and per option.
“Revenue” shows the event's net, what was collected online and on site, the commission, refunds, then the “By price”, “By option” and “By payment method” breakdowns, with what's still to collect and to pay out to resale sellers.
Edit an event
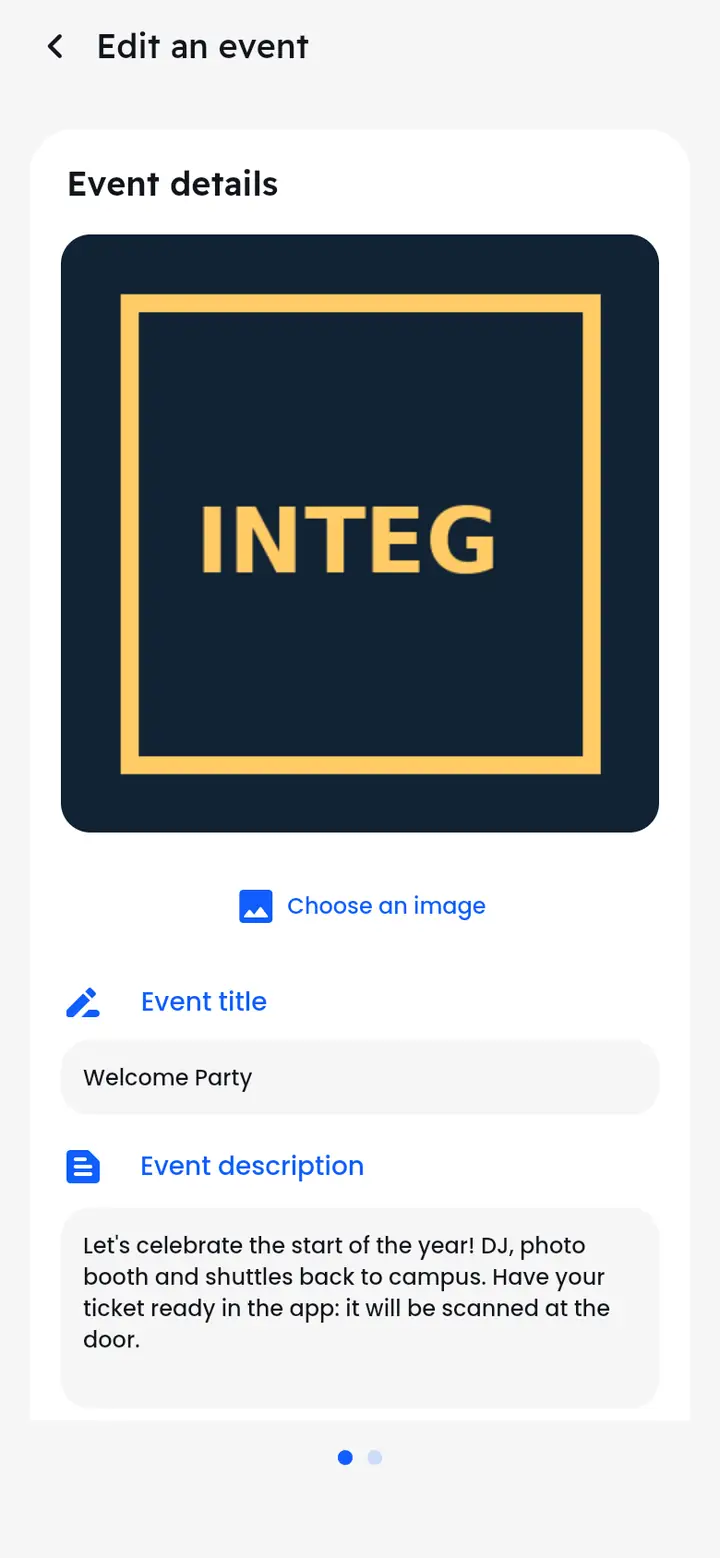
Image, name, description, times, prevention.
“Edit” in the event's admin brings up its details: image, title, description, times (including last entry), booking opening and prevention policies. Remember to tell attendees about a change (see “Make an announcement”).
Running the school
For school admins: students, years, codes, domains, grant holders, groups.
The school dashboard
Manage my school: figures, to-do, people, school life, actions.
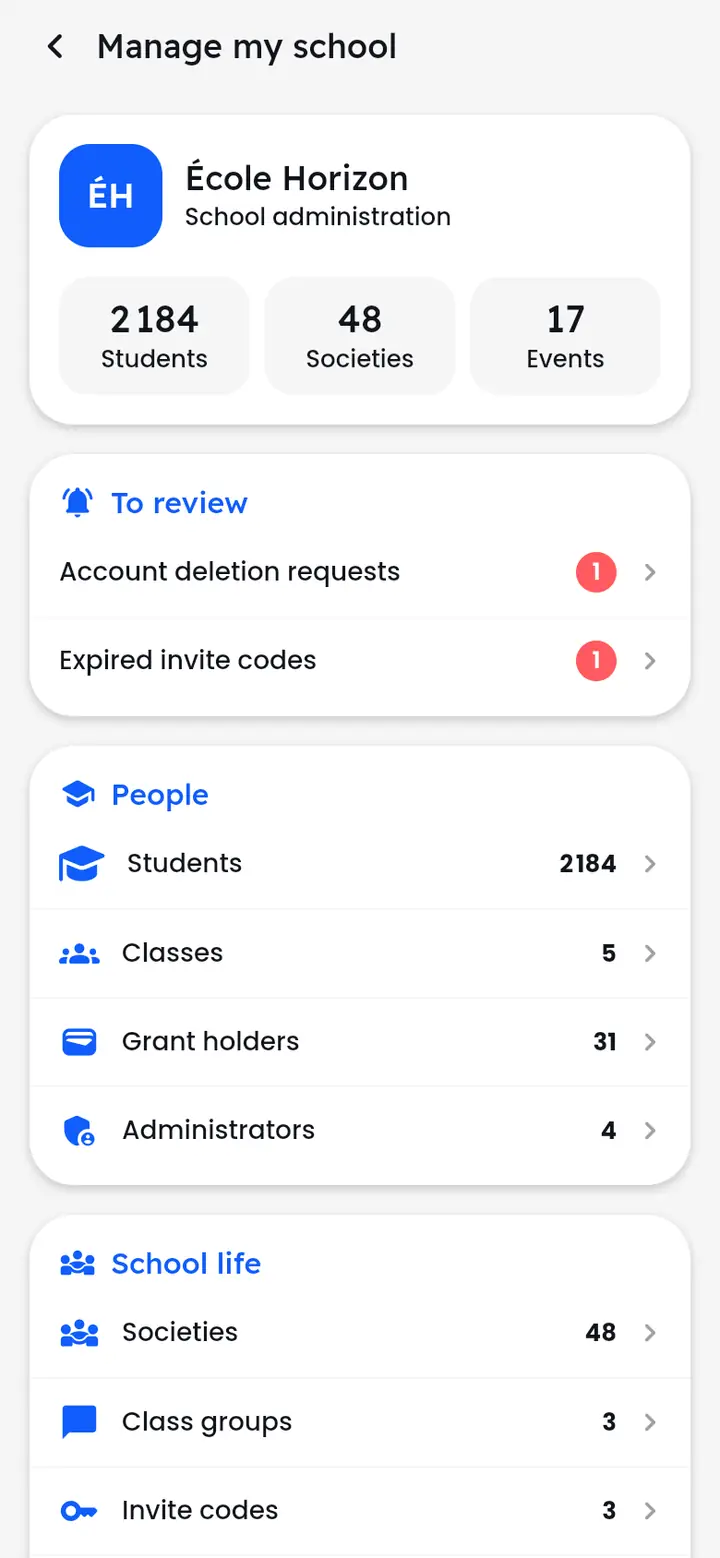
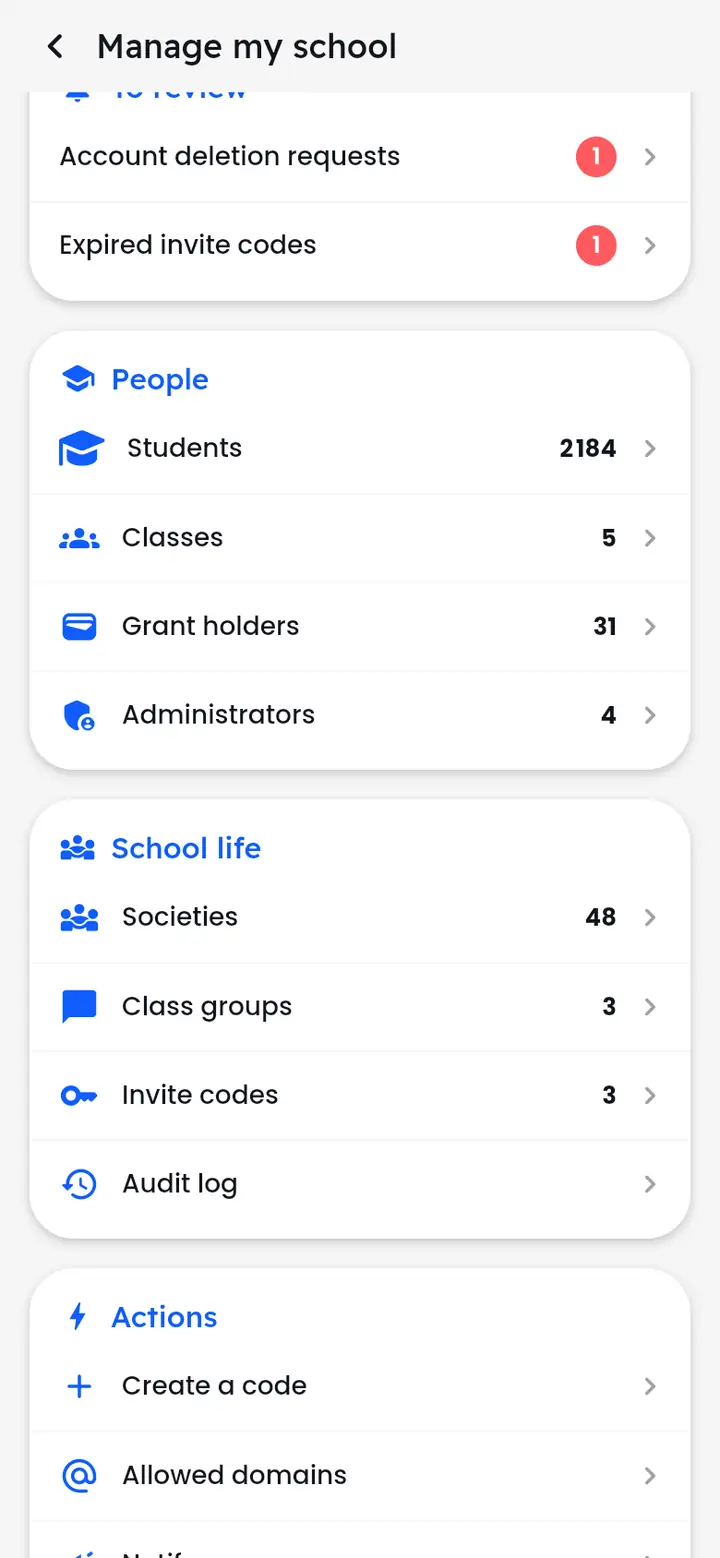
On home, the admin icon at the top right opens “Manage my school” (visible to school admins). It shows the school's figures, what's “To review” (account deletions requested, expired codes), then the “People” and “School life” sections, and “Actions”: create a code, allowed domains, notify, invite by e-mail.
Manage students
Year, password reset, read-only, deletion.
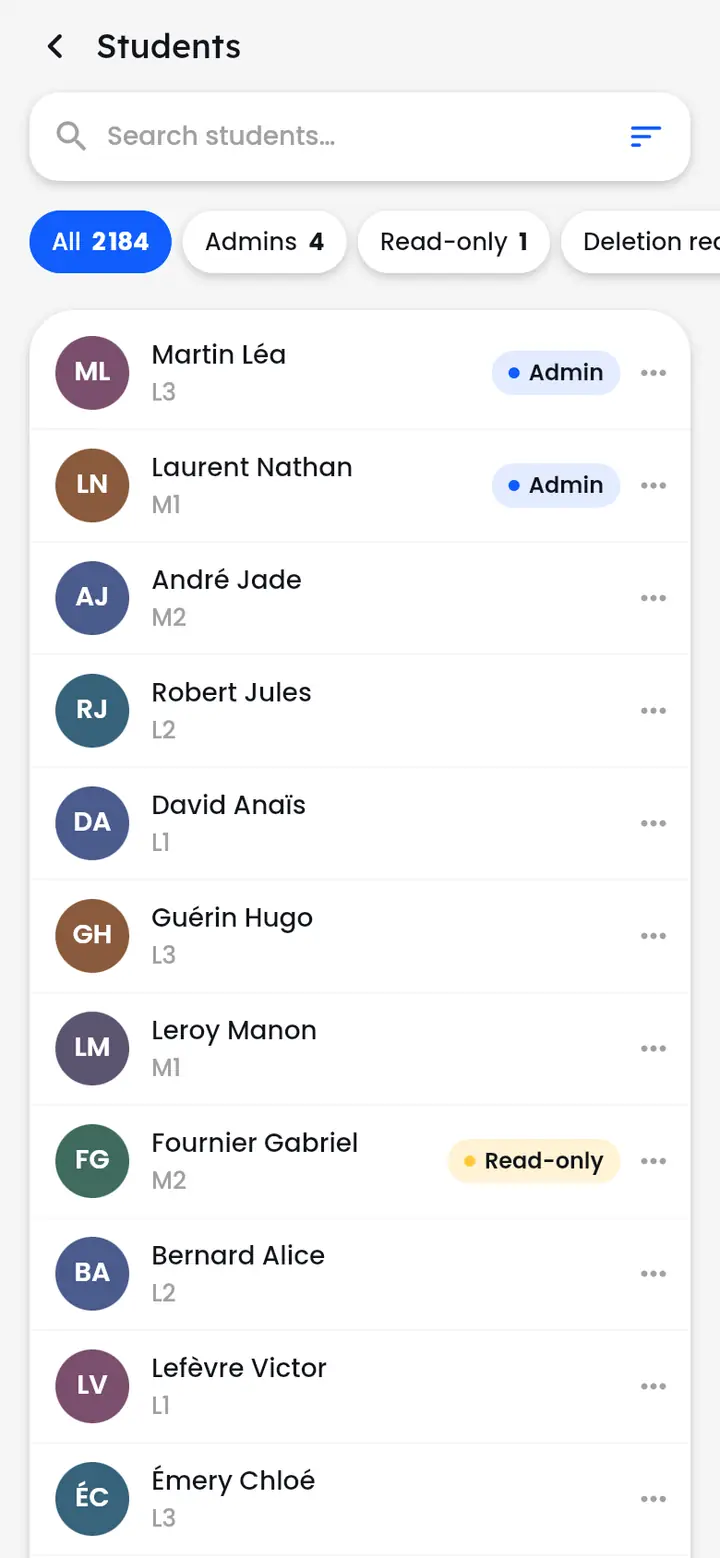
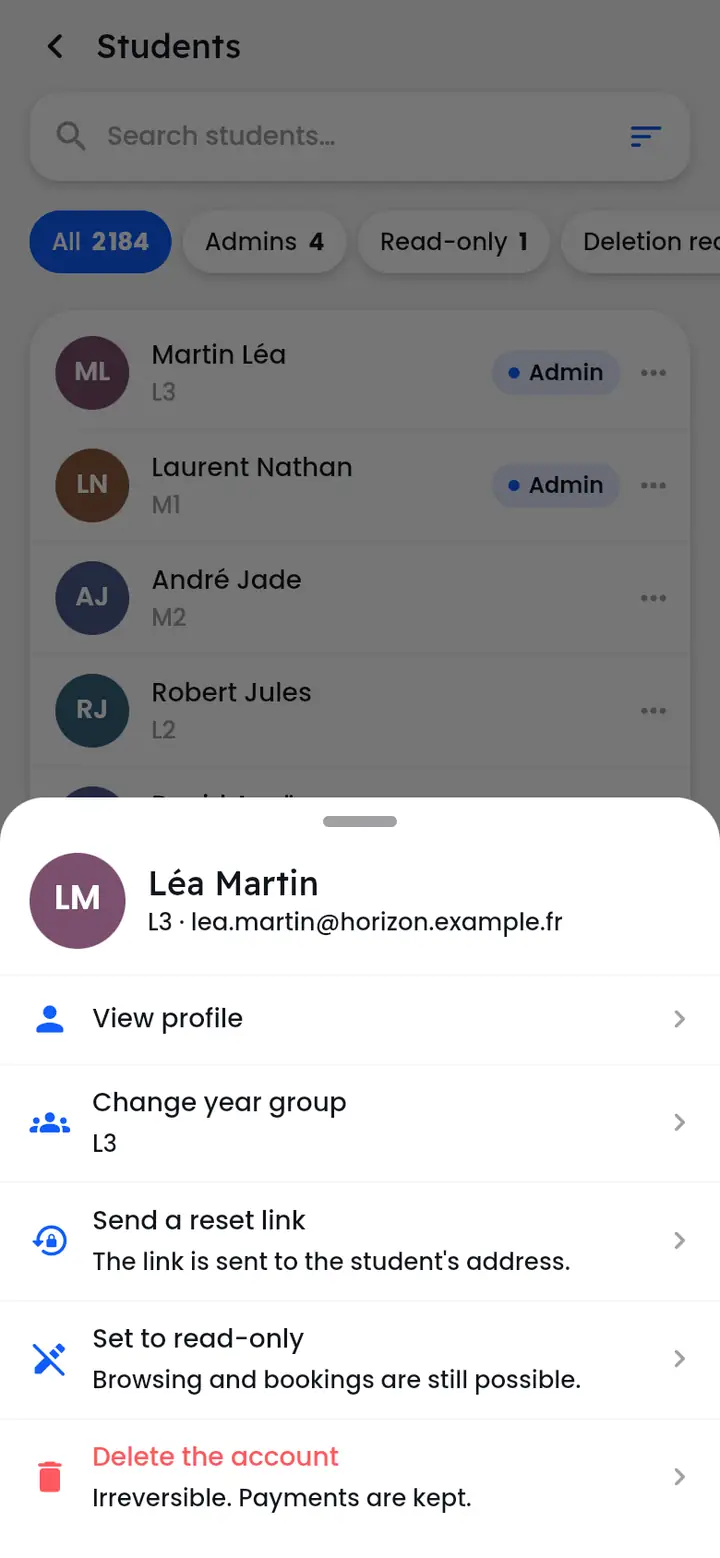
“Students” lists the school's members; filter by “Admins”, “Read-only” or deletion requested, and search by name. A student's three dots offer:
- “View profile”, “Change year group”;
- “Send a reset link” for the password;
- “Set to read-only”: for a set time, with a reason the student sees; they can browse and book, but not post, comment or write;
- “Delete the account”: can't be undone, payments are kept.
Manage years and moving up
Create, rename, delete a year; move its students up.
“Classes” lists the years with their students, codes and groups; the + creates one. A year's three dots: “Rename”, “Year rollover” or “Delete”.
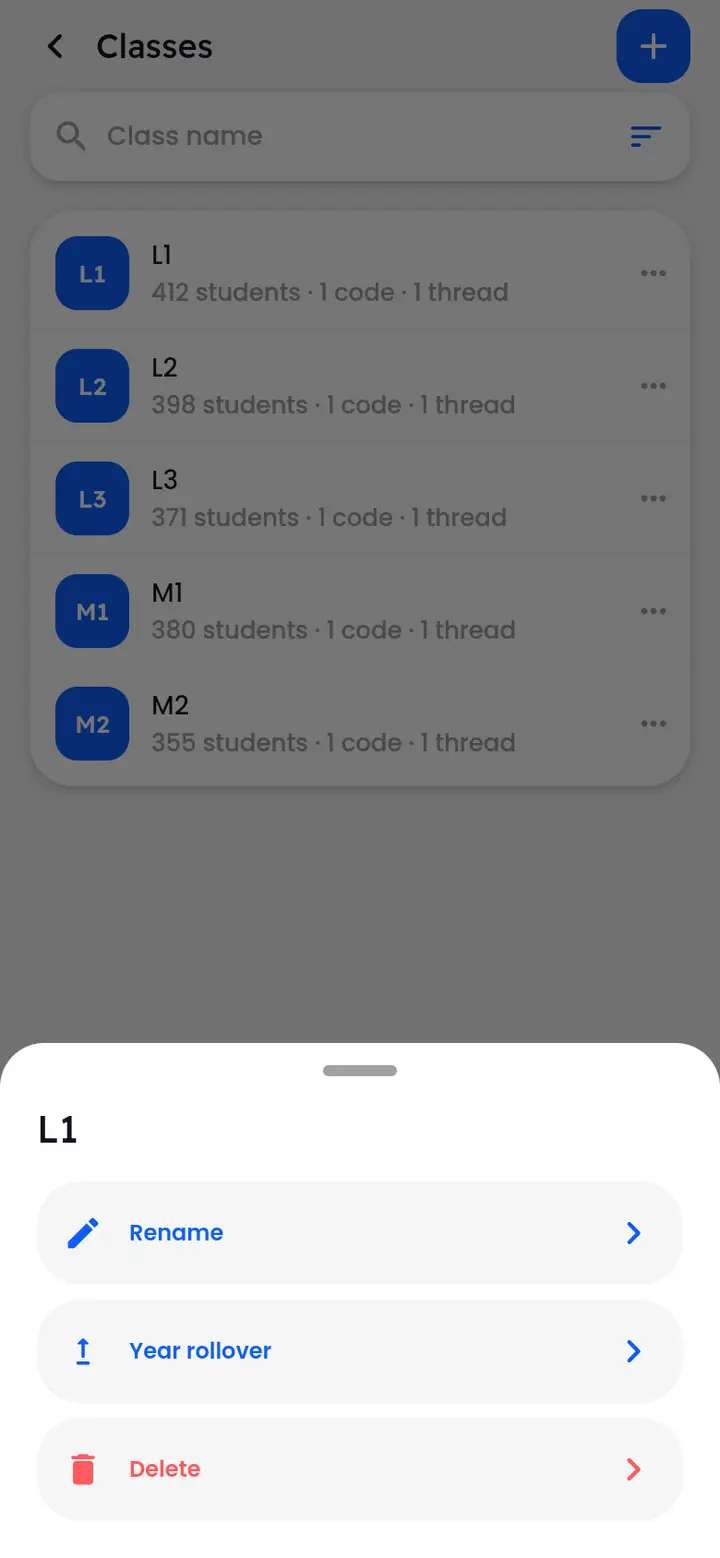
Moving up moves the students into the chosen year (create it first), except the exceptions you pick (“Who stays?”). The old year isn't deleted: it keeps the exceptions. To delete a year that has students, the app asks where to send them.
Create and manage sign-up codes
A code to join the school, optionally admin or single-use.
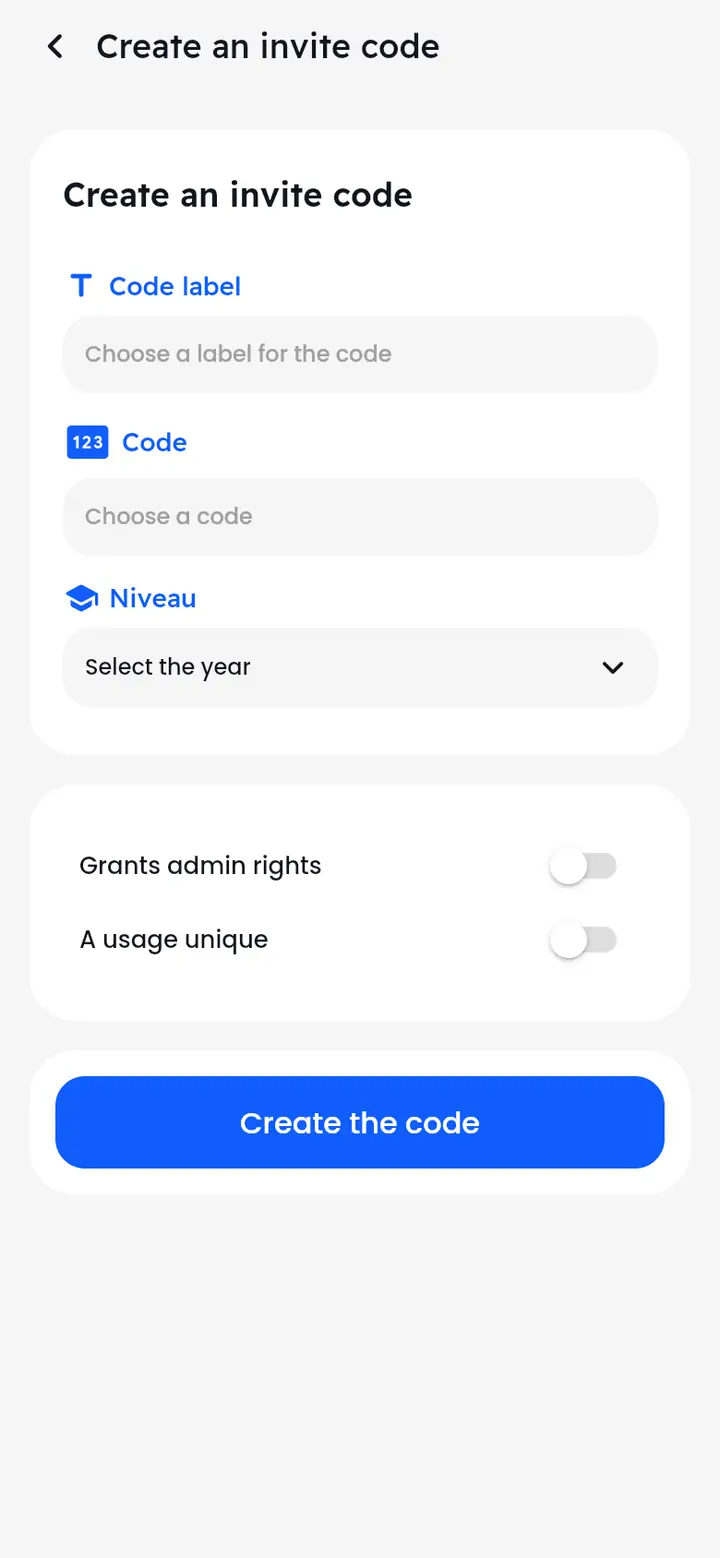
- “Invite codes”, then the + (or “Create a code” on the dashboard).
- Give a title (to recognise it), the code, and the year it assigns.
- If needed: “Grants admin rights” (careful, anyone who uses it becomes an admin) and “A usage unique”.
- Tap “Create the code” and pass it on.
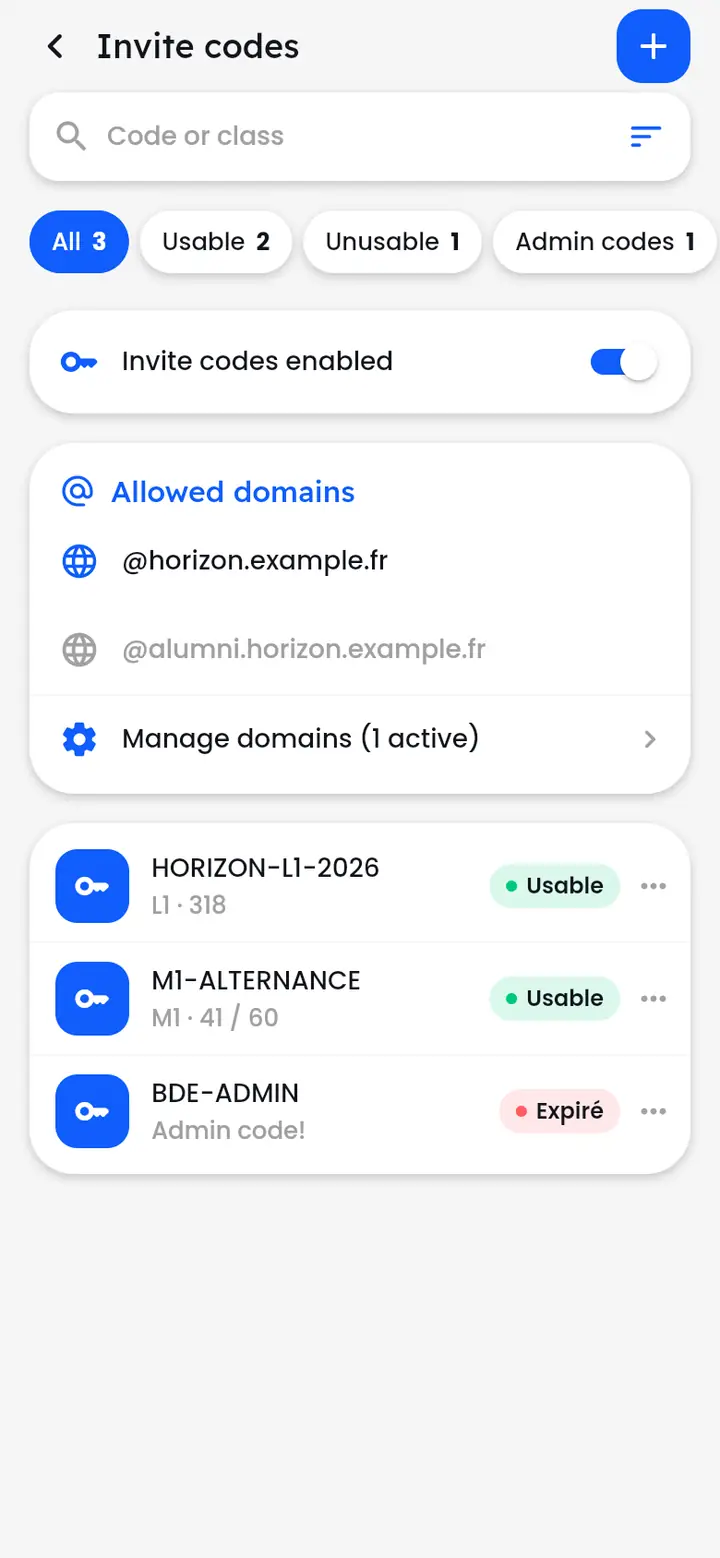
The list shows each code, its uses and its status (“Usable”, expired…); the three dots deactivate, reactivate or delete it. The “Invite codes enabled” switch turns all codes off at once.
Allowed domains
Sign up without a code with a school address.
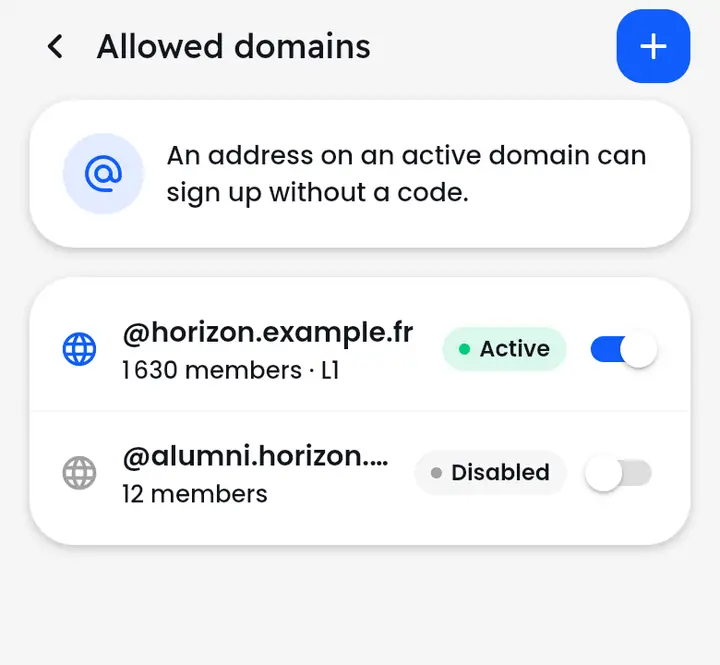
An address on an active domain can sign up without a code, after e-mail confirmation. “Allowed domains”: the + adds a domain (e.g. “students.school.edu”), with a default year for new members. The switch turns a domain on or off; turning it off doesn't delete any account.
Check grant proofs
Approve or reject, remove the status.
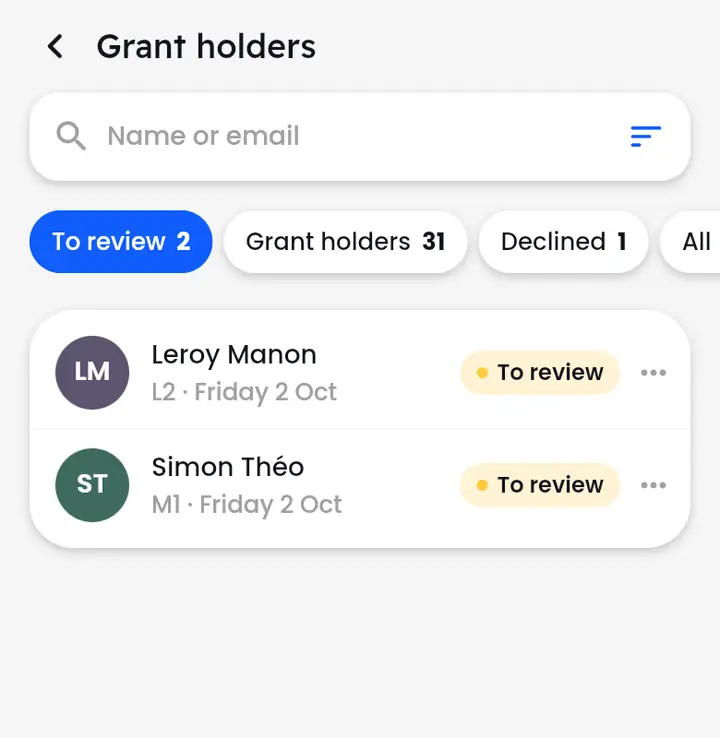
“Grant holders”: the “To review” tab lists uploaded proofs. The three dots: “View the document”, “Accept” or “Decline”. An approved grant holder gets the grant-holder price on the school's events; “Remove role” takes it back (the person is told).
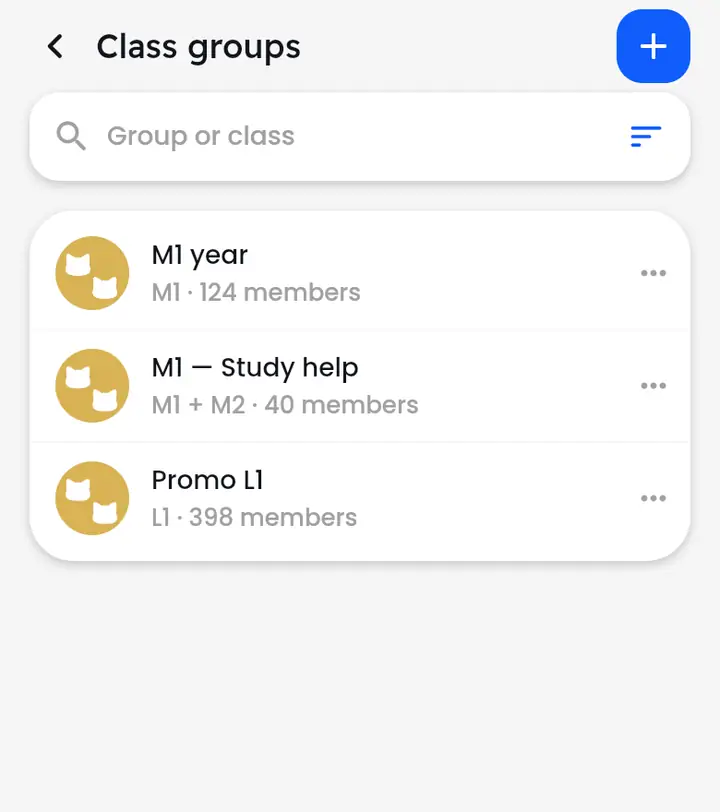
Create year groups
A chat per year, and invited years.
“Class groups”, then the +: a picture, a name, the year. The year's students see it in the “Groups” tab of their messages. In a group's details, “Guest year groups” invites other years as well.
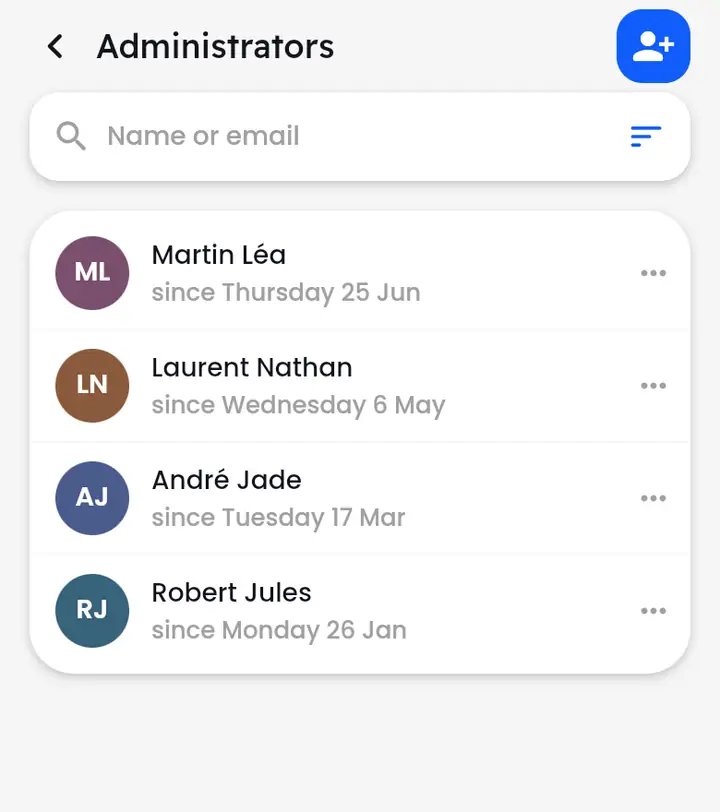
Appoint or revoke a school admin
The school always keeps at least one admin.
“Administrators”: the button at the top right adds an admin (search for the person); an admin's three dots let you “Revoke” them. The school must keep at least one admin.
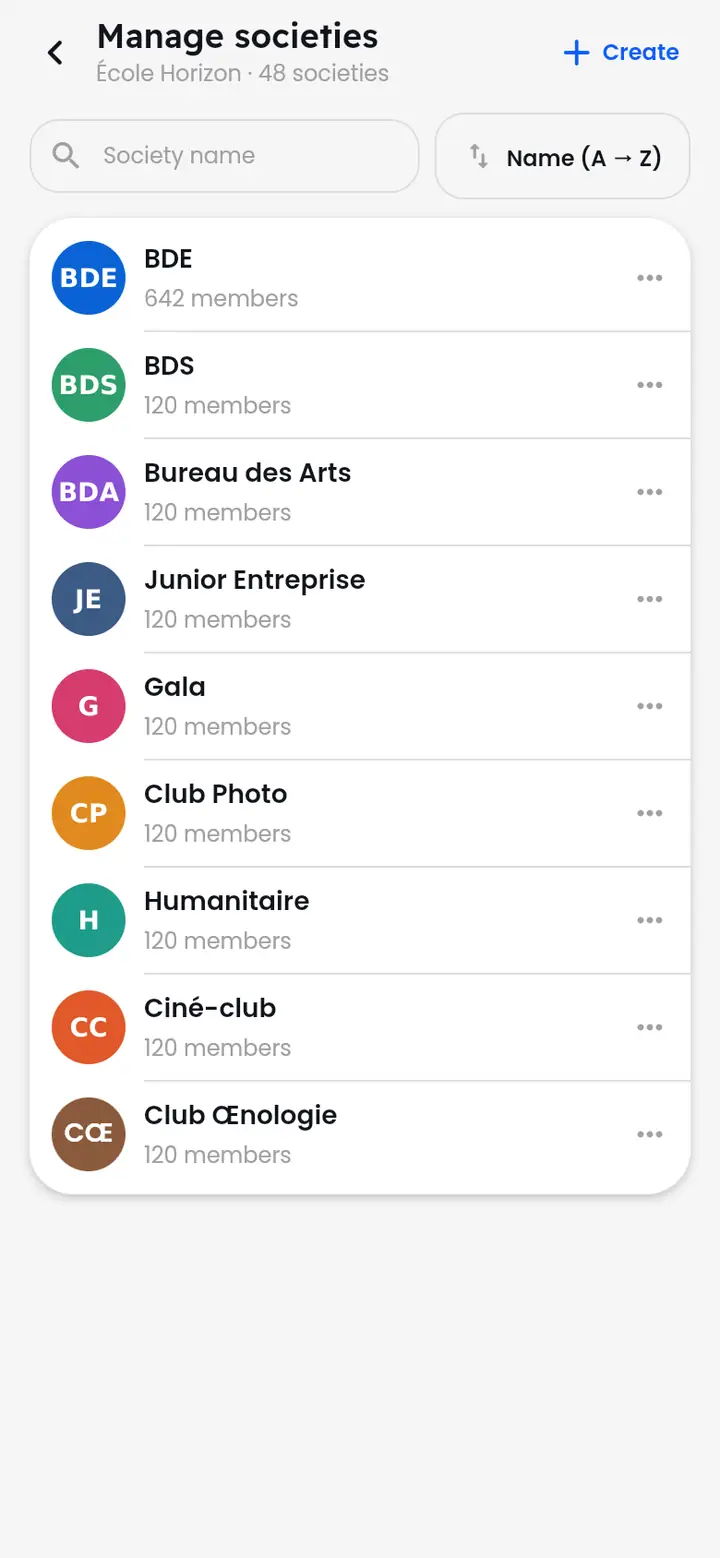
Manage the school's societies
Create or delete a society.
“Societies” (in “School life”) lists the school's societies, with their members. “Create” adds one; the three dots let you “View the society” or delete it (can't be undone).
Notify the school, invite by e-mail
A notification to the whole school; personal invitations.
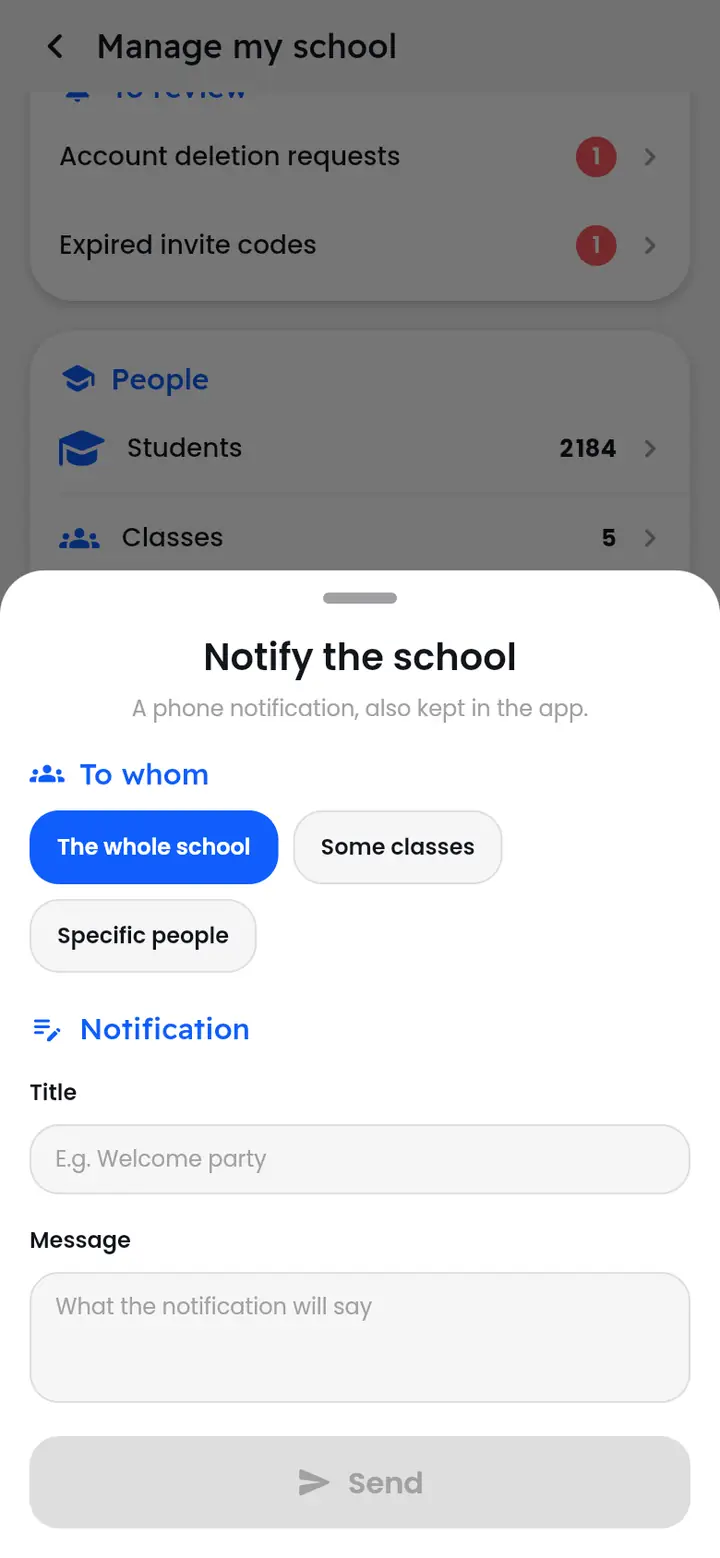
“Notify” sends a notification (on the phone and in the app) to “The whole school”, to “Some classes” or to “Specific people”: a title, a message, “Send”.
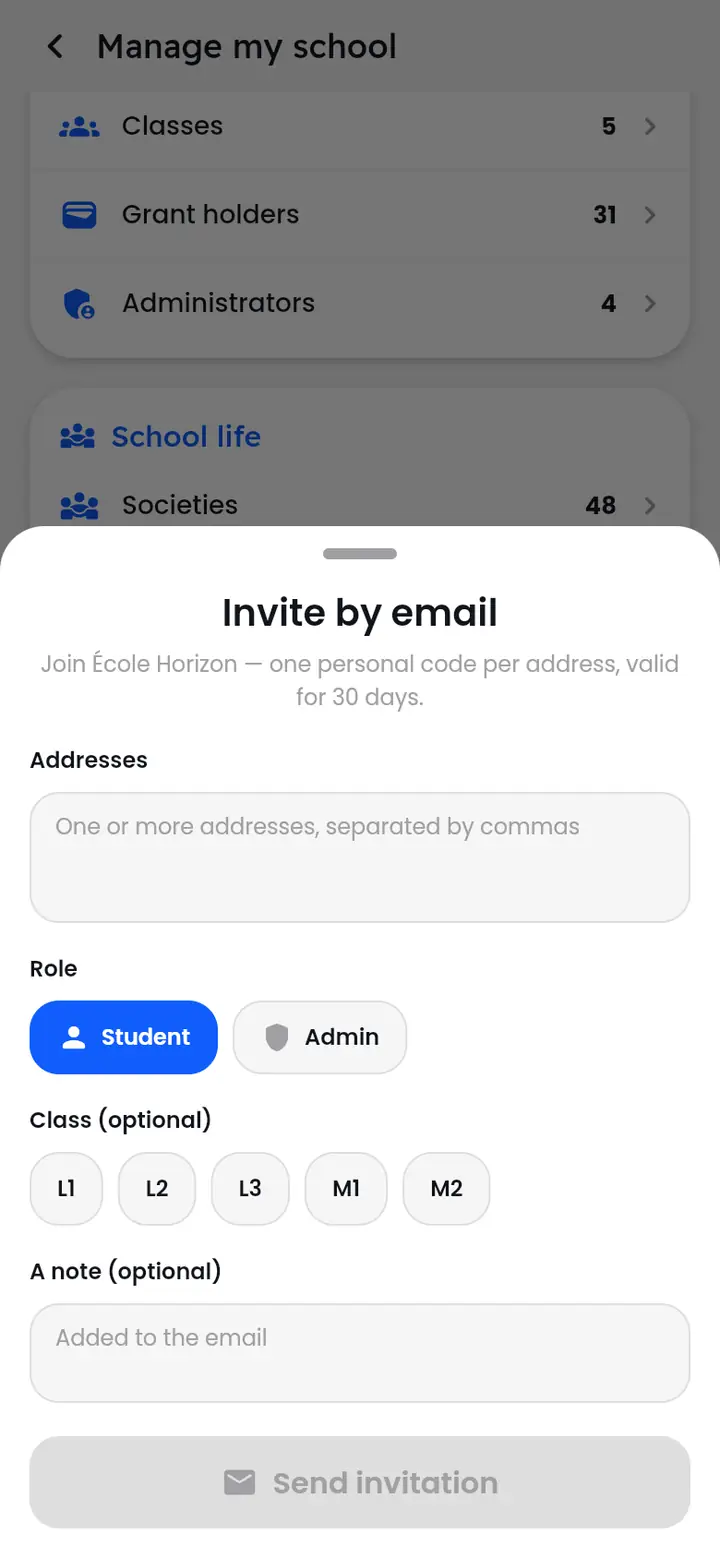
“Invite by email” sends one or more addresses a personal code valid for 30 days, as “Student” or “Admin”, with an optional year and message.
The school's audit log
Every admin action in the school.
“Audit log” lists, with dates, what was done in the school (roles, codes, years, tickets, money…) and by whom. Search by author, target or action, filter by family, sort newest or oldest first.
TeleChat team
For super admins: reports, users, schools, finances, commission.
Handle reports within 24 hours
All schools: uphold and remove, keep, exclude.
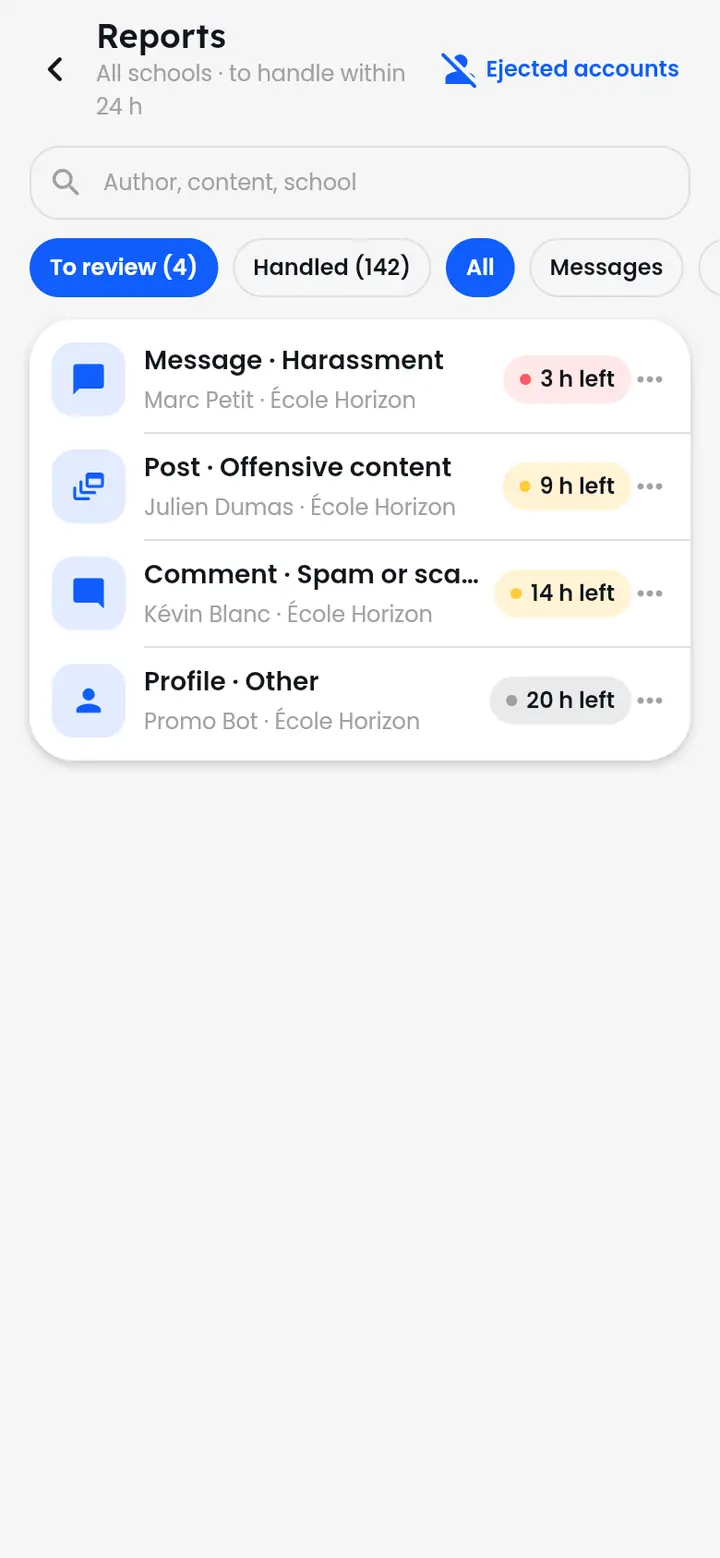
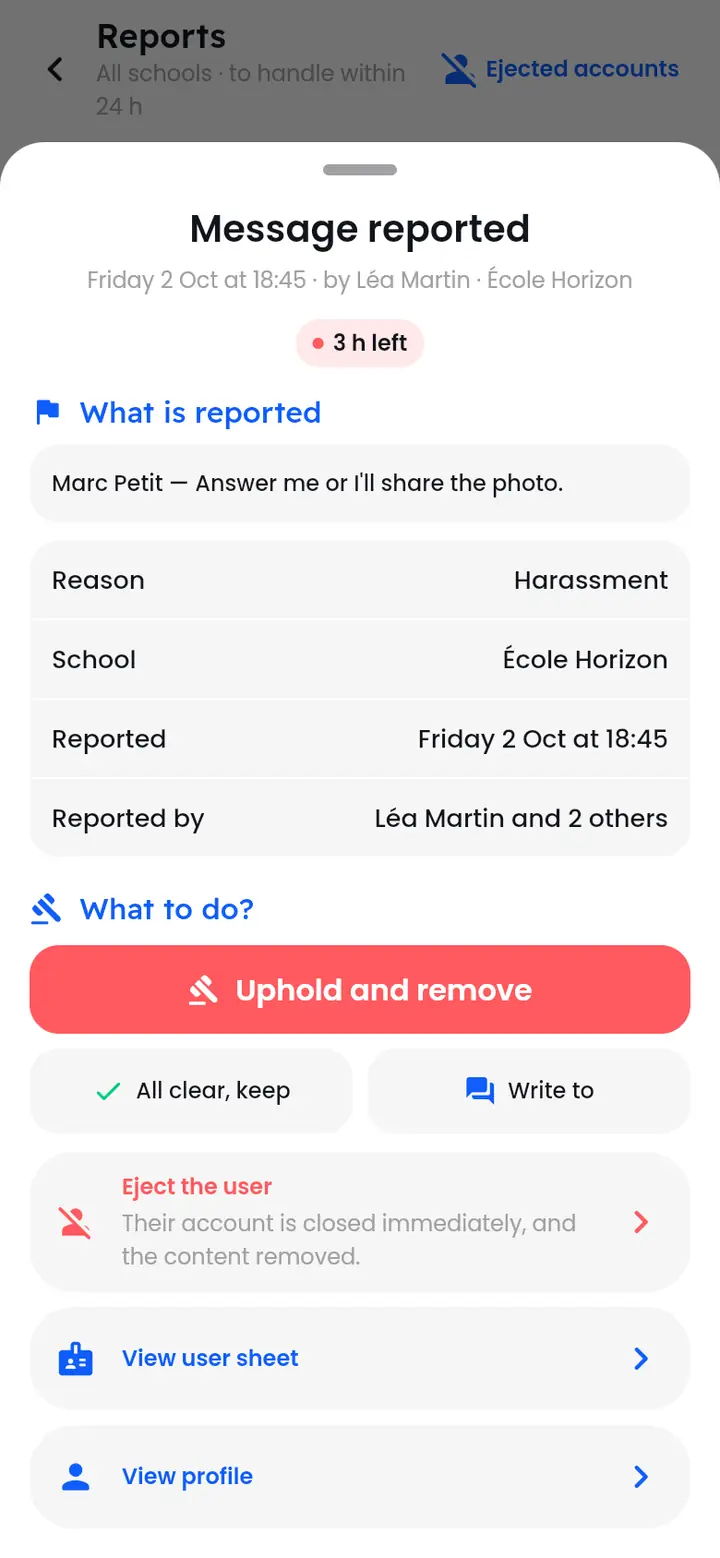
Settings > “Reports” (or the “TeleChat team” section of admin): the queue for all schools, with the time left. Endangerment of a minor comes first. Tap a report to see the content, the reason and who reported it, then “What to do?”: “Uphold and remove”, “All clear, keep”, write to the author, or “Eject the user” (account closed immediately).
“Ejected accounts” lists accounts closed after a report, with “Reinstate”.
Find a user and act on their account
The user record: tickets, reports, roles, actions.
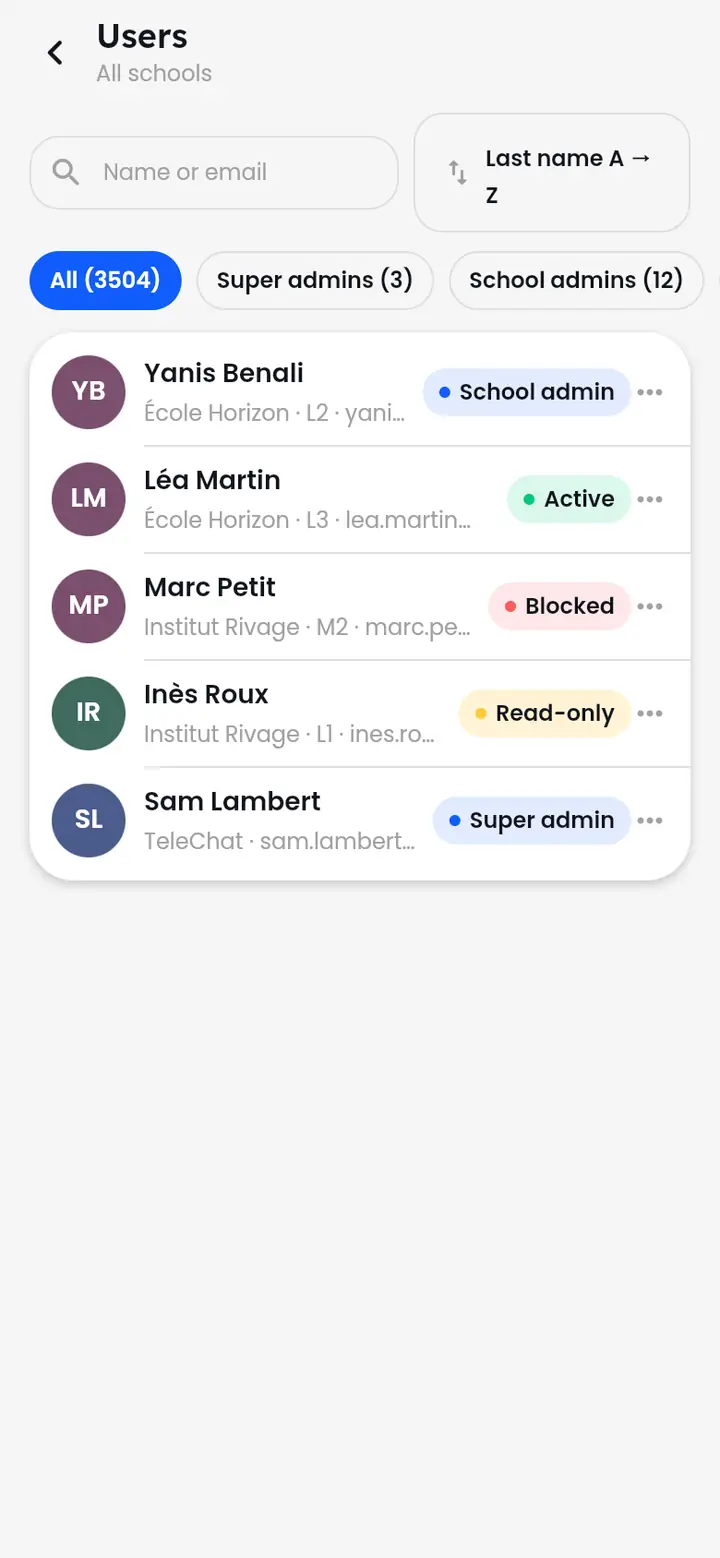
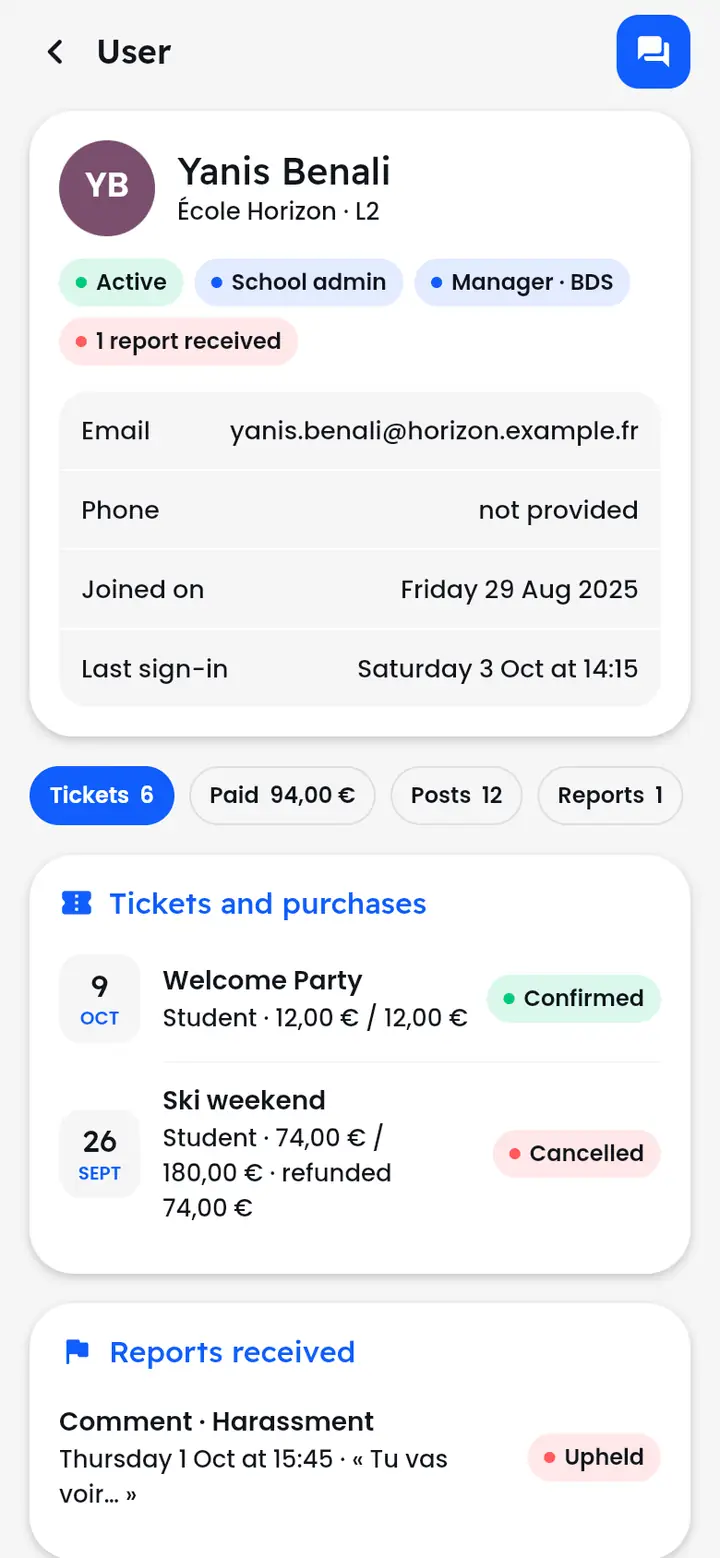
“Users” searches every school and filters by role or status. A user's record gathers their tickets and purchases, reports received, activity, societies, linked accounts and roles, and offers: message the person, reset link, change school or year, read-only, block the account, delete and anonymise.
Create and run schools
Schools: create, edit, invite an admin, run.
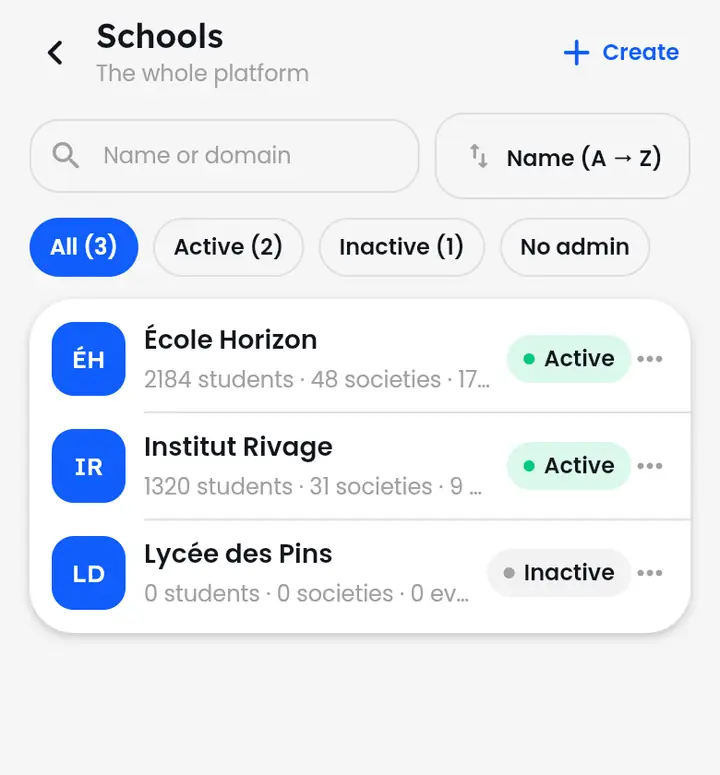
“Schools” lists every school. “Create” adds a school (name, logo, mail domains, open or not, codes accepted or not), then you invite its first admin by e-mail. A school's three dots: “Administer this school” (every admin menu then serves it), see its societies or events, “Edit”, “Invite an admin”.
Societies, events and tickets across schools
Three cross-school lists, and ticket lookup.
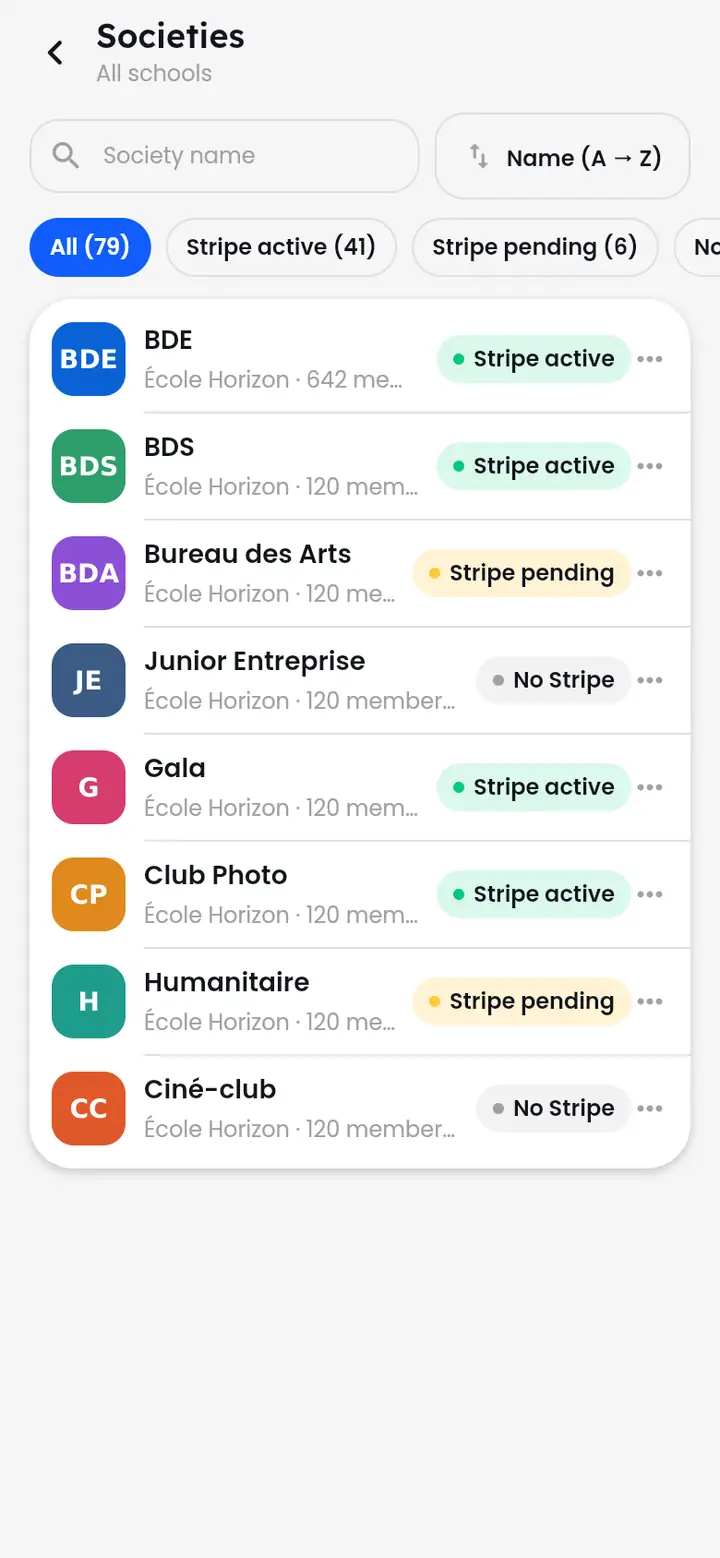
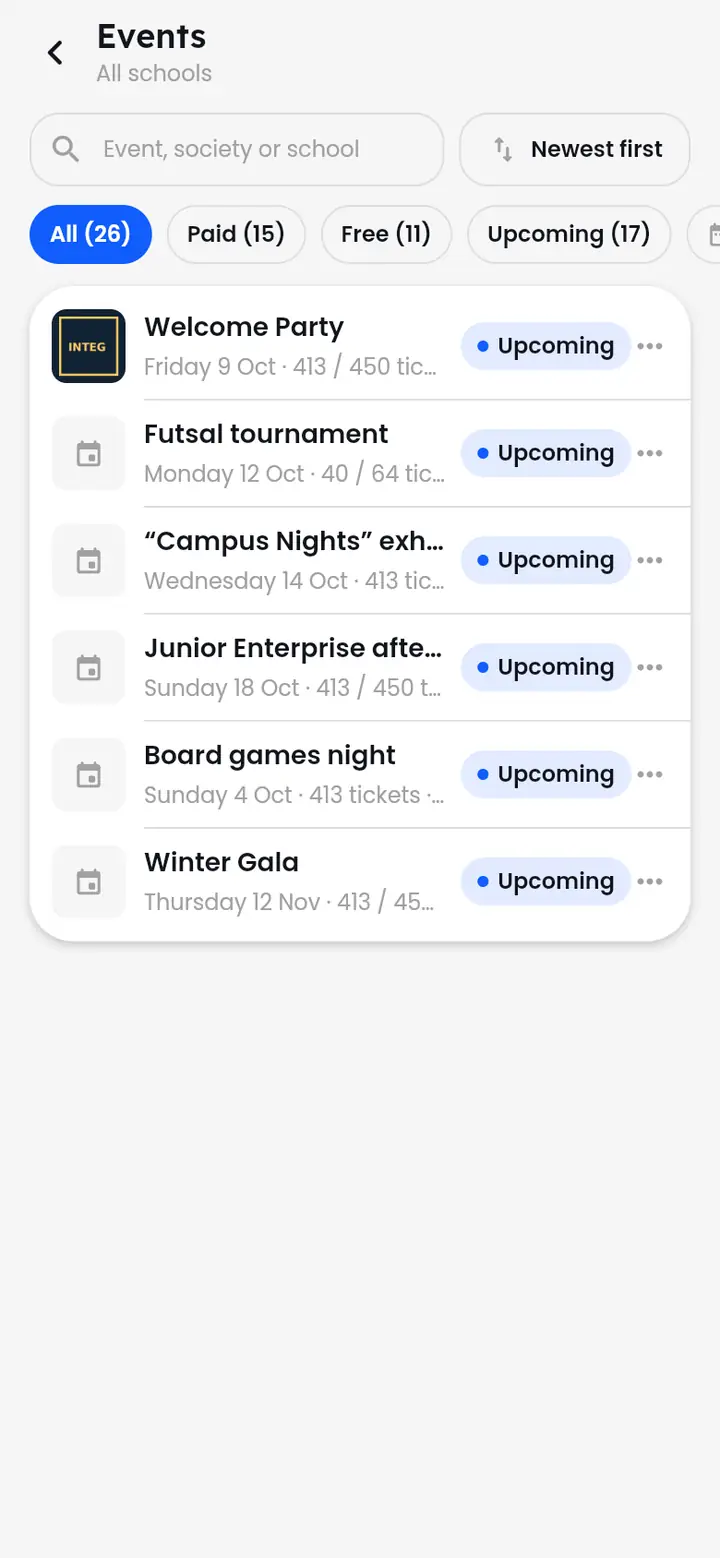
“Societies” (filtered by Stripe status), “Events” (paid, free, upcoming, period) and “Find a ticket” (by ID or reference) cover every school. From a society, you can run it as if you were one of its leaders.
Platform finances and commission
TeleChat's commission, by default and set per school, society or event.
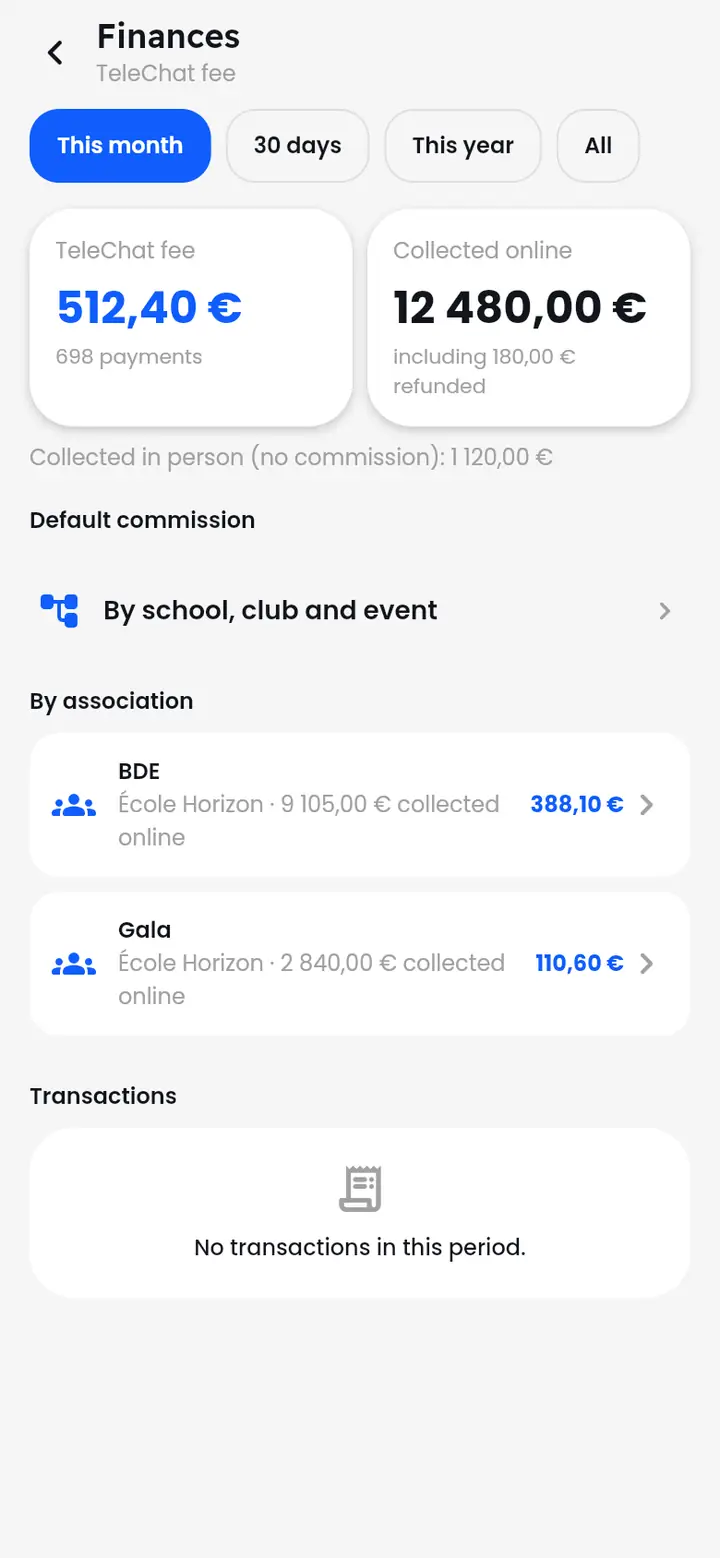
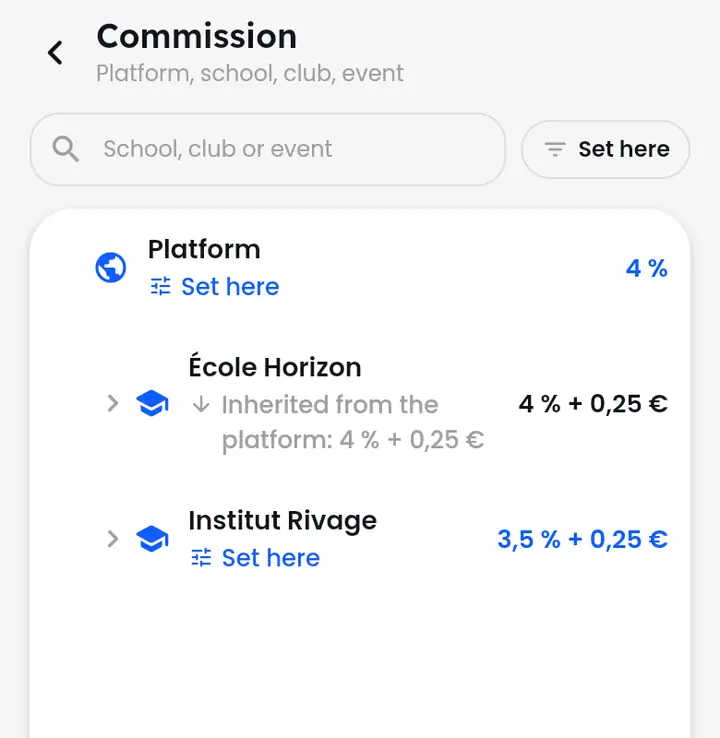
“Platform finances” shows TeleChat's commission and what was collected online over the period, by society and by month. “Commission” sets the percentage and the fixed fee: at platform level, or for a school, a society or an event (an empty field inherits from the level above). A setting can be imposed on everything below; it applies to future payments.
The team, the global log and support
Super admins, log of all schools, answering support.
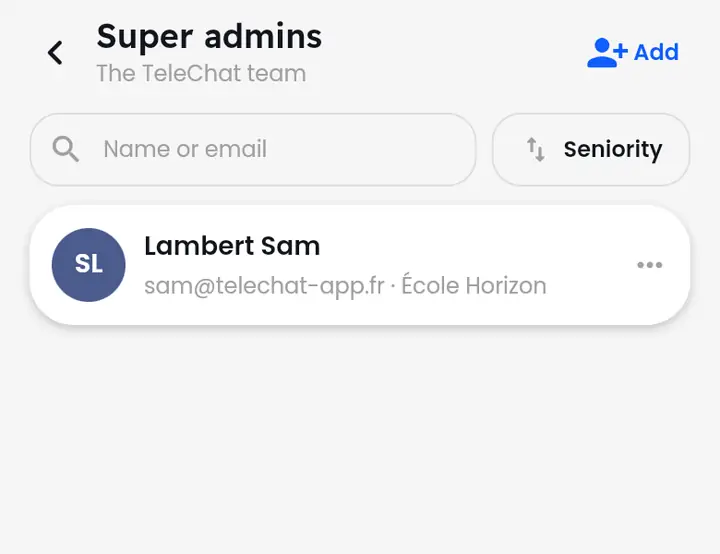
“Super admins” lists the TeleChat team; “Add” appoints someone (they'll be able to run every school, read every log and notify everyone). “Global log” gathers the logs of every school. “Notify the platform” sends a notification to everyone, to some schools or to some people.
Every “Chat with support” opened by a user arrives in your messages, under the person's name: every super admin sees it and can answer. To write to someone first, use “Write to {0}” from their record.
On computer and tablet
The same app, laid out for large screens.
How do I find my way on a large screen?
The top bar replaces the bottom one.
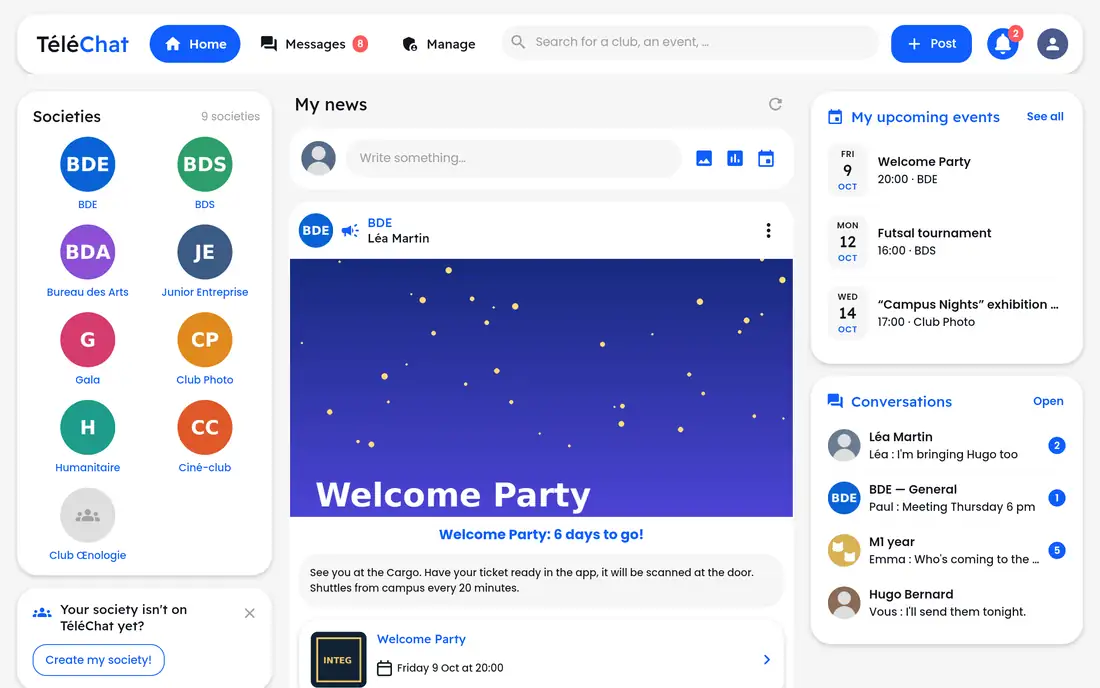
On computers and tablets (from 800 points wide), TeleChat shows a bar at the top: “Home”, “Messages”, “Manage”, search, “Post”, your notifications and your profile. Home reads in columns: societies, news, upcoming events and conversations.
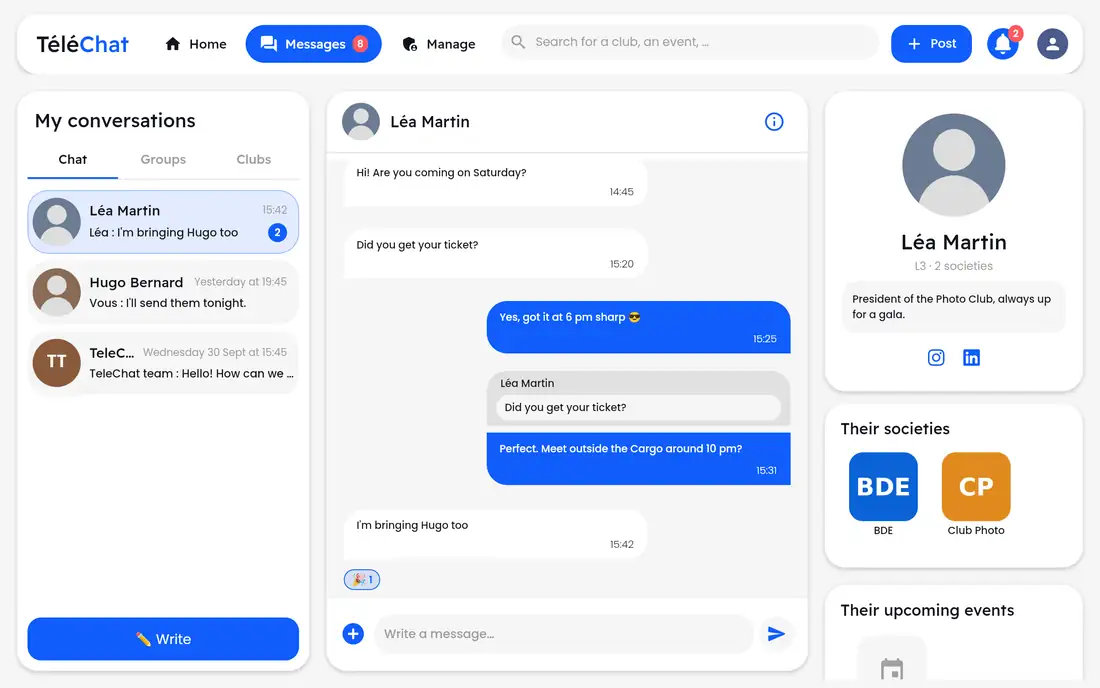
Messages on a large screen
The list, the conversation and the details side by side.
“Messages” shows the conversation list on the left and the chosen conversation in the middle; on a wide enough screen, a third column shows the person's profile or the group's details.
The Admin space
Society, Event, School: a sidebar to run everything.
“Manage”, in the top bar, brings admin together: an “Club” / “Event” / “School” selector, then in the sidebar every admin page (dashboard, payments, members, prices, attendees, access control…). “Back to TéléChat” takes you back to the app.